

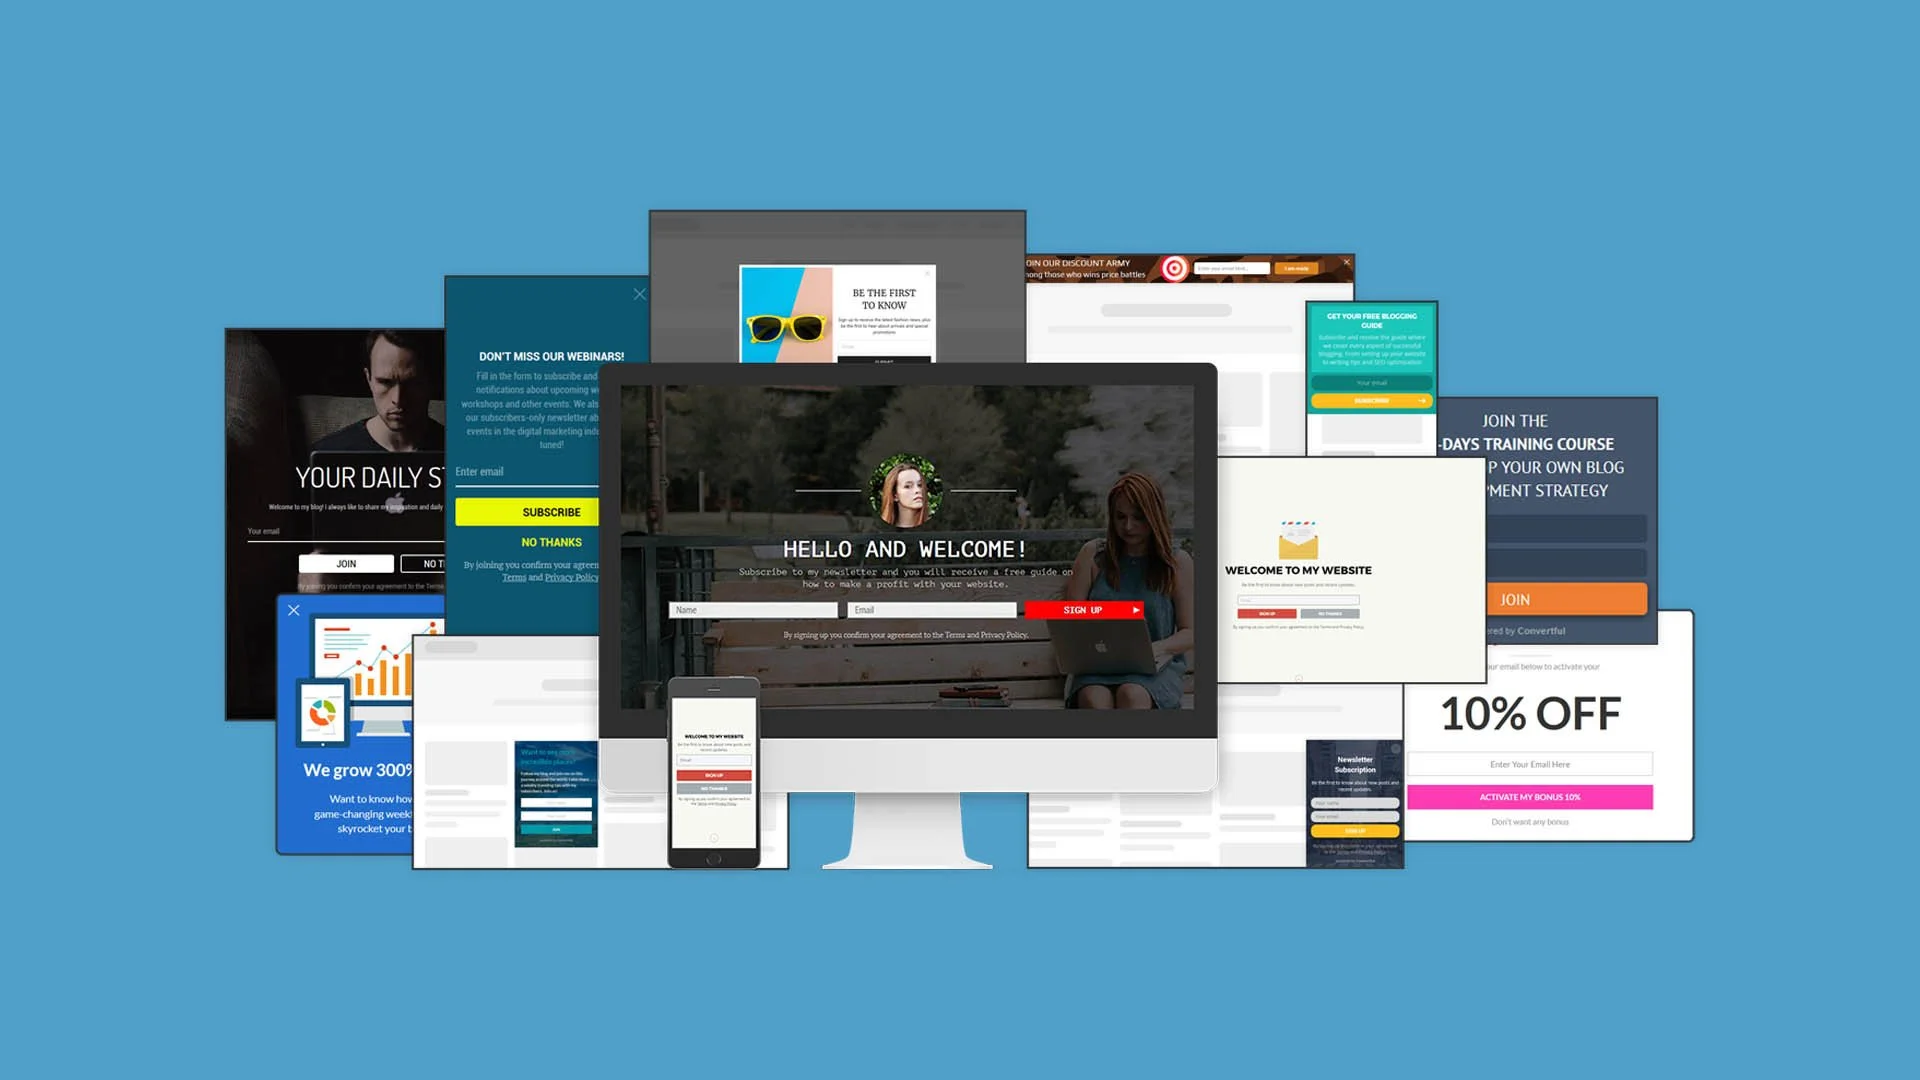
17+ Free Social Media Tools For Managing Your Local Business
The best social media tool in your digital pocket is the one that's accessible. More than that accessible though, I think it's also the one that you actually use. It makes no sense to invest your time or money into something that becomes shelfware. Here are 17+ of the best free social media tools you can use right now.
What's the best social media tool in your digital pocket?
The one that's accessible. That was an obvious one. More than that though, I think it's also the one that you actually use. It makes no sense to invest your time or money into something that becomes shelfware.
I would argue that the best social media tools are in your smartphone. It's with you 100% of the time, so it meets the accessibility requirement for sure.
Using your smartphone to the max, that's a different story. I've heard so many small contractors tell me 'I have this iPhone but I'm sure I'm not even using 1% of it's features.'
It's not that you are using the iPhone features – you're not using the right apps!
I put together a list of the 17 best and free social media tools to manage your business, broken down into five categories:
Content
Make It Beautiful
Publishing
Engagement
Website Tools
I gave this as a presentation to a local business group in October of last year, and many of them have told me they are using these apps today.
Want to download the presentation? Click here to get the download.
Content Curation Social Media Tools
Content is at the heart of Social Media, so it makes sense to start here.
Good Content = Scrolls past
GREAT Content = Thumb Stopper
Follow the rule of social media thirds. One third of your content should be self-serving and promotional, one third needs to be industry related, and the other third can be fun engaging posts. This offers a natural mix of posting.
Think of your contractor posts as if was a personal profile. None of your friends wants to see you begging for business every post.
Story Chief
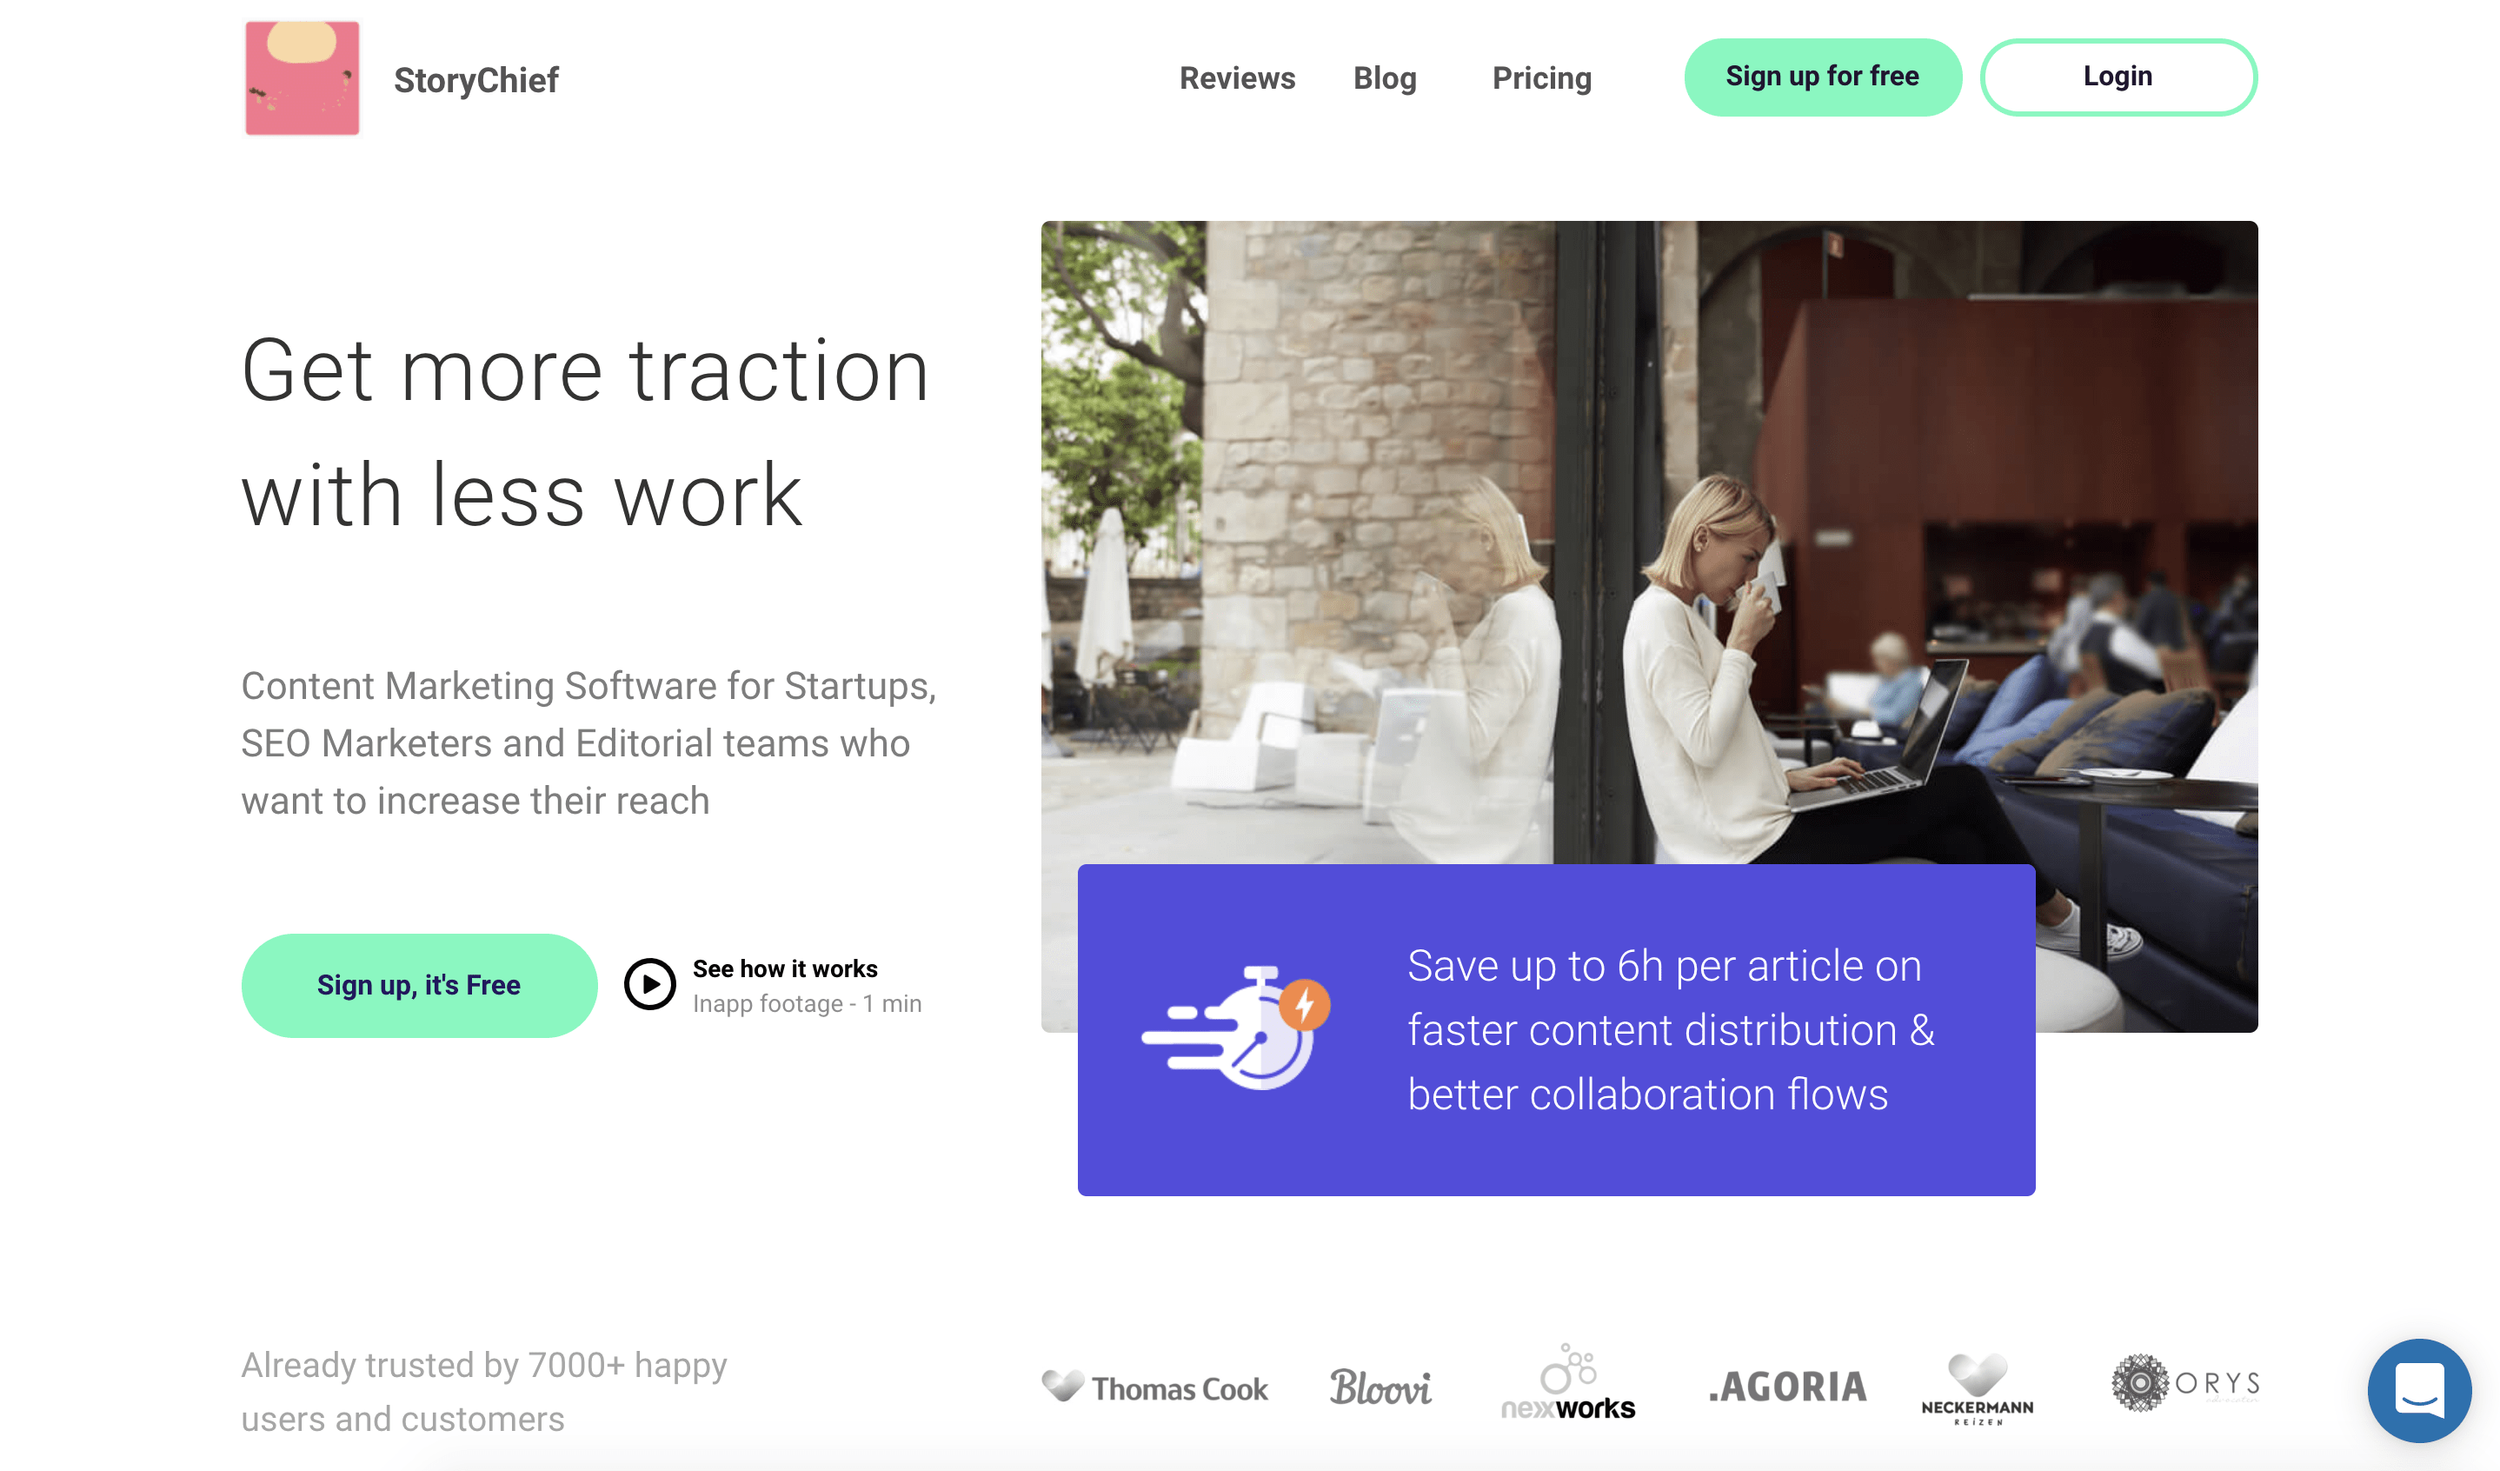
We're starting this list off with a mega free app called Story Chief. At it's core, story chief is designed to help you write better articles. In fact, I'm writing this article inside story chief now.
That's where the differences between Story Chief and most other writing tools end.
When you set up your free account, you can connect several social media channels for post-publishing. So when you're publishing your story, you can select:
Where it gets published (Your blog + Medium + another blog for instance)
Social channels – here you'll specify which social channels to publish to, the content to include in the post, AND schedule it to go post at a later time.
Feedly
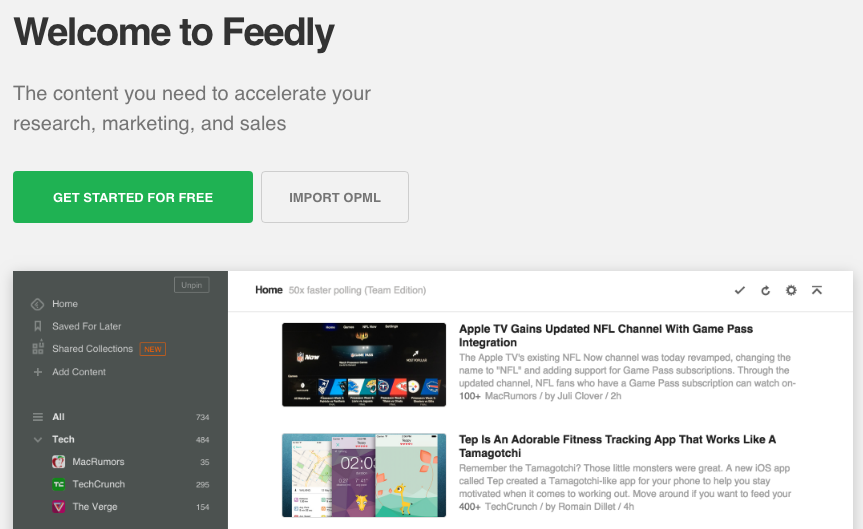
Feedly helps solve the I don't know what to post dilemma.
After setting up your account, you'll select topics that you want to create a feed for. Then, feedly scours the web for you looking for articles on those topics. It also integrates with several publishing tools, which we cover in the third section.
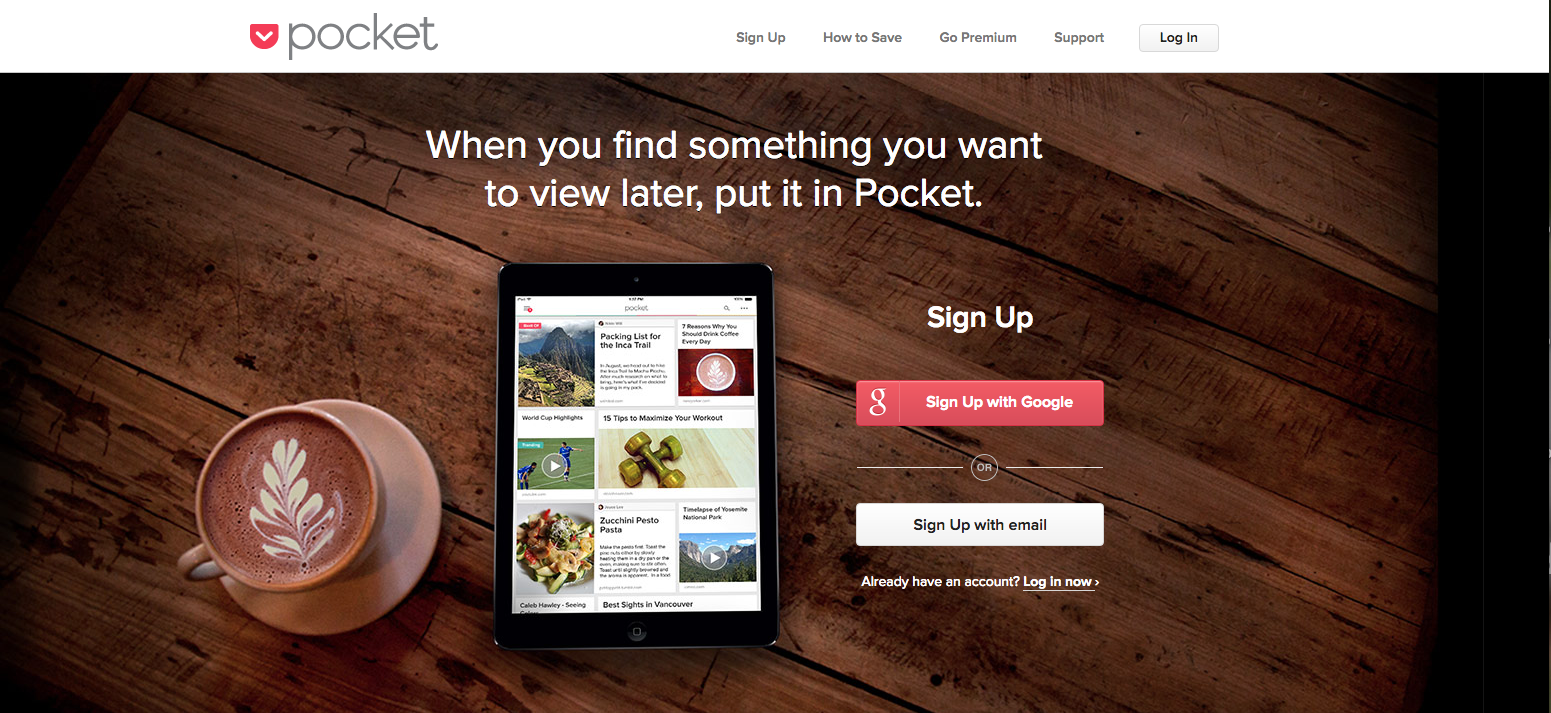
How many times have you started to read an article, only to get interrupted and needed to pause. Or, maybe you're doing what I do, you open a link into a new tab so that you can go back to it later. Or maybe you read the whole article, and wanted to share it, but not quite yet.
That's the old way. The new way is Pocket. Say you're scrolling through Twitter and you find a great article. All you need to do is tap the link, then click the share button on your phone and "Save to Pocket". It's literally a digital pocketful of content that's saved for later!
Then, when you're ready to read it or share it, just go to the pocket app and your links are all saved. Pocket also integrates with publishing apps, so you can select pocket as your source to schedules posts.
Google Alerts
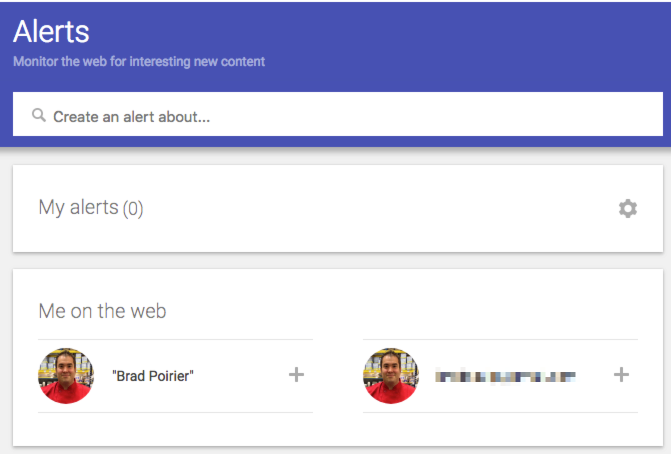
Using Google alerts couldn't be more simple. You just go to http://google.com/alerts, setup a search term you want to be alerted of new content for and boom.
Basically, you're saving a "google search" for getting alerts. Say you wanted to get an alert anytime Cambria Countertops was mentioned in the news. In Google Alerts, you'll literally type in: Cambria Countertops, and the next time they are mentioned in the news, you'll get an alert.
You can set up your alerts in three ways:
As it happens (instantly)
Daily
Weekly
Alerts get sent straight to your inbox and from there you can do as you please, or save it to your pocket. 😉
Make It Beautiful
Once you have the content, now make the content work for you.
Facebook posts with images see 2.3X more engagement than those without images. (Buzz Sumo)
Facebook users spend 3X more time watching live videos than traditional videos. (Facebook Newsroom)
Canva
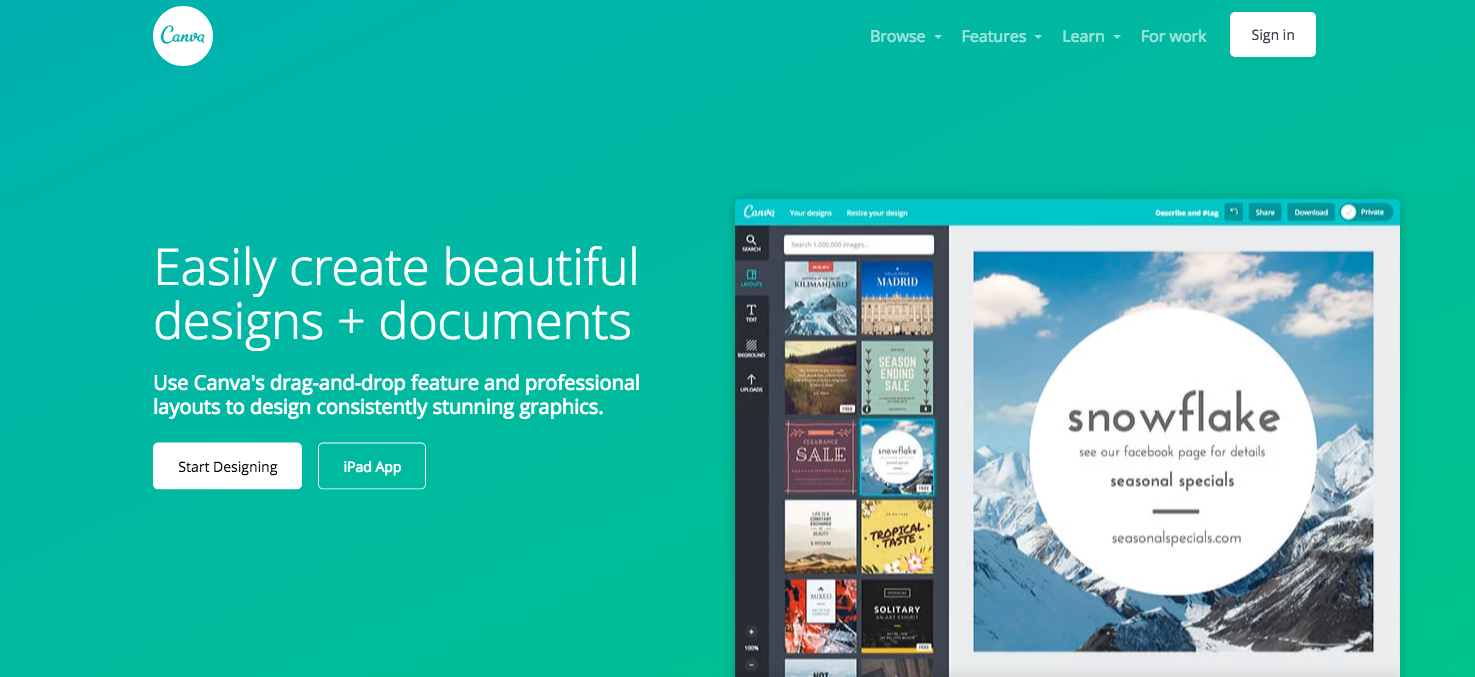
Canva is an excellent design tool that allows you quickly and easily make social media graphics that will really pop out. You don't need any design skills, and hardly any computer skills.
By using their pre-made templates, you can pump out graphic after graphic. Canva is easy to use and you can get an image out in minutes.
Adobe Spark
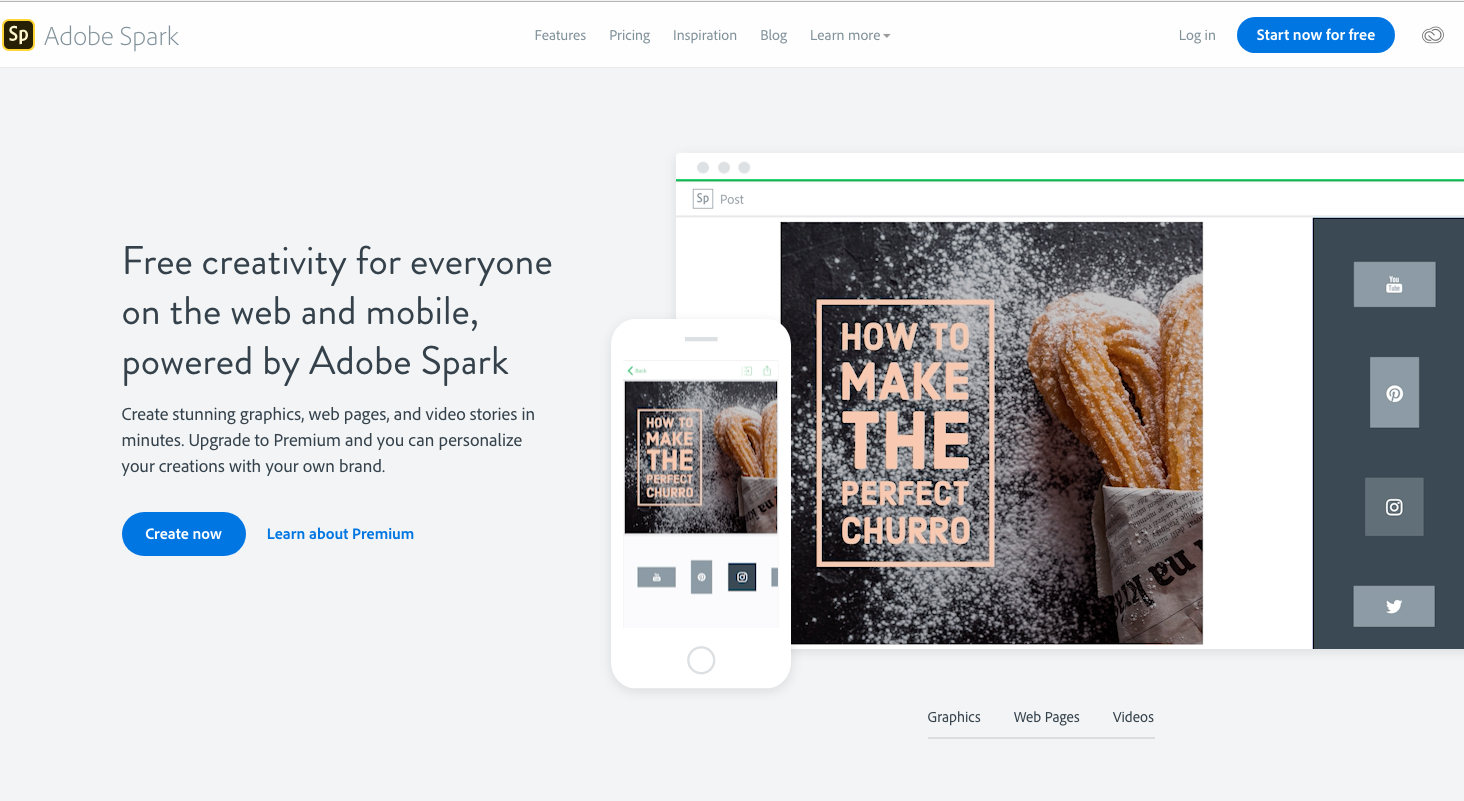
Hands down, Adobe Spark has the best mobile app for creating social media images. You can either start with a template or start from scratch. You just choose a photo, add some text, and then make it spark.
The Spark app excels in bold typography. You can fit your message inside many different shapes and sizes, and it will automatically adjust the font size based on the shape size. You can also add color overlays to the image to make the text easier to read.
A brand new feature to the app is animated text. You can select the text, and have it animate – so it essentially turns your plain old image into an video!
Spark has easy sharing built right in. Once you're done with your image, you can either save it to your camera roll, or share it directly to any social media network. You can also send it to your buffer or hootsuite app to schedule it for later.
Stencil
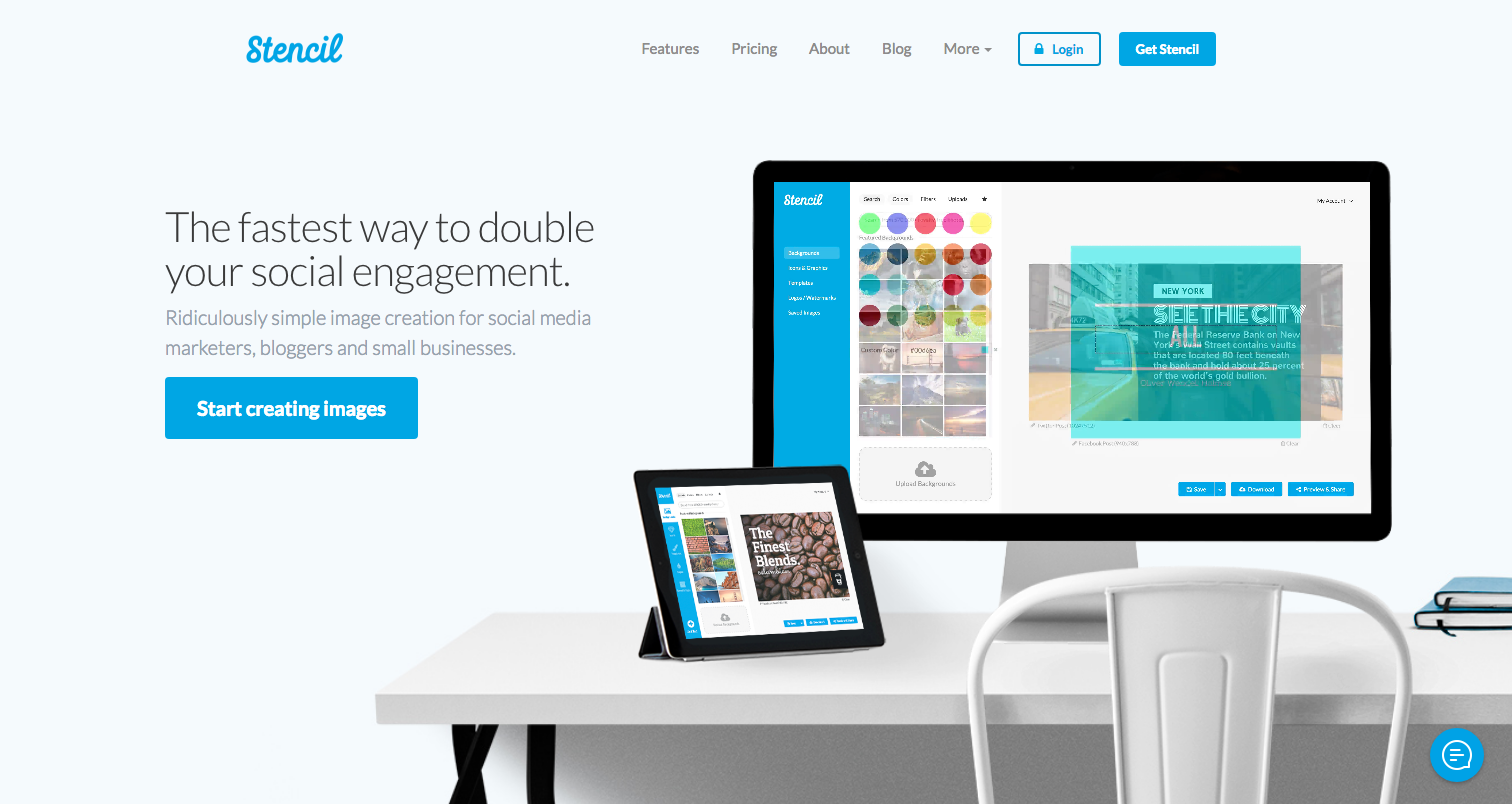
Meet your new best friend. Stencil is similar to Canva, but a lot more flexible. With Stencil, any layout available to you is included, you're not paying per layout. Stencil gives you the most amount of design options than any other design app I've seen.
A handy feature is that you can upload your logo, and keep it in an "assets" area. You can upload a few variants of your logo also, such as a standard version, then upload an all white version, and then grayscale version. You can just turn it on or off depending on which logo is useful for that design.
If you elect for their paid plan, you'll get over 2.8 million photos, icons and graphics to choose from to help you out. By the way, their most expensive plan is $12/mo when paid annually. So, it's also the most affordable of the paid versions.
Stencil also has a direct publishing feature. So once your layout is done, just share to your selected social networks. As a bonus, you can preview what your social media post will look like, so you can make it perfect!
Rocketium
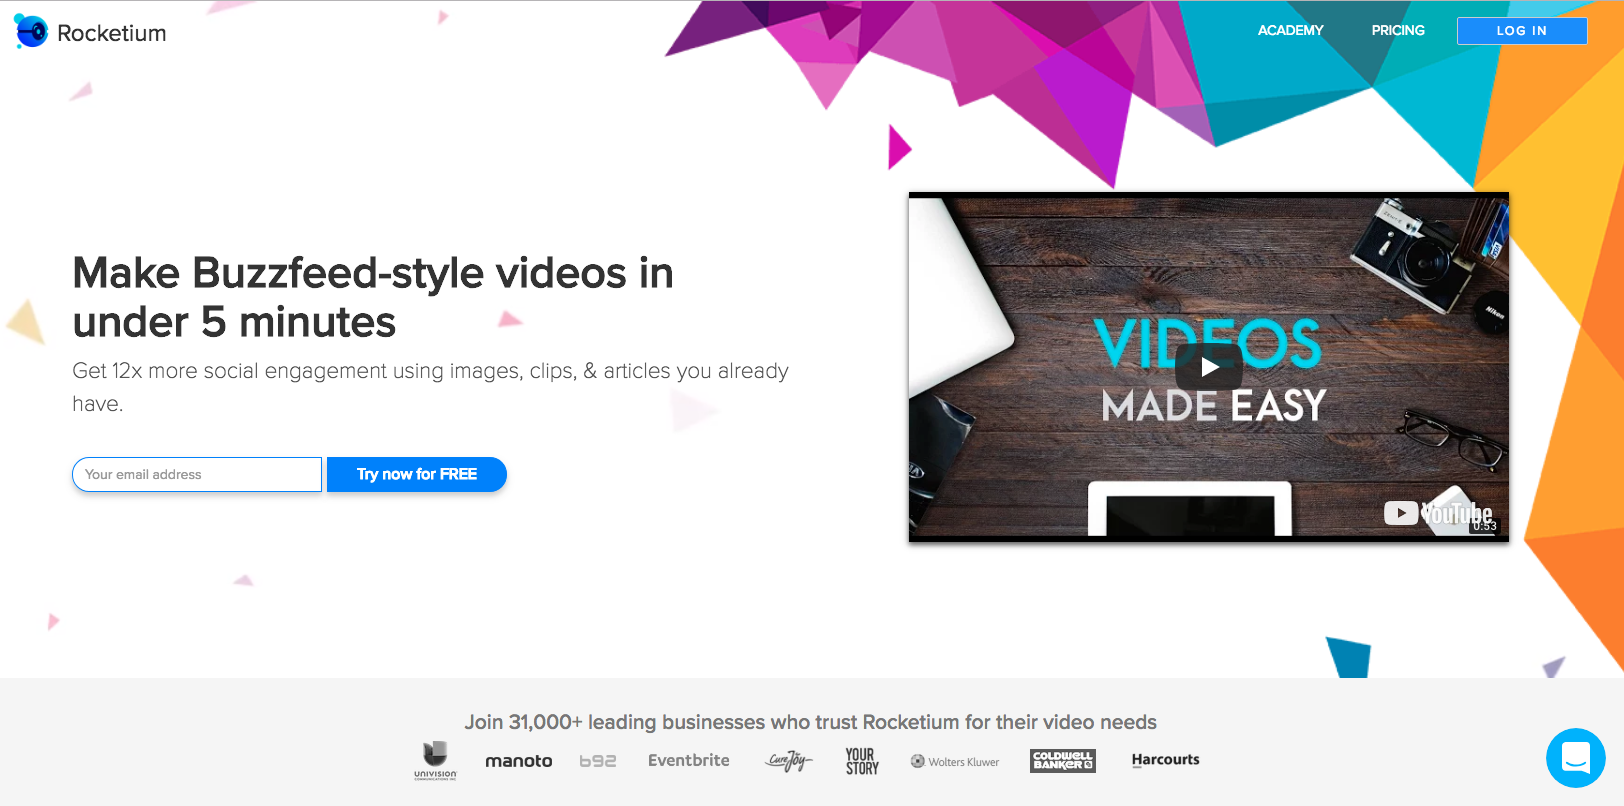
You know how you've been saying: "I wish I could create videos for social media, but I don't know anything about computers."
Boom. Rocketium allows you to "make buzzfeed-style videos in under 5 minutes." It's true, I've made them and under that time frame.
Rocketium is the absolute easiest way to make a video for anywhere. 31,000+ users can't be wrong. You know what's really awesome about their app? You can export it in many sizes. You can export your video into:
16:9 – Standard Widescreen, useful for YouTube or any other channel
1:1 – Square, perfect for Instagram
9:16 – This creates vertical video, which is exactly what you'll need for Instagram Stories and/or IGTV (Instagram TV)
Facebook Cover – You can create a video for your Facebook cover this way!
0.8:1 – This is specific to creating an Instagram video ad
Pssst: If you really like using Rocketium and want to upgrade to a paid plan, use code AFBRAD10 and save 10% off your monthly plan!
Publishing Social Media Tools
You have the content, it's beautiful – now it's time to publish.
Later
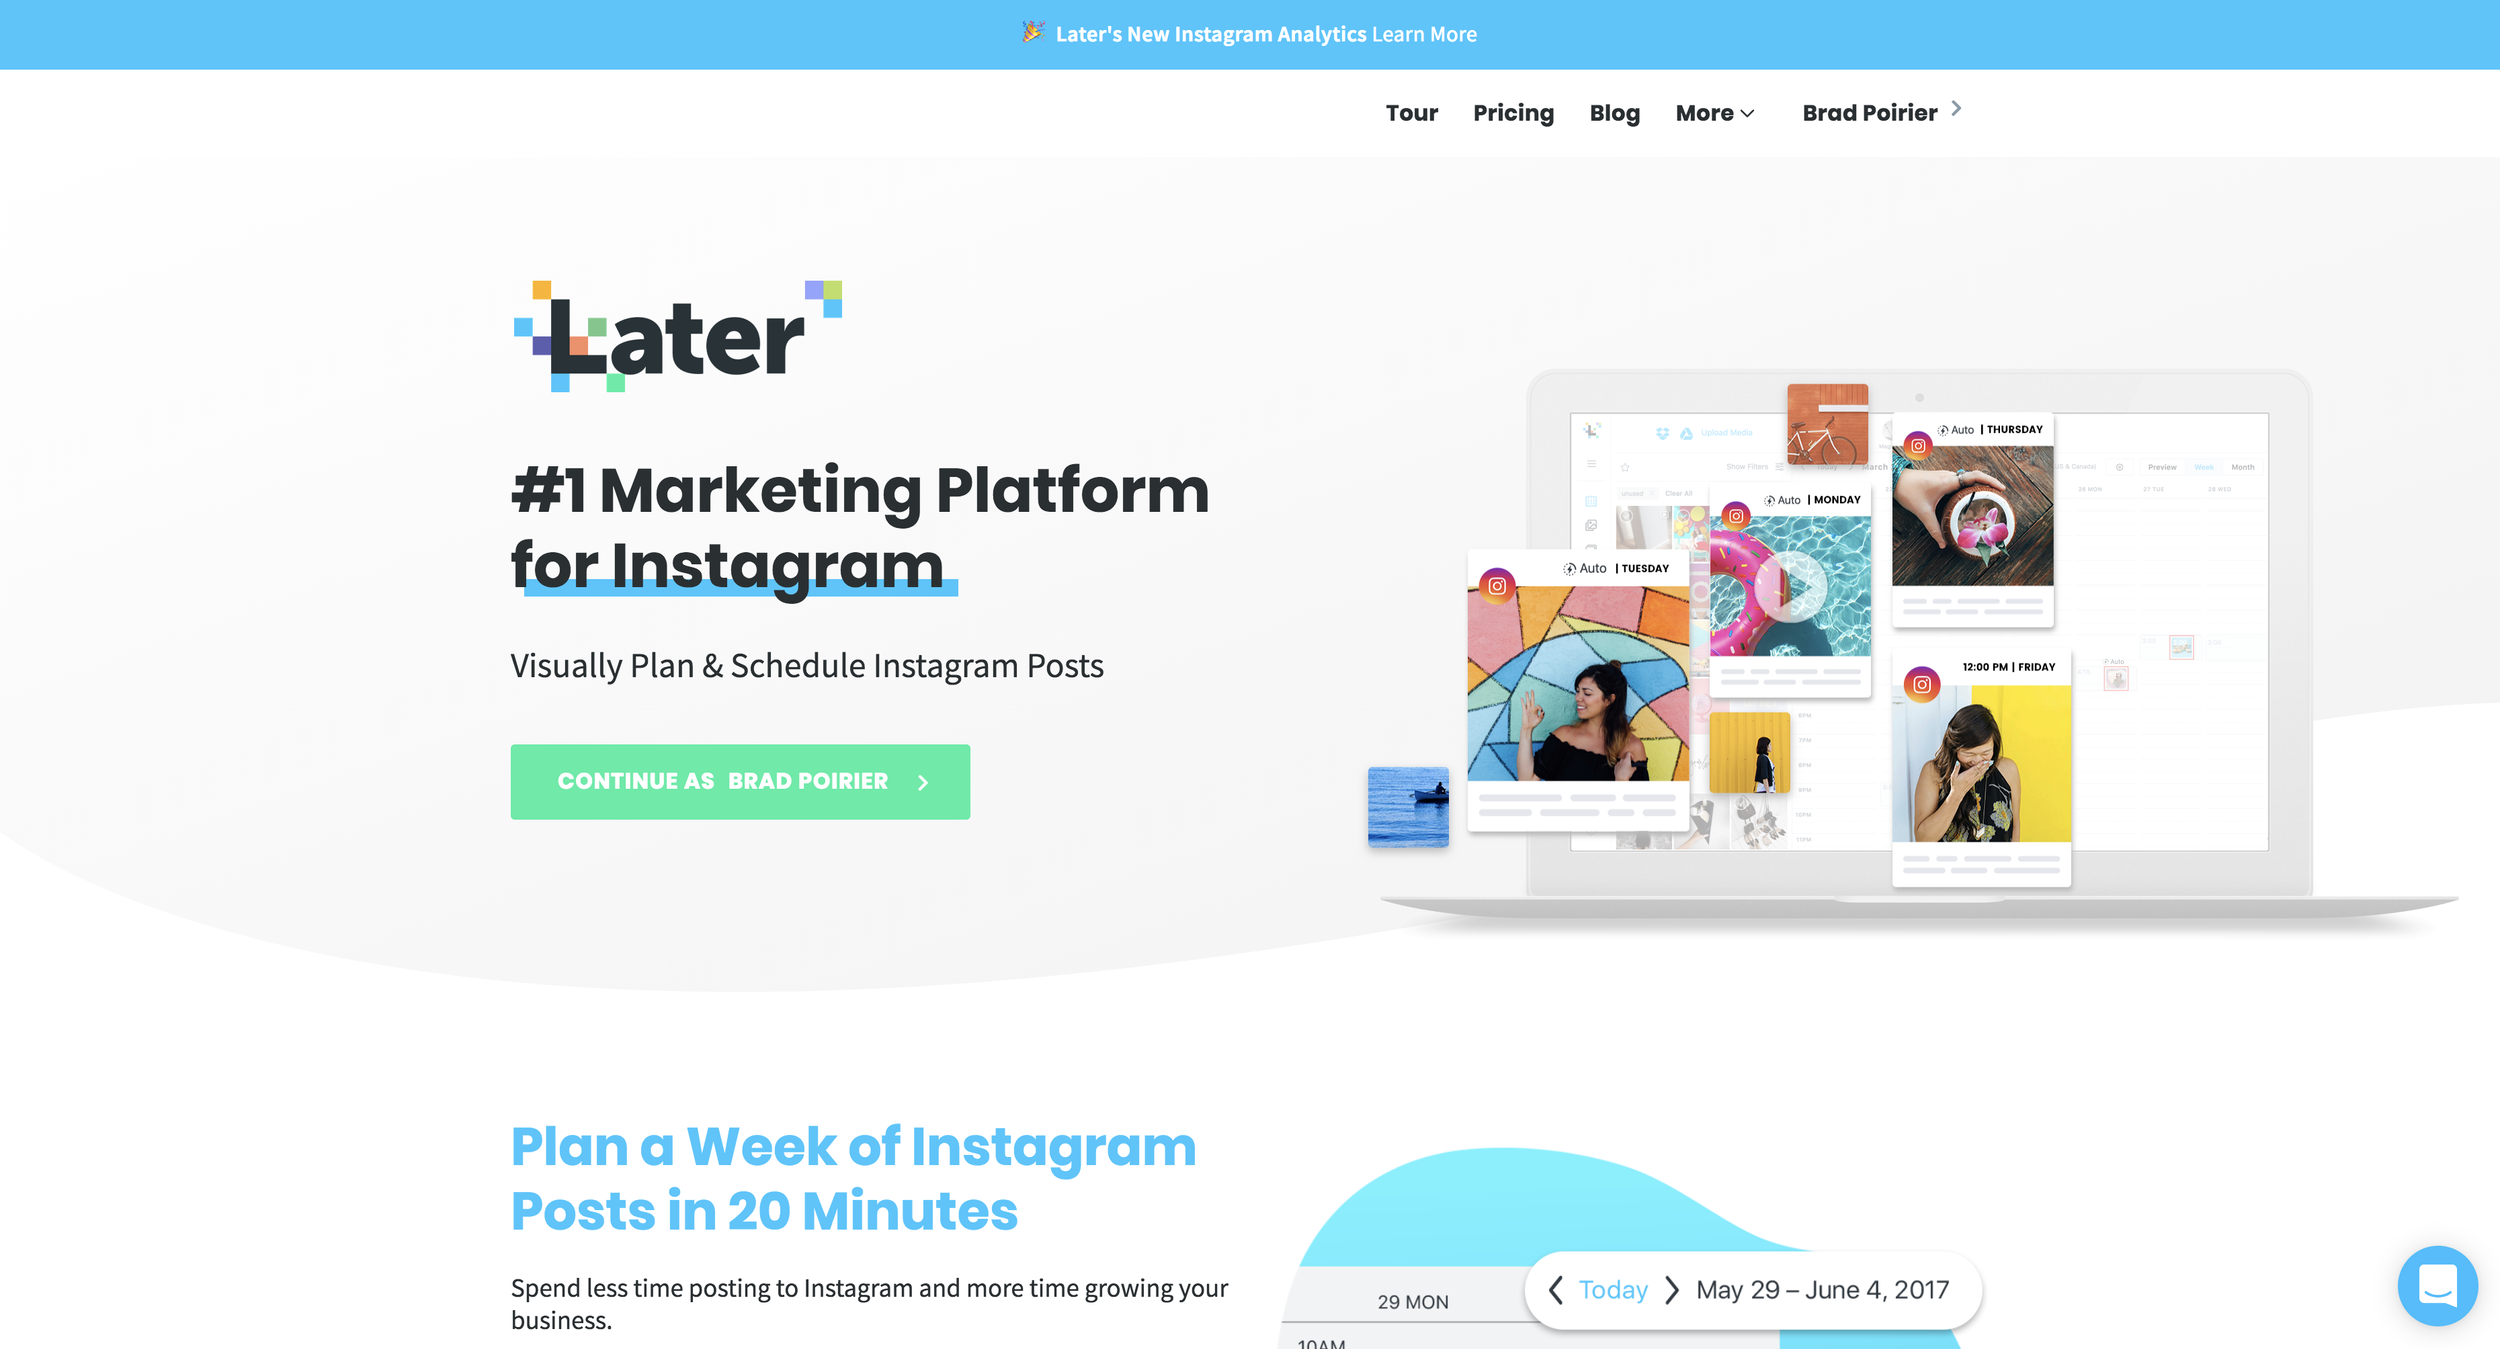
First up on the list is our newest social media platform that we're in love with. In fact, Later is the primary social media platform we use at Bear City Impact. We have a full write up on why we switched to using Later.
However, if it's too long and you don't want to read, here's the main points of consideration:
Excellent media manager
Quick schedule a week's worth of posts
Hashtag suggestions
Link in bio management
Content Studio
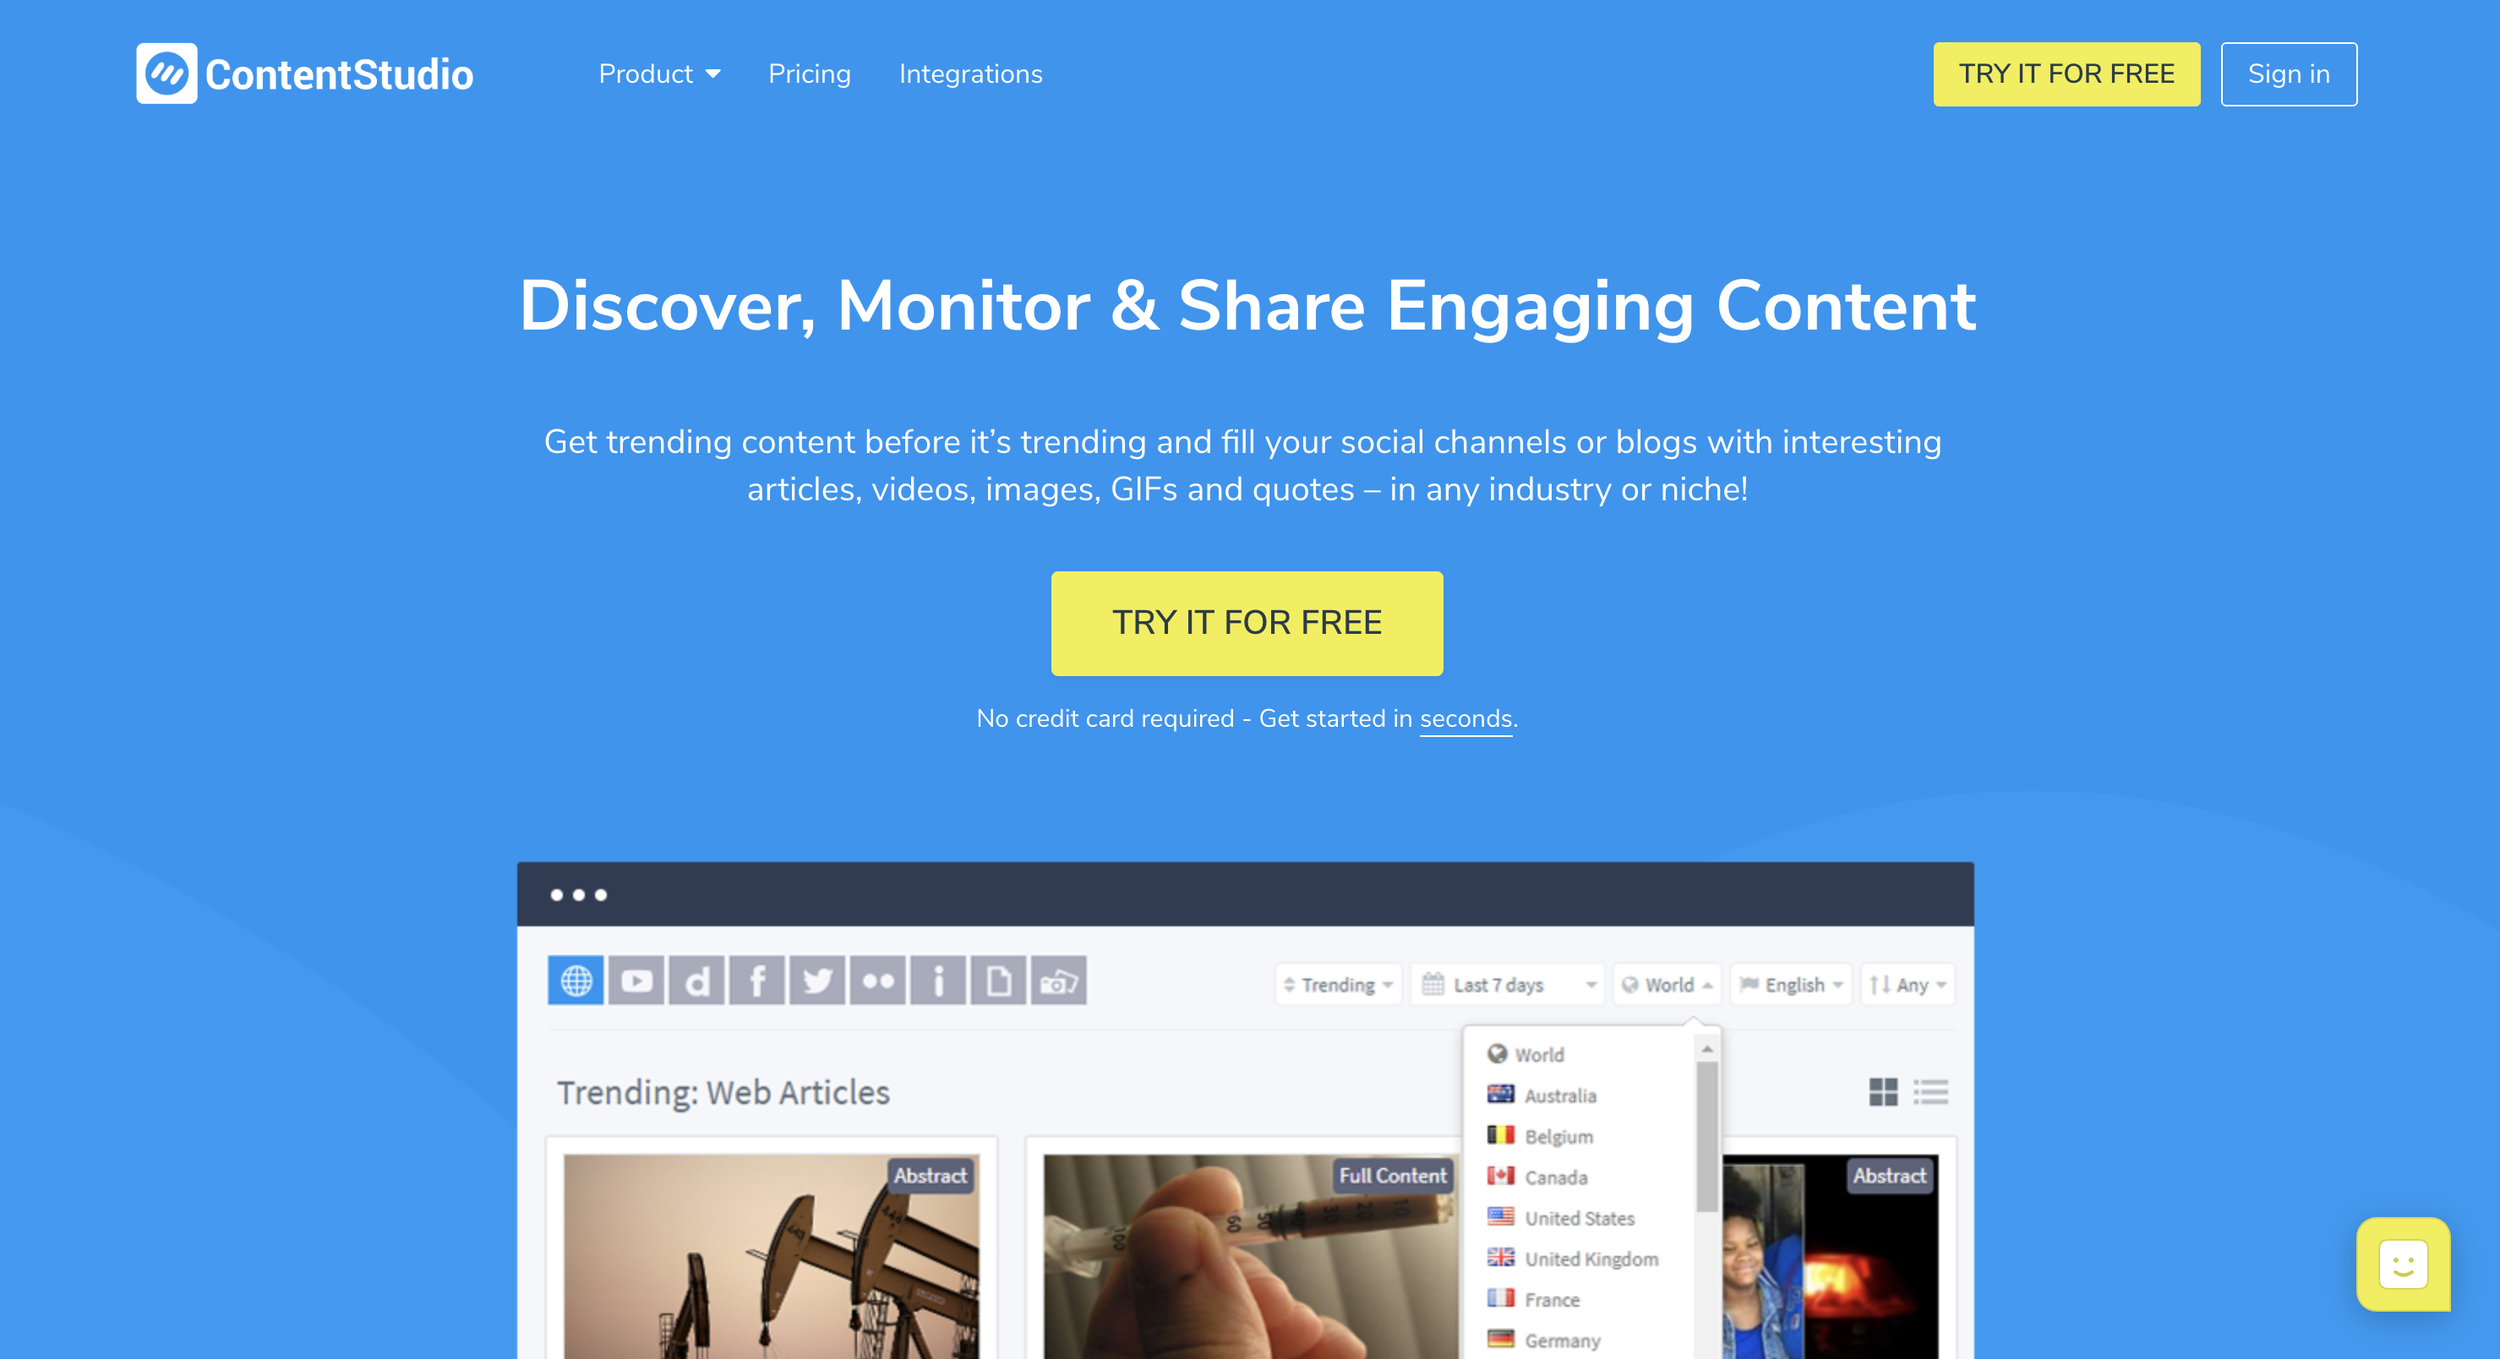
Content Studio is actually a three fold tool. It allows you to discover (content curation), publish, and automate your social media pages.
Regarding the publishing side of the app, Content Studio is second to none. In their discovery tab, you can see the latest trending articles from around the web, so that you can share buzzworthy content. Or you can search by keyword, topic, hashtag, etc.
Where Content Studio differs from the other content curation apps mentioned above, is that you can schedule that content right from within the dashboard. Once you find a piece of content that you want to share, you'll see how many times it's already been shared on the web. You can then click the share button, and either publish the content immediately, or schedule it to go out on a queue.
When you create your account, Content Studio will setup a publishing queue based on the networks you want to publish to, and the days and times that are most useful for publishing. You can, of course, modify the queue schedule. So now all you have to do is add content to your queue and you'll never run out of posts to your social media accounts.
MissingLettr
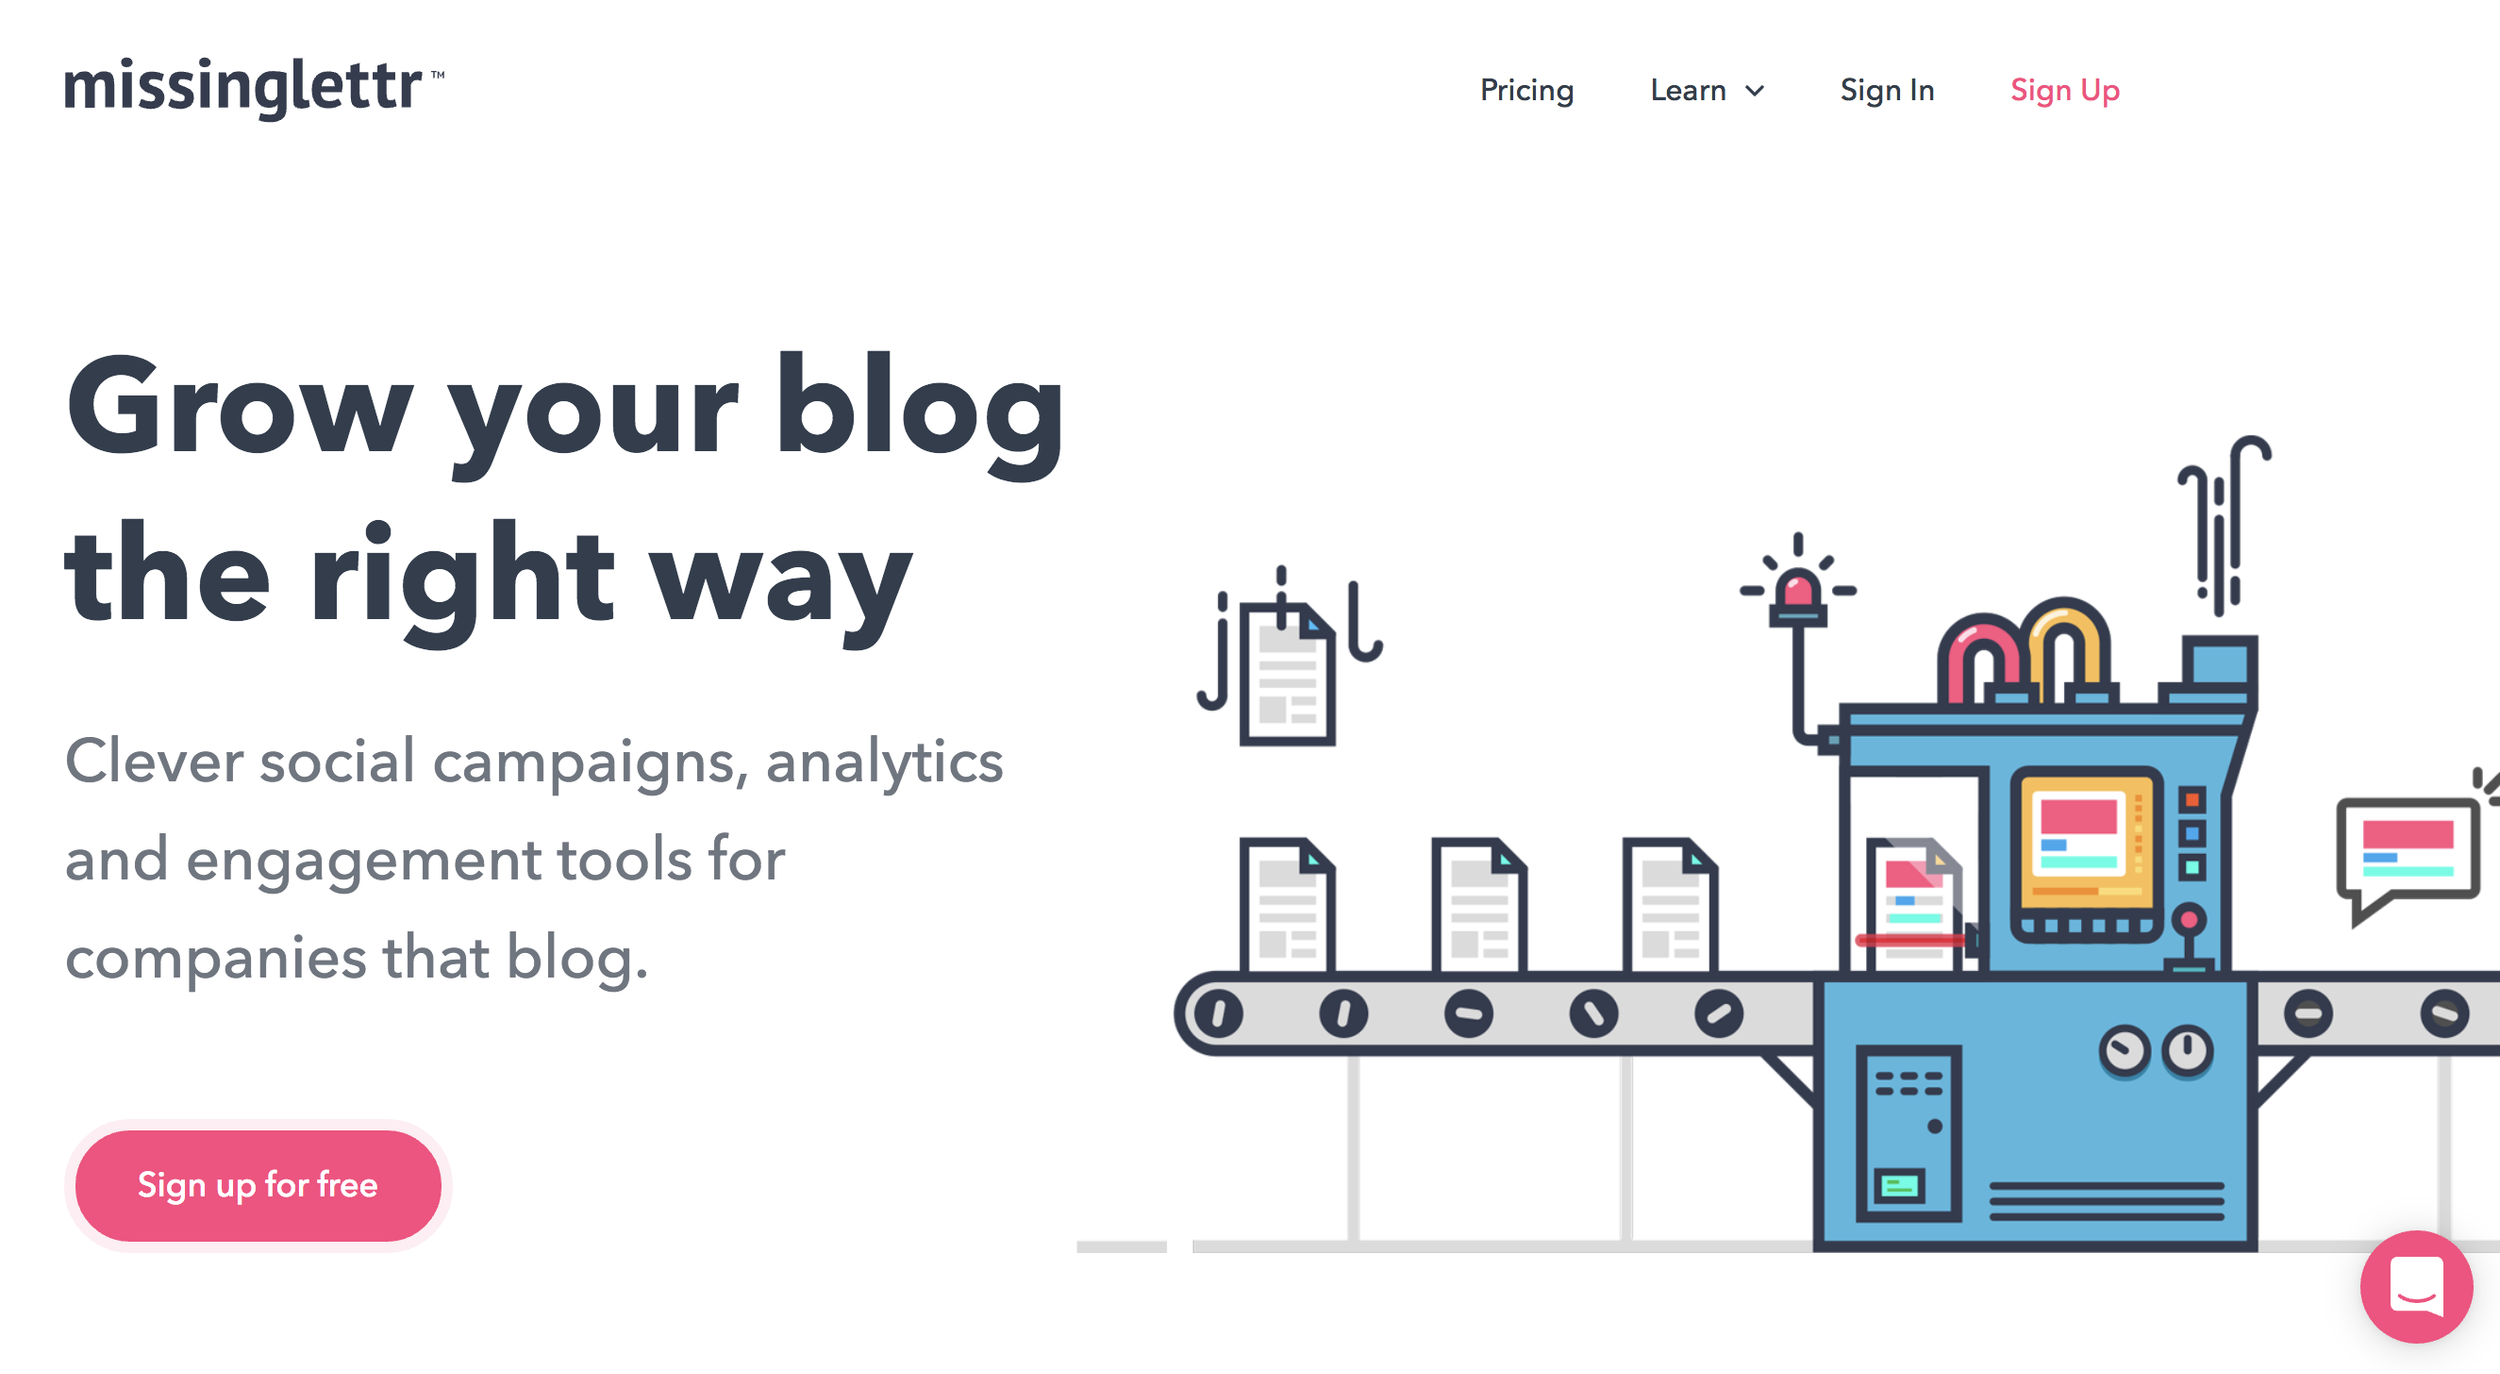
Ya'll got a blog? Cool. Well, social promotion should be a big part of your blog traffic. You want to get other people to share your content. You need to get your content out there first though. Hmm.
MissingLettr is so stinking easy to use. Add your blog's rss feed to your account. Then, whenever you publish a new post, you'll get a happy little email from MissingLettr saying they have a new social media campaign waiting for you!
When you open the campaign to review, it will look something like this:
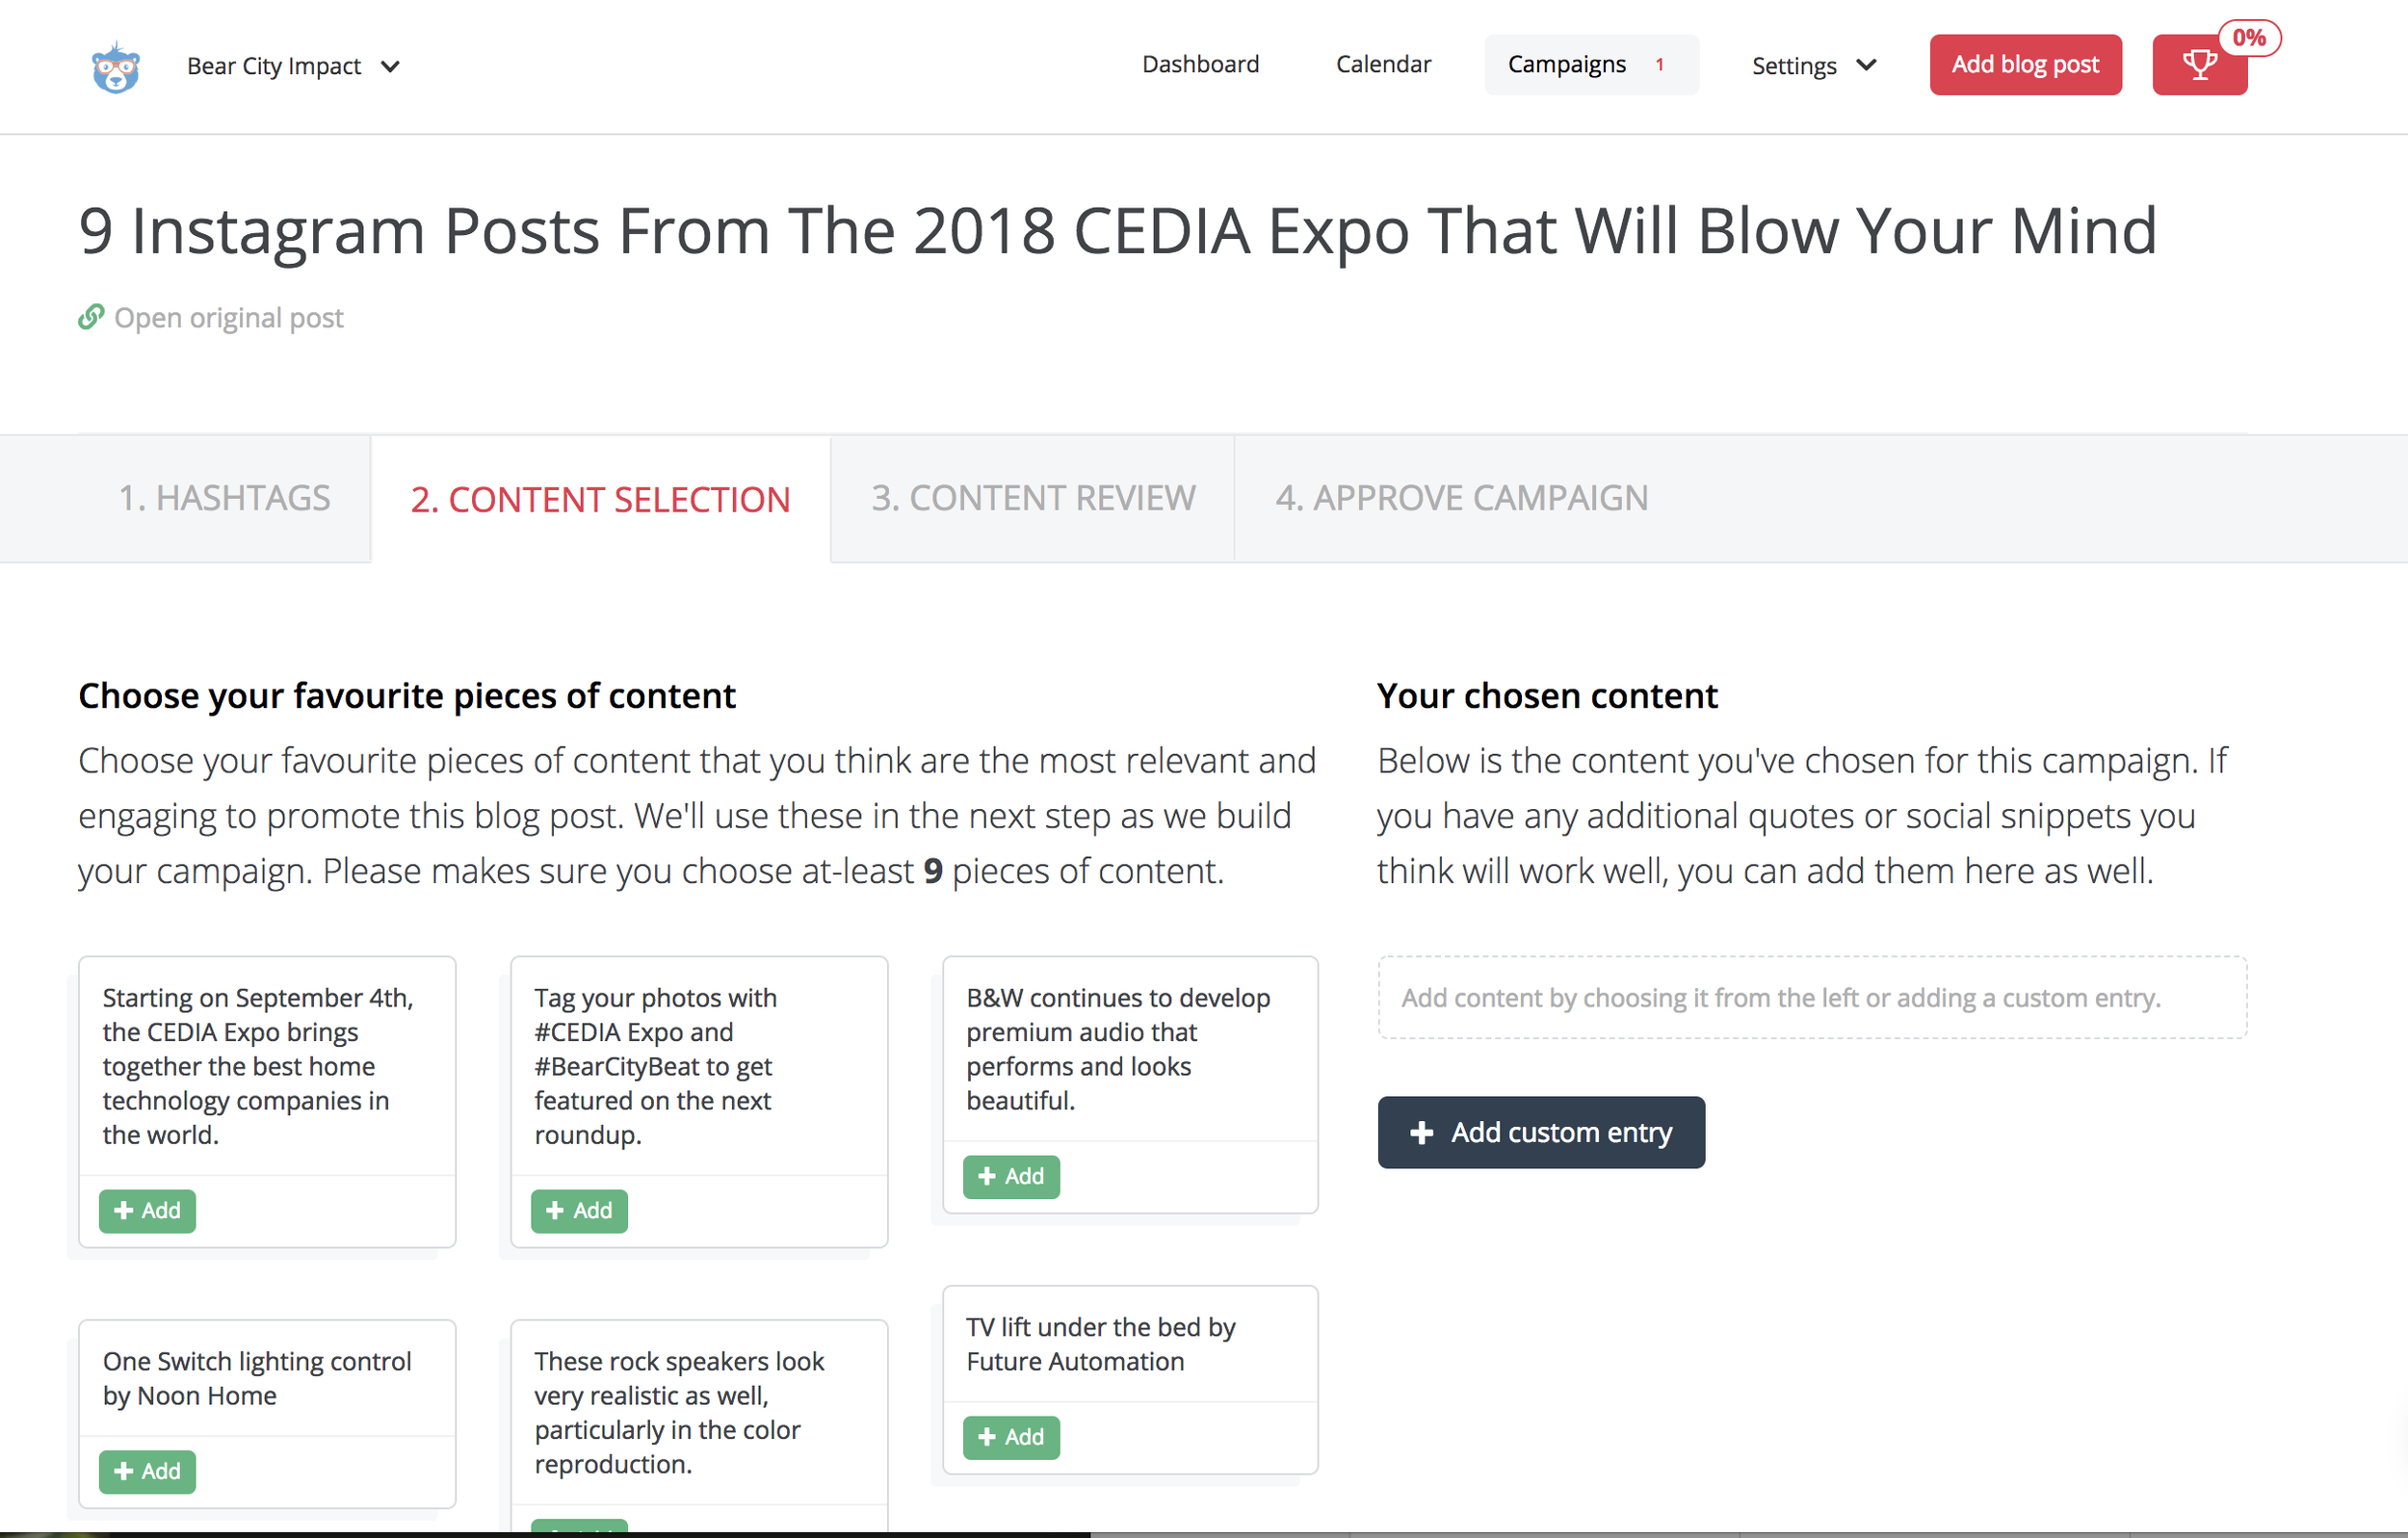
MissingLettr pulls content from your blog post into wonderful snippets. You'll need to select at least 9 of these to get started. Just click the +ADD button! The reason you need to select at least nine snippets is because MissingLettr is creating a year long social media campaign for you. They will schedule your social media posts one at a time at different intervals spread across the year to go out.
So for instance, if you are blogging on a weekly schedule and using MissingLettr, you'll have a constant flow of original content being shared on your social media to your blog. Even if you only blog once per month, that means one blog = nine pieces of content for the year.
After you have selected your content snippets, this is the really fun part. You'll get to customize how each post looks. The review page looks something like this:
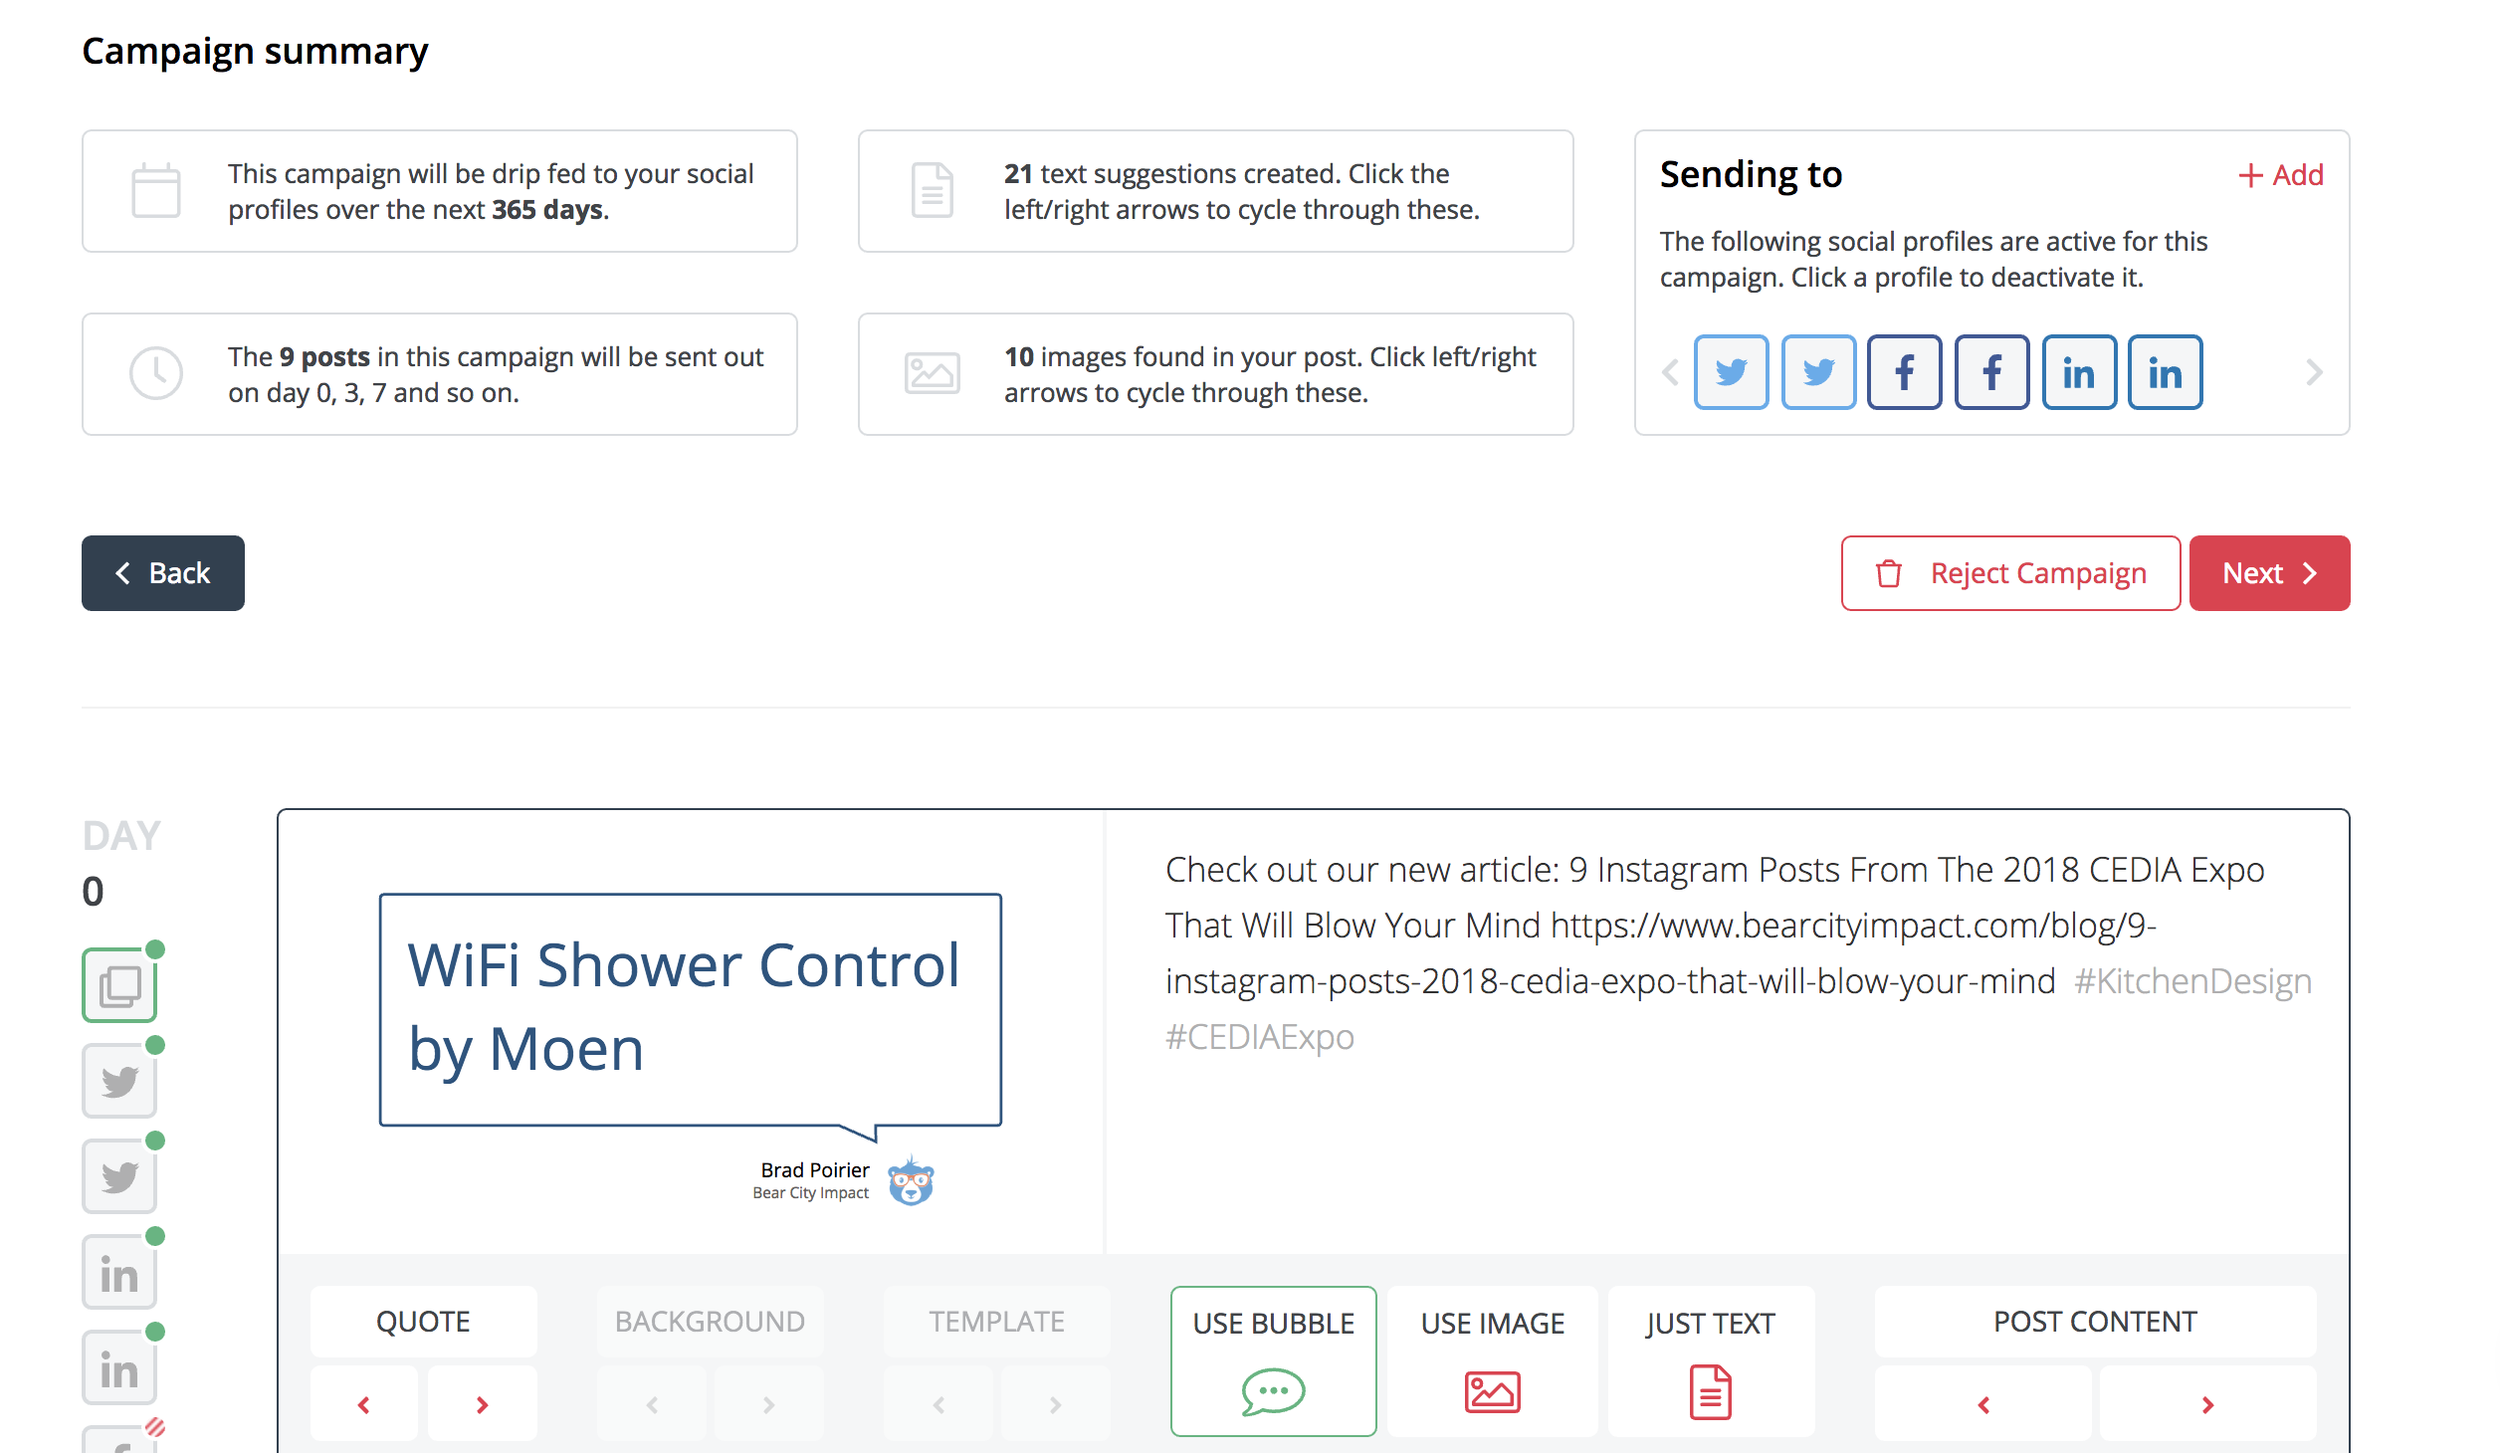
So in this case, for day 0 (which is the first post to go out basically), you'll select how your social post will look. You first choose wether you want the post to include a native image from the blog, a bubble image, or just plain old text.
If you choose the bubble option, it turns your text into fun bubble quotes that appear as images on your social posts. I think this is a creative way to share your content, especially when the blog post might not be media rich. If you don't like the quote shown, just hit the arrows until it brings up one you like.
Awesome right?
Hootsuite
Hootsuite is one of the top contenders when it comes to publishing apps. Most social media publishing tools offer a free plan. Hootsuite has the most valuable free plan though. You can manage up to three social media accounts in their free plan.
For scheduling, you can set up to 30 messages per month. You can post as much as you want, but for scheduling in the future, you'll have up to 30 messages. So for instance, if you're managing a Facebook page and Instagram account, you can schedule 15 messages for each to go out throughout the month, and then post as much as you want on the spot. Or, you can schedule 30 posts for Instagram and none for Facebook. Up to you!
Speaking of Instagram, Hootsuite was one of the first publishing apps to have a direct integration with Instagram – meaning, you can schedule a post from your desktop computer to send to Instagram.
Mic Drop.
Hootsuite gives you an RSS integration as well. You can put your blog RSS in and then it will auto post whenever there is a new blog entry.
Buffer
You can't talk about social media schedulers without talking Buffer. Buffer is probably the cleanest, simplest scheduler out there.
Buffer integrates fabulously with many other apps, including Stencil, Feedly, and Pocket.
My three favorite features about Buffer is there content inbox, queue, and analytics.
The content inbox is a great way to keep your queue fed. (You need to feed the queue!). You pop in a couple RSS feeds and Buffer will add it to the content inbox. You can then preview the article and add it to your queue.
Speaking of the queue, once you add a social media channel, Buffer will automatically set up a suggested queue of posting times. It's tailored per channel. So if you setup a Facebook page, Instagram account, and a Twitter account – the queue will be different for all three of them. It's based on suggested best days/times to post. You can completely customize the queue times and days though if you want.
When you add content, you can either publish now, add to queue, or super awesome feature share next. The share next will push another item down the queue, so it still gets scheduled but then your newest content will be shared next.
Once you add content to the queue, you can just set it and forget it. Or you can move posts around via drag and drop. Alternatively, you can get a birds eye view of your content calendar and see what's going out for the week/month.
The analytics tab is super clean and easy to read. It's going to show you all recently published posts by default. The next tab will allow you to sort by most popular. You can set the popularity by most likes, comments, clicks, shares, or reach.
This is excellent for recycling high performing content. If your focus is on clicks, just sort by most clicks, find the top 2-3 content pieces and then you can reschedule the post to go out again in the future. You can schedule it with the same content, or you can update the photo or the text if you want.
Engagement Social Media Tools
Engagement is all that any social media platform cares about
The more engagement a social media user has > the more they stay on the app > the more the app makes money
Focus on engagement :)
Facebook Pages Manager
This is one of those apps that should be obvious, but sadly so many businesses are using the regular "blue" Facebook app to manage their business page. The blue app is the standard app you use to get your personal Facebook feed.
The Facebook Pages Manager app is the official app from big blue themselves. It's more advanced than using the regular app. One hidden feature is that you can manage BOTH your Facebook and Instagram inbox from the one app. Any comments or direct messages from either Facebook or Instagram will get filtered to this one app. Makes it easy for keeping your audience engaged.
KingSumo
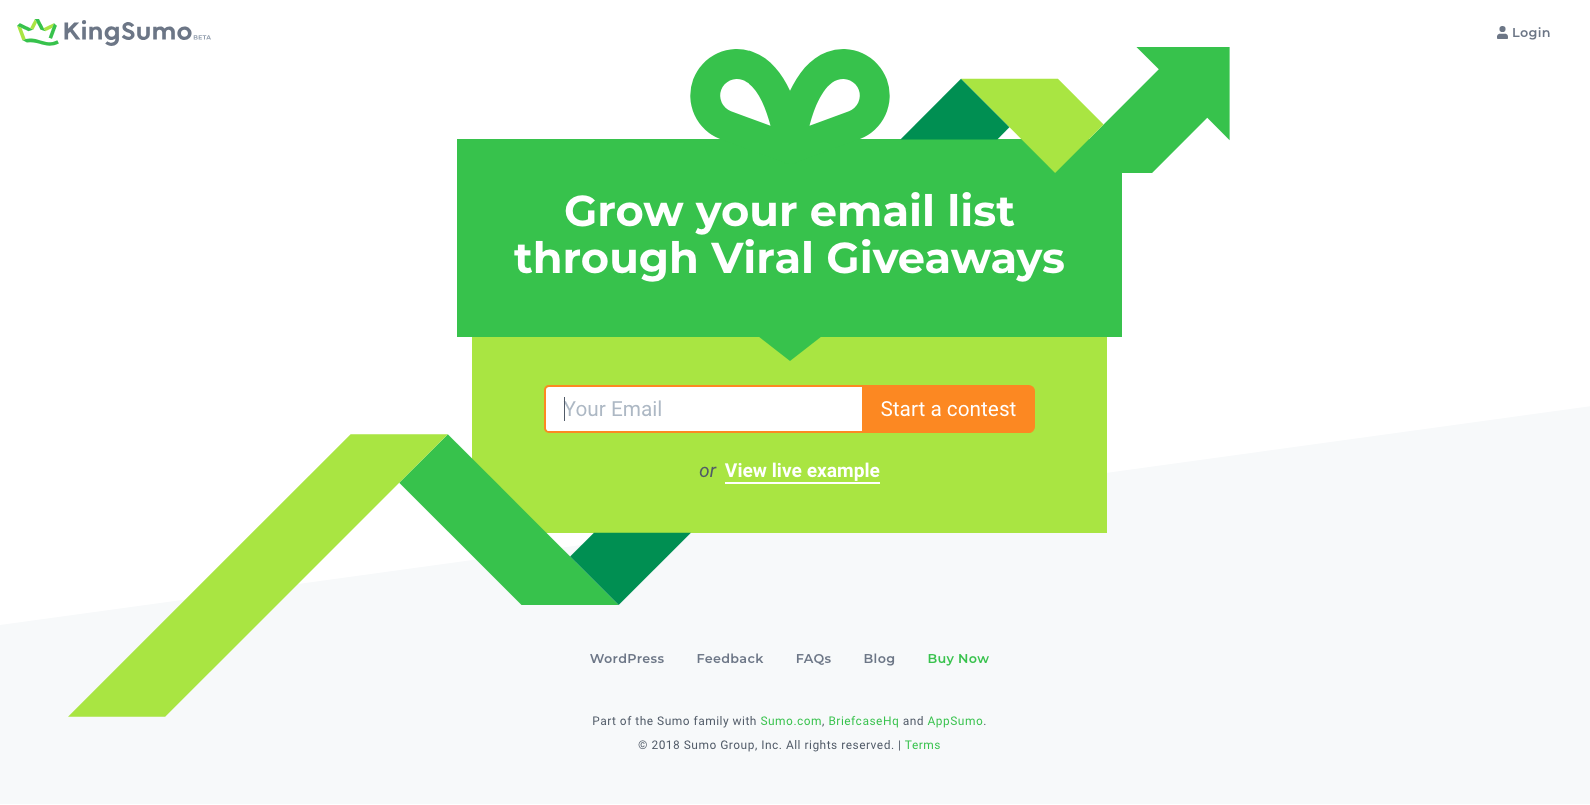
KingSumo isn't directly a social engagement tool, but it has some engagement features in it. Primarily, KingSumo helps you grow your email list, which you should be doing also.
Basically you create viral contests with this app. You setup a giveaway, and the first entry point is someone submitting their email. After that, they get bonus entries for : 1) sharing your contest on social media, and 2) liking your social media pages
The sharing and liking for entries will help create social media engagement.
I used KingSumo for a client giveaway recently, and the results were fantastic.
Our contest resulted in:
60 new Facebook likes
250% increase in Twitter followers
163% growth in email list
Plus anyone who entered the contest, we setup an auto-responder email with a special contest code where they could shop only during the contest period with a special discount, which created increased orders during that time.
Tagwin

Tagwin is similar to King Sumo, but designed for Instagram specifically.
Use Tagwin to run a Hashtag Contest or Follow to Win, and also take advantage of these additional entry conditions:
Require Follow
Require Like on Post
Require Comment on Post
Require Mention on Post
Website Social Media Tools
What’s the point of social media? For some it’s branding. Others you can direct leads from Facebook. (Messenger, etc)
Often you want to draw traffic back to your website.
Mobile Monkey
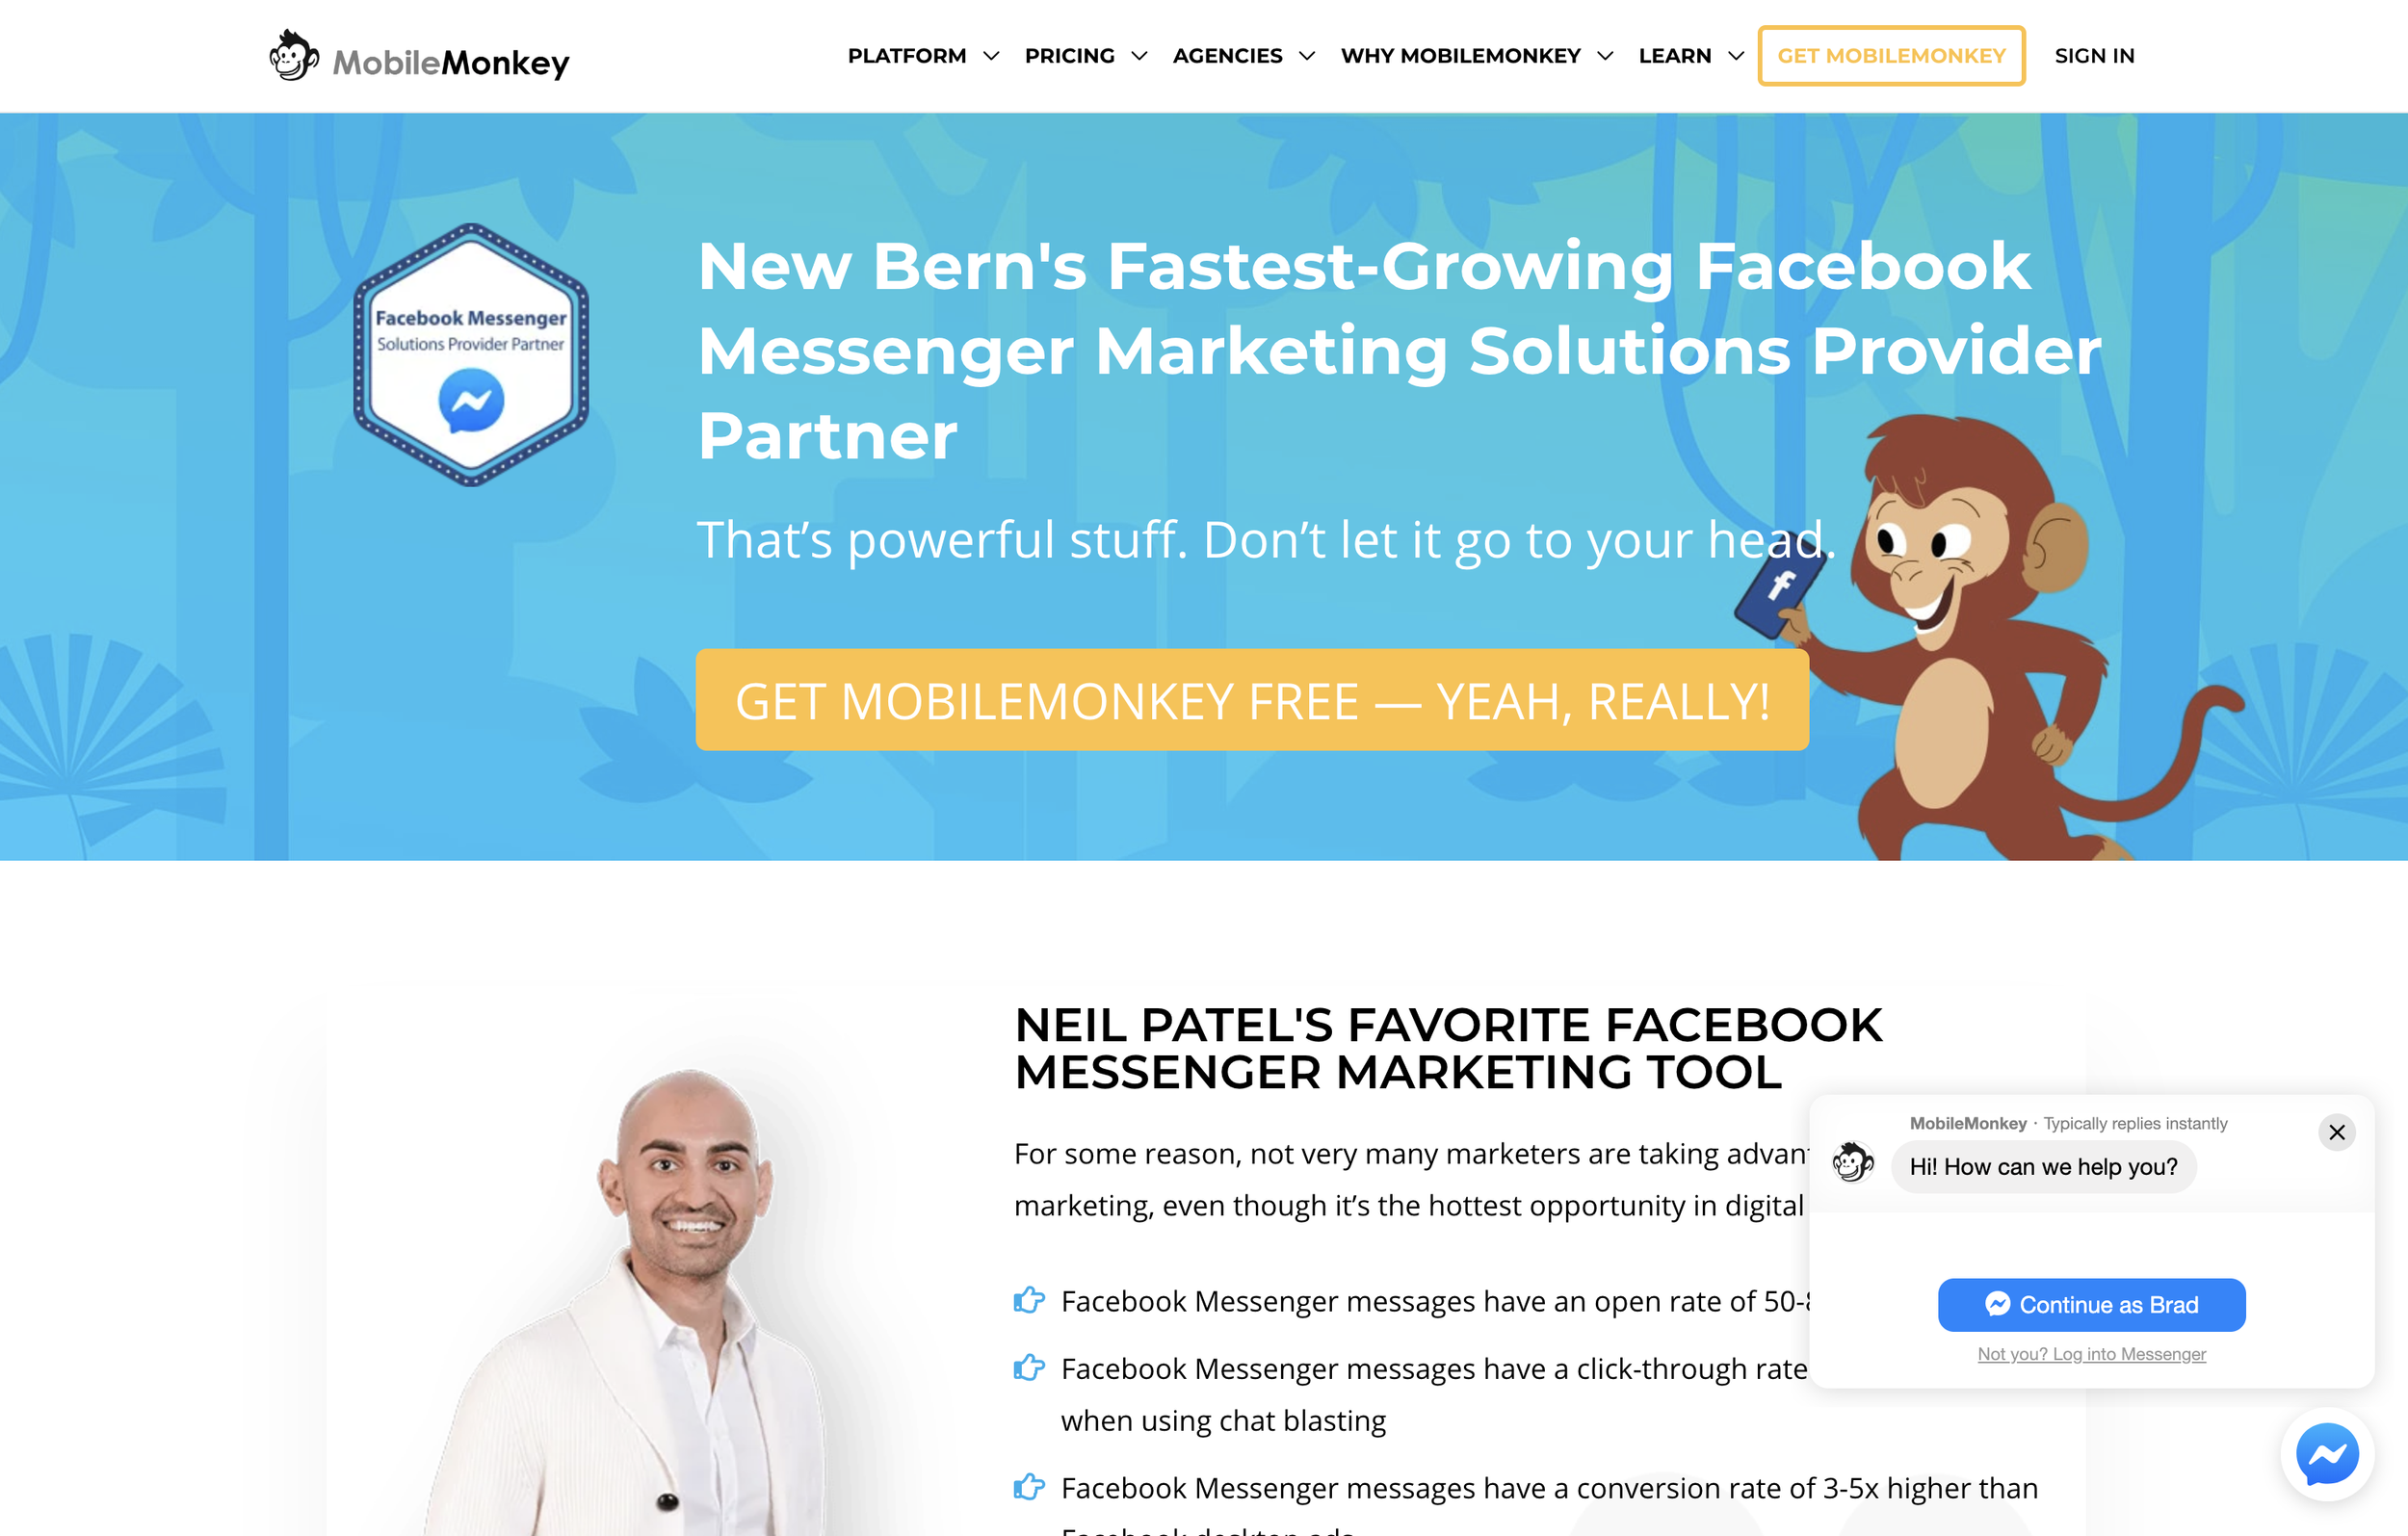
I've been using Mobile Monkey for about a year now and I must say, it is hands down one of the best tools in my website conversion kit. It's actually both a website tool and a direct Facebook tool.
In short, here's what it does: You connect it to your Facebook business page, and when people click on "SEND MESSAGE" from Facebook, they can enter into an automated messaging system. Based on how you setup the chatbot, the person messaging your business can have several different responses back to them.
The team at Mobile Monkey has made it incredibly easy to setup chatbots by including over 14 different chatbot templates ranging from eCommerce bots, Real Estate, Lead Generation, Beauty Salon, Restaurants and more.
I can 100% attest to getting my own clients through the chatbot provided by Mobile Monkey.
I get a lot of new messages directly from my website since I have the chatbot integrated here as well. New visitors are prompted with a chat message and if they choose to engage, it puts them into the chat pipeline.
You can also trigger it by a link. Try it here for instance, click this link to engage with my chatbot. You can insert this link at the end of an email as well.
If you're not using a chatbot for your Facebook Messenger, you're missing out BIG TIME.
I have a complete video tutorial on setting up a chatbot using Mobile Monkey as well.
Campsite
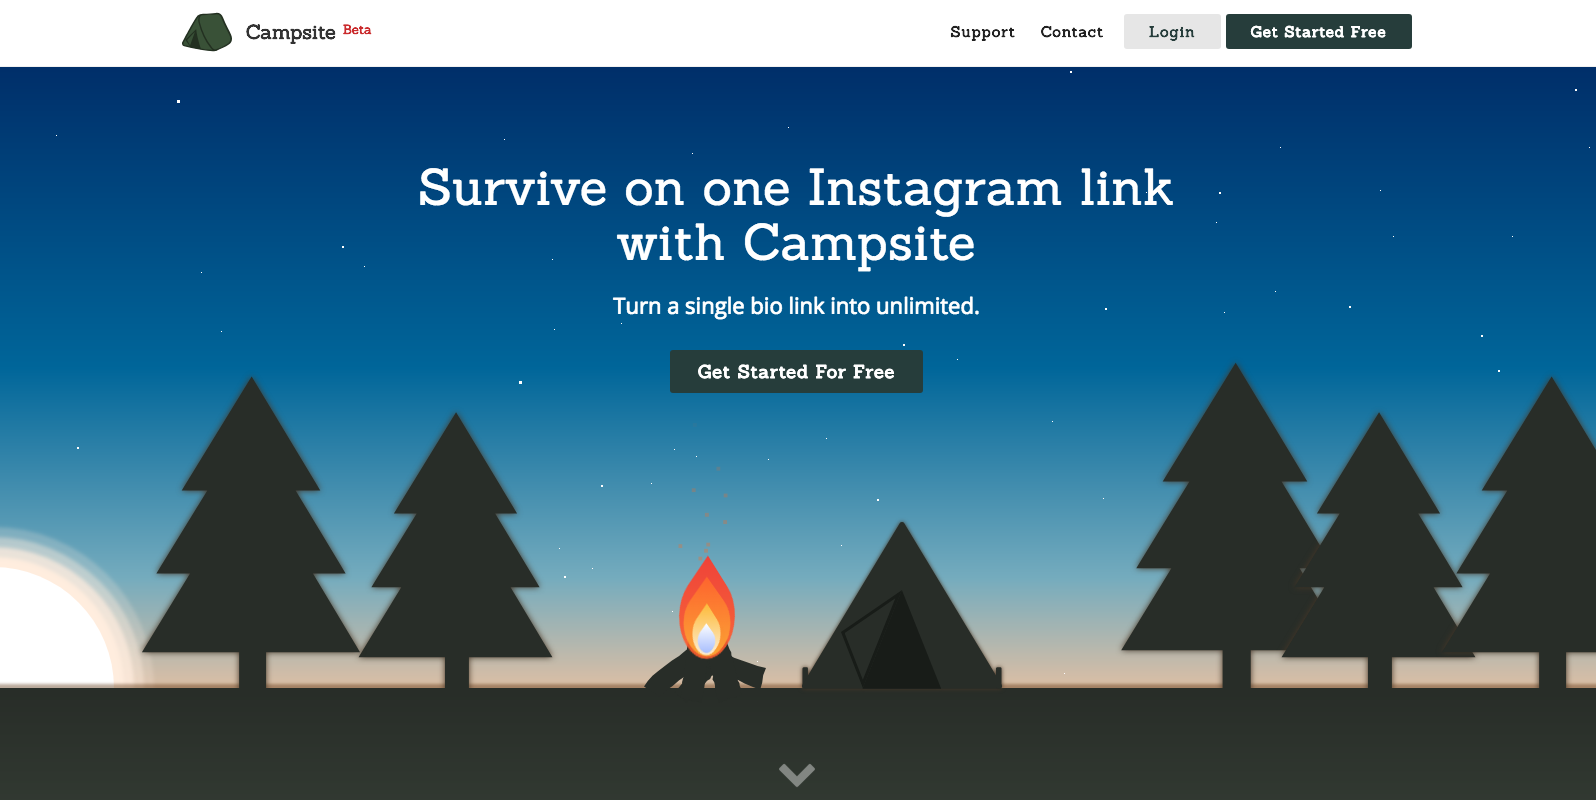
Ugh, I know it. Instagram doesn't let you put clickable links in your posts. And double ugh, they only allow for one link in your bio.
Yay for Campsite. Campsite is a free landing page of sorts. You just add a bunch of links to your campsite page, and then you'll copy your unique campsite link and put that as your website in your Instagram bio.
Then, when someone goes to that link, they are presented with all of your links associated with each post. You can even use the picture from the post to match up!
The page is completely customizable also. From the background color/image, button colors, profile image, etc.
Yoast SEO
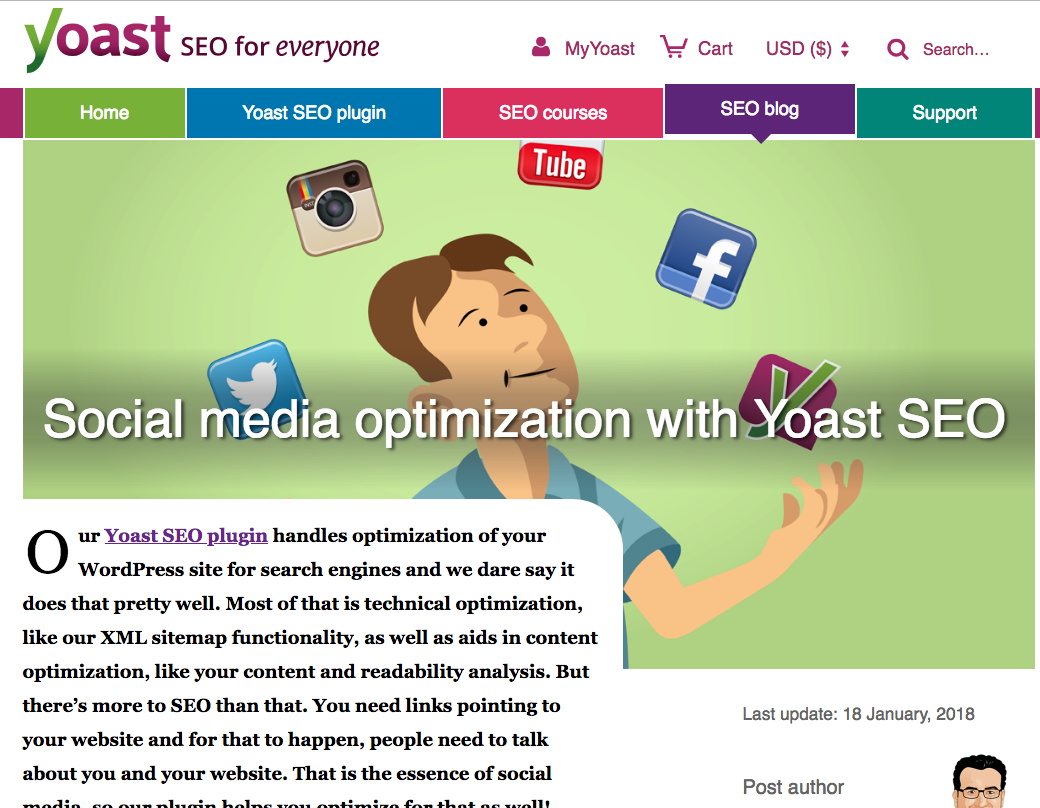
This is a Wordpress specific plugin that is mostly suited for SEO. However, social sharing plays a big role in your search engine find-ability.
When you share any link to Facebook, the Facebook computers try to automatically associate an image with that link. It doesn't always do a good job. Sometimes, it will grab the logo of that website, or some other image on the page.
Yoast makes sure that an open-graph image is set for your blog or any page of your website. Open-graph is the protocol used by Facebook (and other social channels) to pull images from a website to attach to links. You'll never have crappy image shares again!
Yoast makes it easy to set the image you want to be shared. You can customize this for each network as well, since Facebook, Twitter and Pinterest for example all have slightly different image share sizes. Twitter will pull the image used for Facebook and just crop it, but if you're the fine-tuner-type-of-person, then you can set it manually.
Bonus Social Media Tools
Those were the 17 apps I highly recommend. I asked a group of social media peers to give their recommendations. Here's what they had to say.
Loom Video Recording
Tracey Lee Lorenson likes Loom recording for "the ability to explain simple principles online". Loom is definitely awesome for that. I use it myself. In one click you can start recording your desktop and then when you're done, you'll instantly get a shareable link. So you can just place that link to a social media page, or a private group you're in for instance.
Revue
Neeraj likes Revue. Revue allows you to start a mailing list which curates links to your audience. They have a free tier up o 50 subscribers.
Pixlr
Cathy Larkin of Web Savvy PR likes Pixlr. It is an online image editor that she uses to optimize images so they don't slow the website down. She uses the online app to resize huge photos so they are 72 dpi and less than 100 kb, and the right dimensions for use in a header or slider, or in the body text of a page or a blog post so they don't slow the site down.

Should You Outsource Your Social Marketing?
Deadlines. Employees. Networking. Accounting. Advertising. HR. – The Party Planning Committee. As a small business owner, you likely wear many hats. Should marketing be another one?
Deadlines. Employees. Networking. Accounting. Advertising. HR. – The Party Planning Committee.
As a small business owner, you likely wear many hats.
“Wait, now I have to wear a marketing hat also?”
Well the short answer is no, you don’t have to. It really depends on how competitive you want to be in your industry.
Your big competitors invest lots of time and money into marketing their business, but that doesn’t mean you have to. Outsourcing your digital marketing to a digital marketing agency can both improve your lead quality and improve your overall ROI.
Let me explain.
Your Time Is Your Most Valuable Asset
Time is the one thing that no matter what, you cannot buy more of. Even the wealthiest celebrities with the likes of Kim Kardashian cannot buy more time. What you have to do is, make the best use of your time.
How long does the average digital marketer need to spend each week marketing their business online?
The short answer is: It’s a full time job, literally. But let’s look at some examples from social media today:
Social Media: The majority of businesses spend 6 hours per week on social media
Blogging: The average post can take 1-3 hours to develop content.
Citations: Depending on how many directories have your business listed wrong, it might take you a couple hours each month to fix your directory listings.
Review Monitoring & Response: Scouring the internet for mentions of your company and then responding to those reviews can take 3-4 hours per month.
Those are just the basics of digital marketing: Social media, blogging, local citations, review monitoring.
We’re not even discussing marketing automation, video marketing, on-page seo and more.
Based on just those four areas, for digital marketing to be effective, you’ll need to spend roughly 34 hours per month to create engaging social media posts, two blogs per month, fix your citations and respond to online reviews.
So if you’re a small business owner looking to gain an edge, you probably don’t have it in your budget to hire a full time person just for your digital marketing. Nor do you have the time to spend 10+ hours per week on your digital marketing strategy.
Outsourcing your digital marketing can save you both time and money from hiring someone for your organization.
Expertise in Digital Marketing
So let’s say you’re willing to spend that 34 hours per week on digital marketing, or you want to go ahead and hire in that new staff person to do this. Great.
How much experience do you have?
Chances are, it will take you several months before you acquire all of the tools and training necessary to become effective with your time.
Case in point: Just because you’re posting to social media 12 times per week doesn’t mean that it’s effective.
Are your fans engaging with those posts?
Are they sharing your posts?
What’s your email open and click through rates?
How long is the average visitor reading your blog article?
The answers to these questions will tell you if your digital marketing strategy is effective or not.
You might have the extra time to devote to your digital marketing, but will it pay off if you go the DIY route?
Perhaps. Perhaps not.
Measuring Your Digital Marketing Strategy
Ok, at this point, you are spending the time on your digital marketing strategy, and your are getting better at it.
How do you know it’s working? How are you correlating the time and money invested into revenue?
For every hour you or your staff person spends on digital marketing, how much is that costing you.
Let’s say you hire in someone at the rate of $20/hour x 32 hours per week, that’s costing you more than $2,500 in labor alone, besides taxes and other fees. That’s not counting the cost of any marketing automation and other marketing tools you probably need.
Let’s just say between labor and other expenses (and we haven’t even discussed PPC budgeting), for marketing you might invest over $4,500/mo.
Are you getting at least a 2x return on that each month? Rather, are you bringing in at least $9,000 in sales each month for that?
I should note that, for most small business owners, outsourcing your marketing should cost no where near $4,500/mo. Outsourcing should save you quite a bit of money AND provide a better return on your investment.
Outsource Your Digital Marketing - Yay or Nay?
Thinking about a statement earlier, it all depends if you want to be competitive or not.
Let’s do a test.
Head to google.com, open a private browser tab (incognito, etc) and search for your industry keywords. Don’t search for your business by name. So if your business is “Joe’s Plumbing & Heating”, don’t search for that.
Search for how you want to be found if someone has not been introduced to your business before.
Something like : “Plumbers near me” or “Plumbers in [insert city here]”
The reason you do this in a private window is that it will remove previous search history.
Google is smart. They know you’ve been to your website before, so if you just search for “plumbers”, it will bring up your site first because you’ve previously visited it before.
So, what were the results of this quick test? Were you on the first page? Were you on the top 3 listings? Do you see your business somewhere in the Google Map Pack results?
No?
Then you need to outsource your digital marketing.
Or, you’re just OK with your competition being on those pages.
If by now, you think it’s a good idea to outsource your digital marketing though, you should look for a digital marketing agency.
Increase Your Website Conversion With Easy Opt In Forms
What if I told you that only a few percent of your website visitors will hit that “contact” now button. Then, what if I told you there was a way to automate the growth of your email list - for free. No, I’m not kidding around.
What if I told you that only a few percent of your website visitors will hit that “contact” now button.
Then, what if I told you there was a way to automate the growth of your email list - for free.
No, I’m not kidding around.
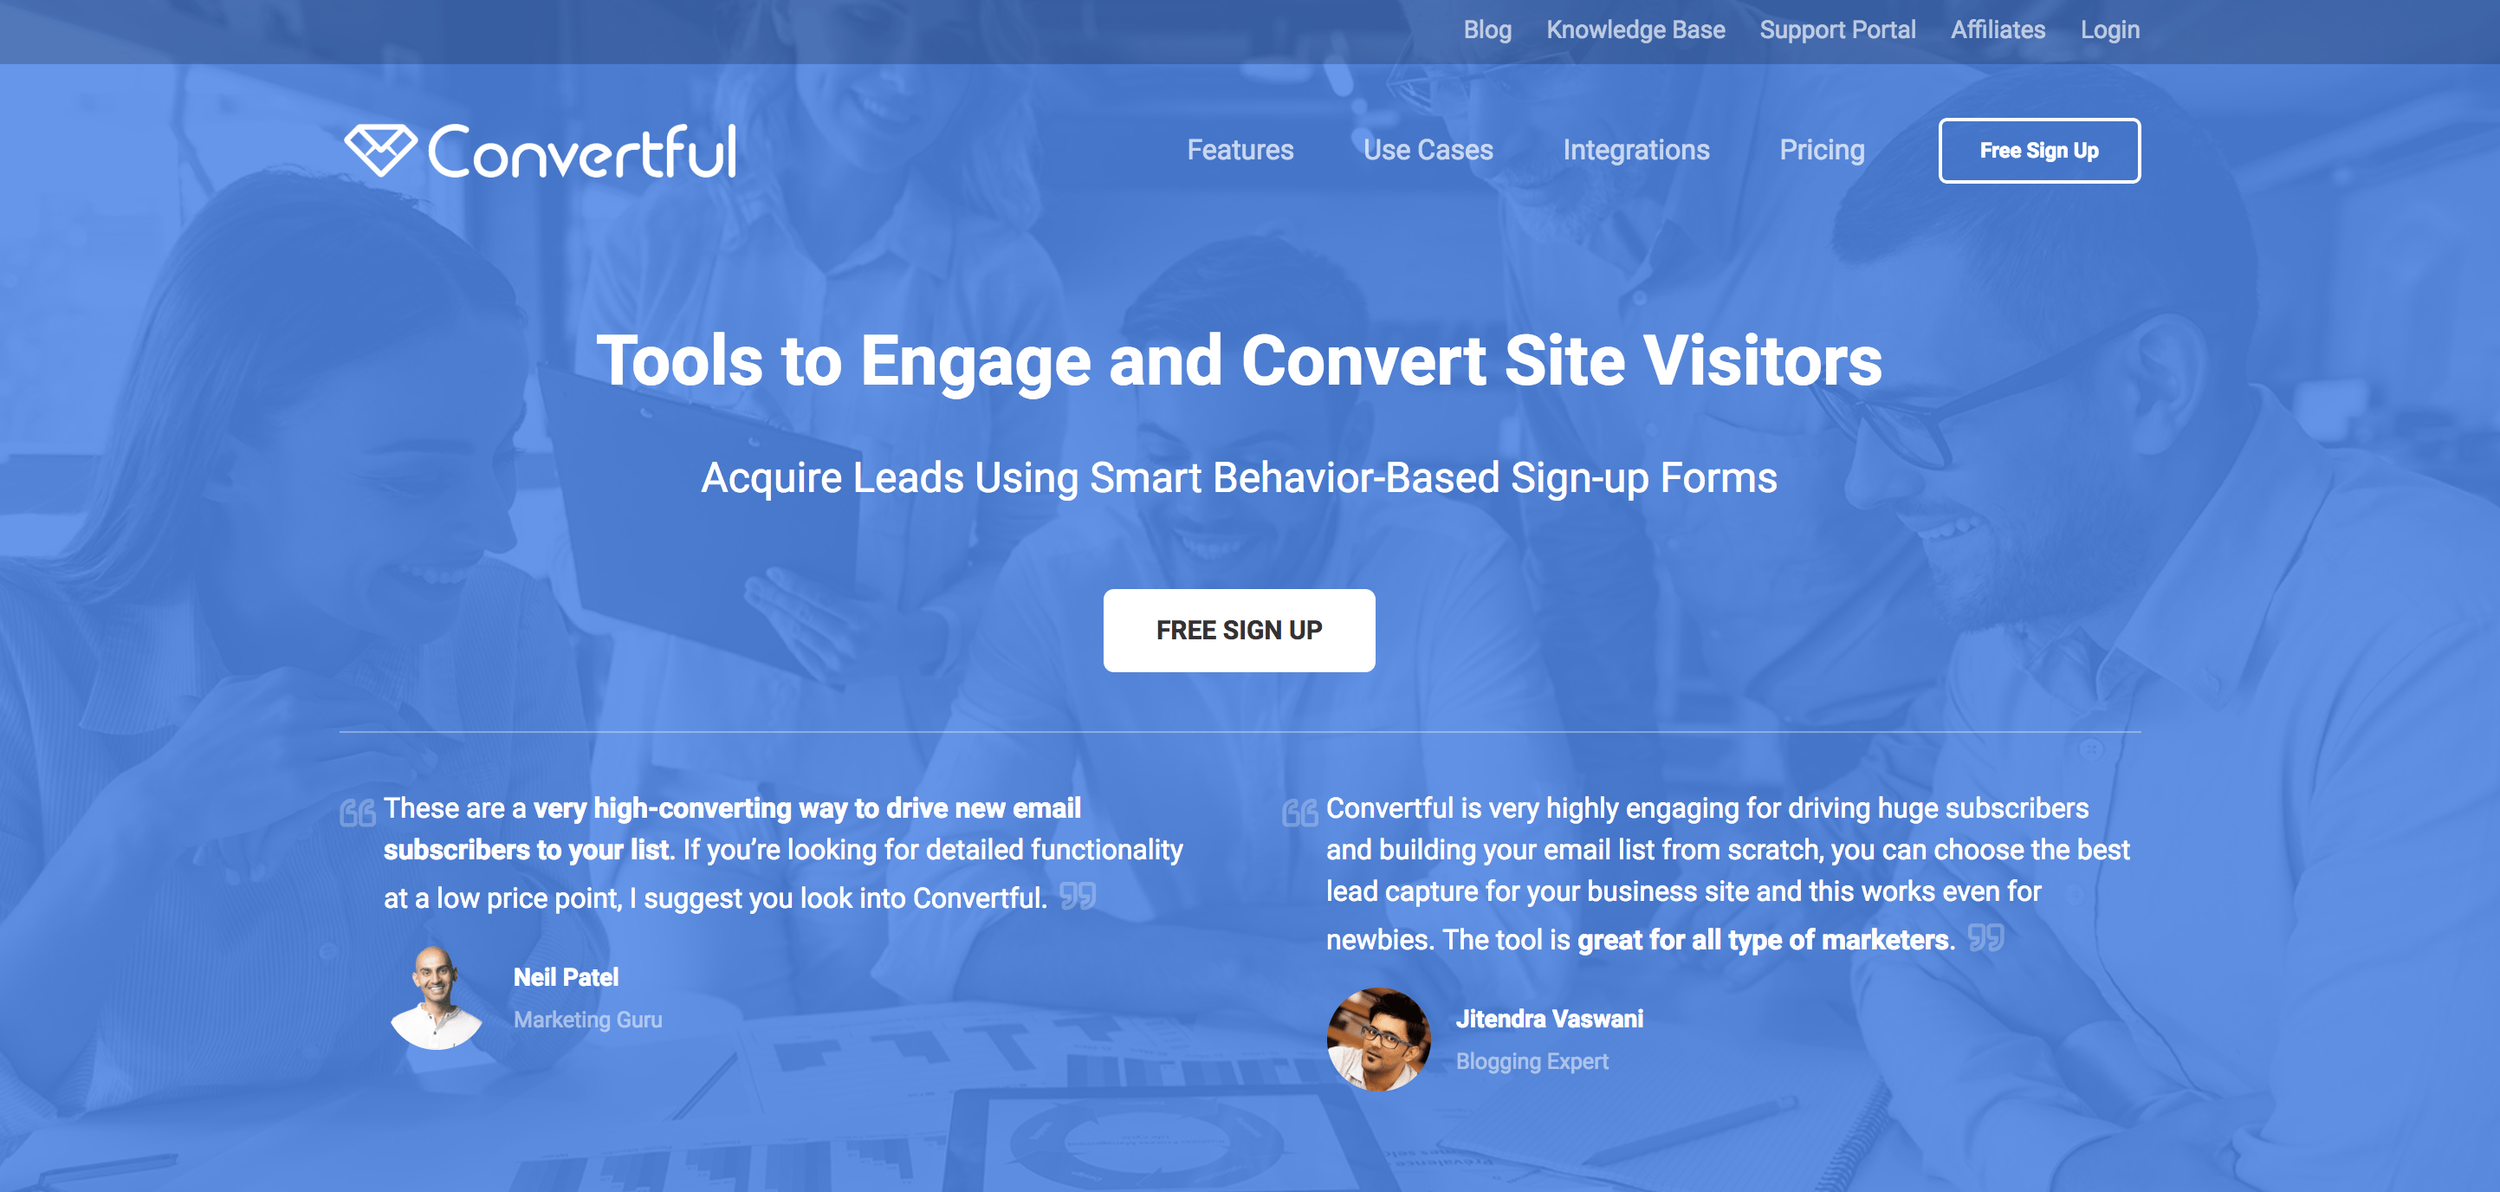
Convertful is a website tool used to acquire more leads using smart behavioral-based sign up forms. The problem with most email tools are that they send the same offer to everyone. Convertful kind of knows your website visitors better than your visitors knows your visitors.
Imagine your website is a local shop for a moment. Here’s how most websites work for a first-time visitor, playing the role of a local business here:
I open the door to your shop and I’m immediately greeted by an enthusiastic employee saying “How can I help you”.
I say “No thanks”, and I continue walking into the store.
Then, a few steps later, another enthusiastic employee comes over and hands me a coupon for 10% if I give them my email address.
Again I say “No thanks” and move on.
Two steps later, a third employee walks over to me and says “Here is our store security policy about how we monitor your shopping”.
All they ask for is a simple acknowledgement that they told me they are monitoring the store for security purposes.
Now, let’s take this one step further. I’m about to leave but I see another person walking in. This person has shopped here before - but guess what - they get the same speel by those three employees.
This is basically how some websites are creating a distracting user experience - for everyone. Local business owners who want to get an edge over their competition have been lured into using these strategies and their websites have turned into some sort of a casino.
What’s the problem here? In the example of the local business, there’s two problems here:
They are giving the same offers to everyone, regardless of their shopping behavior
They are overloading the visitor with too many offers at the wrong times
How To Fix Your Website Conversion With Convertful
In this article you are going to learn how to:
Setup and install Convertful on ANY website
Create your first Email Opt-in widget
Show your opt-in widget to targeted visitors
Send your opt-in subscribers to your email service
1. Setup and install Convertful on any website
ConvertfulImage source:
Getting Convertful on your website couldn’t be easier. Seriously.
Create your free account, enter the website address you want to place it on, and then you will get a code to place on your website. Each website will be a bit different, but you’ll want to add this to the </head> section of your website, so refer to your website’s help docs on where to place custom code.
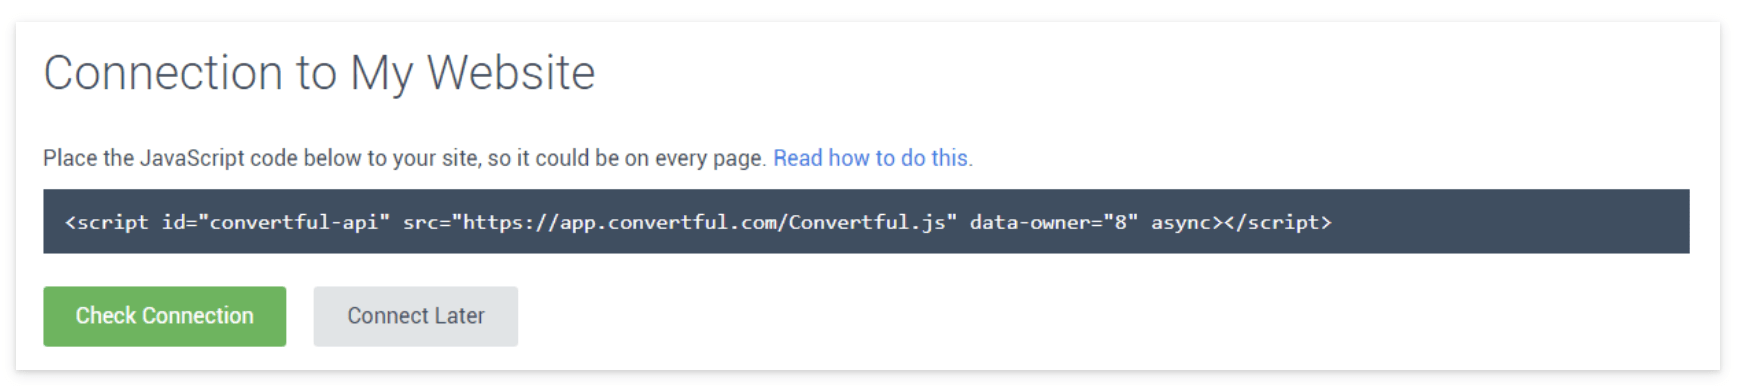
If you’re using Wordpress, it’s even easier. After you create your free account, you just install the Wordpress plugin.
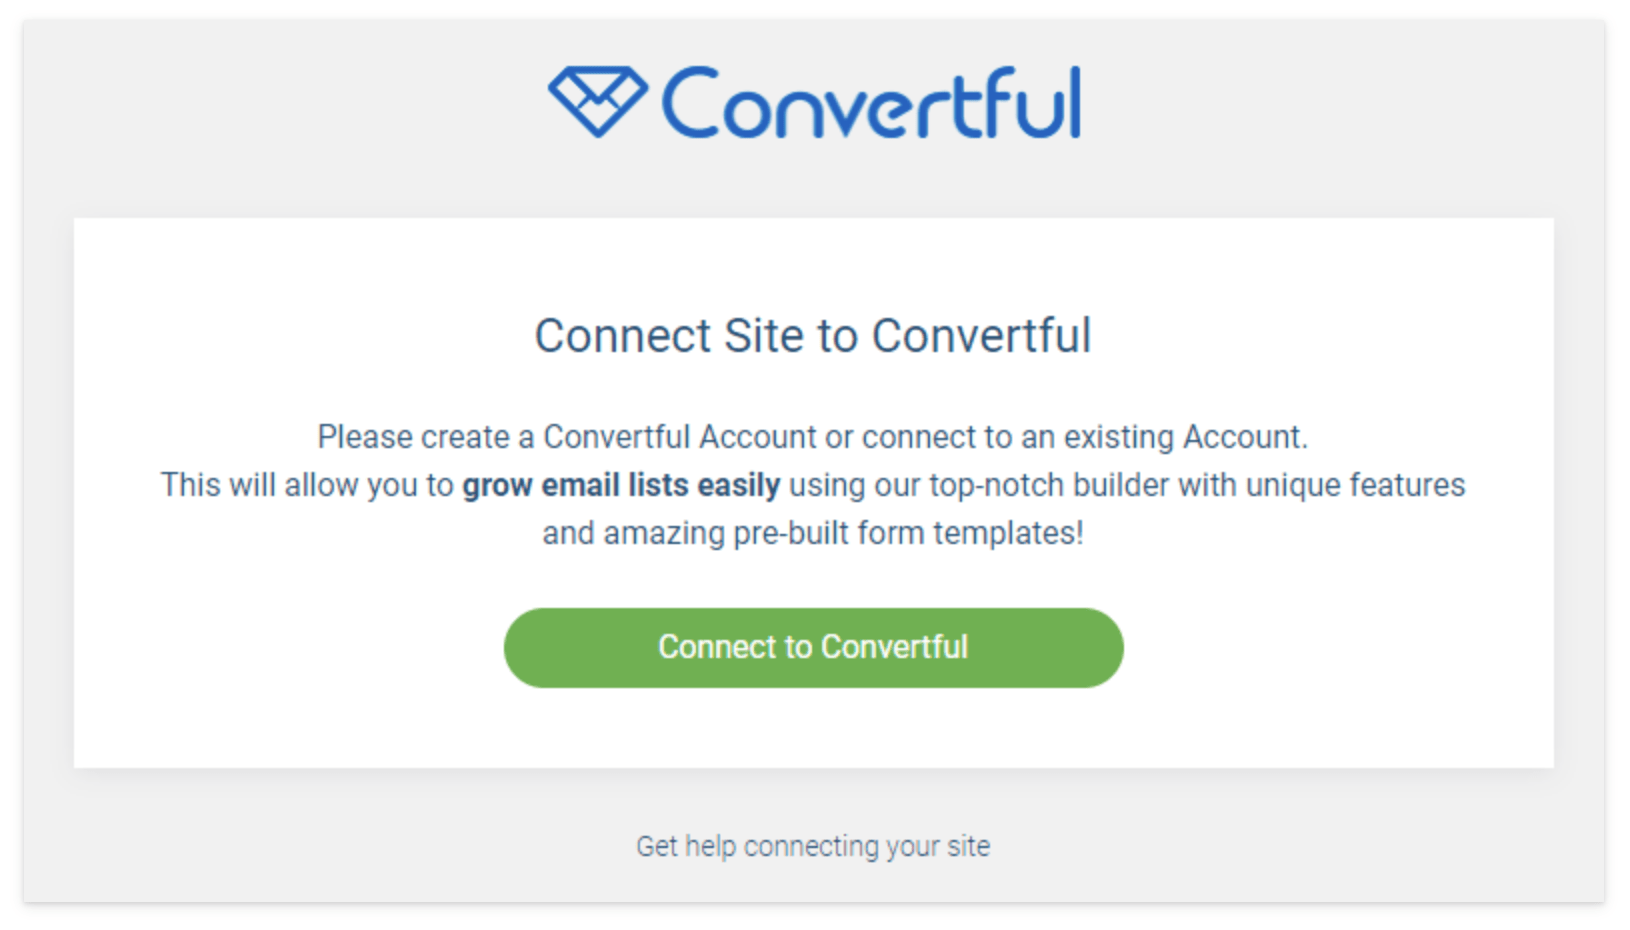
When you click the “Connect to Convertful” button it will open a window logging you into your Wordpress site for authentication.
That’s it, in both instances, you have now completed the step to installing Convertful to your website.
2. Create your first email opt-in widget
The whole point of Convertful is grow your email list. By using a combination of the right offer at the right time, you can grow a (loyal) email list, turning visitors into customers.
Click on WIDGETS in the blue bar at the top
Click the green button that says “Create” widget
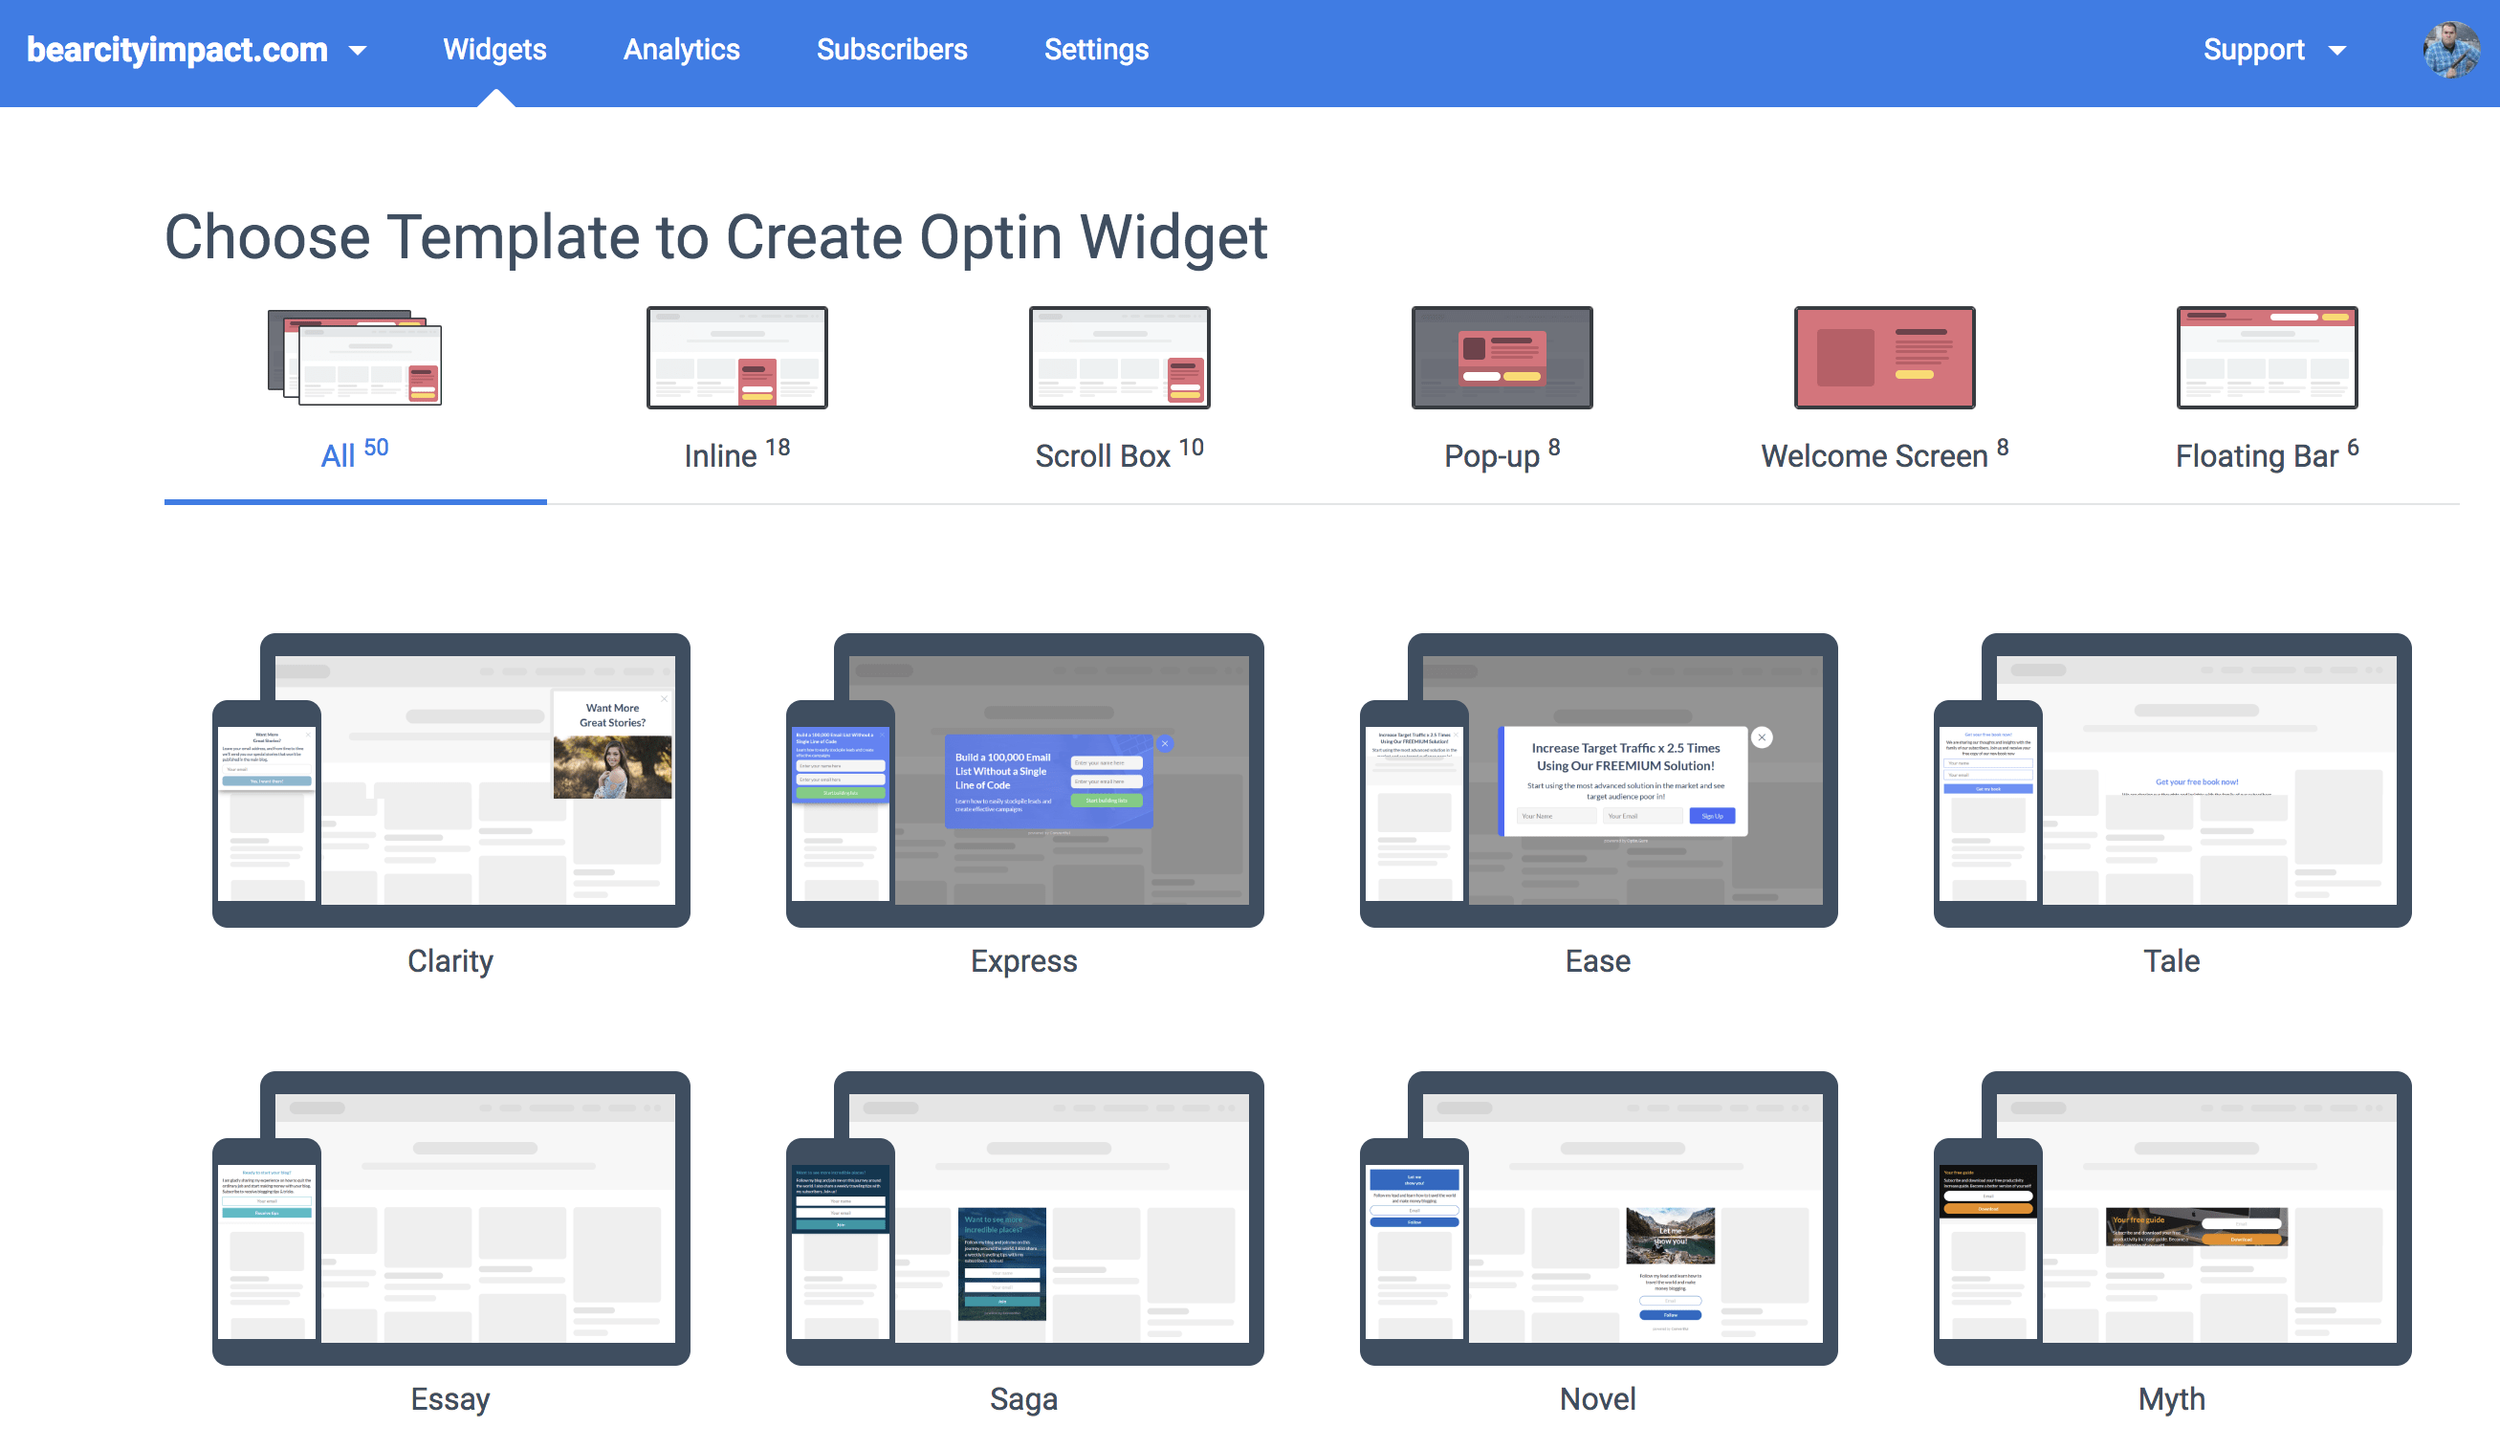
Choose your template as shown above
Currently there are 50 different templates across 5 different opt-in styles to choose from. Each of the styles can be used for capturing email addresses, but they each have their best case use.
1. Inline Widget
This will be place in line with the rest of your content, in a static position so to speak. When using this widget, it will always show, because you are manually injecting it into your desired content area. It’s best to use this in a sidebar of your blog, or as a strip below some content.

ConvertfulImage source:

ConvertfulImage source:
2. Scroll Box
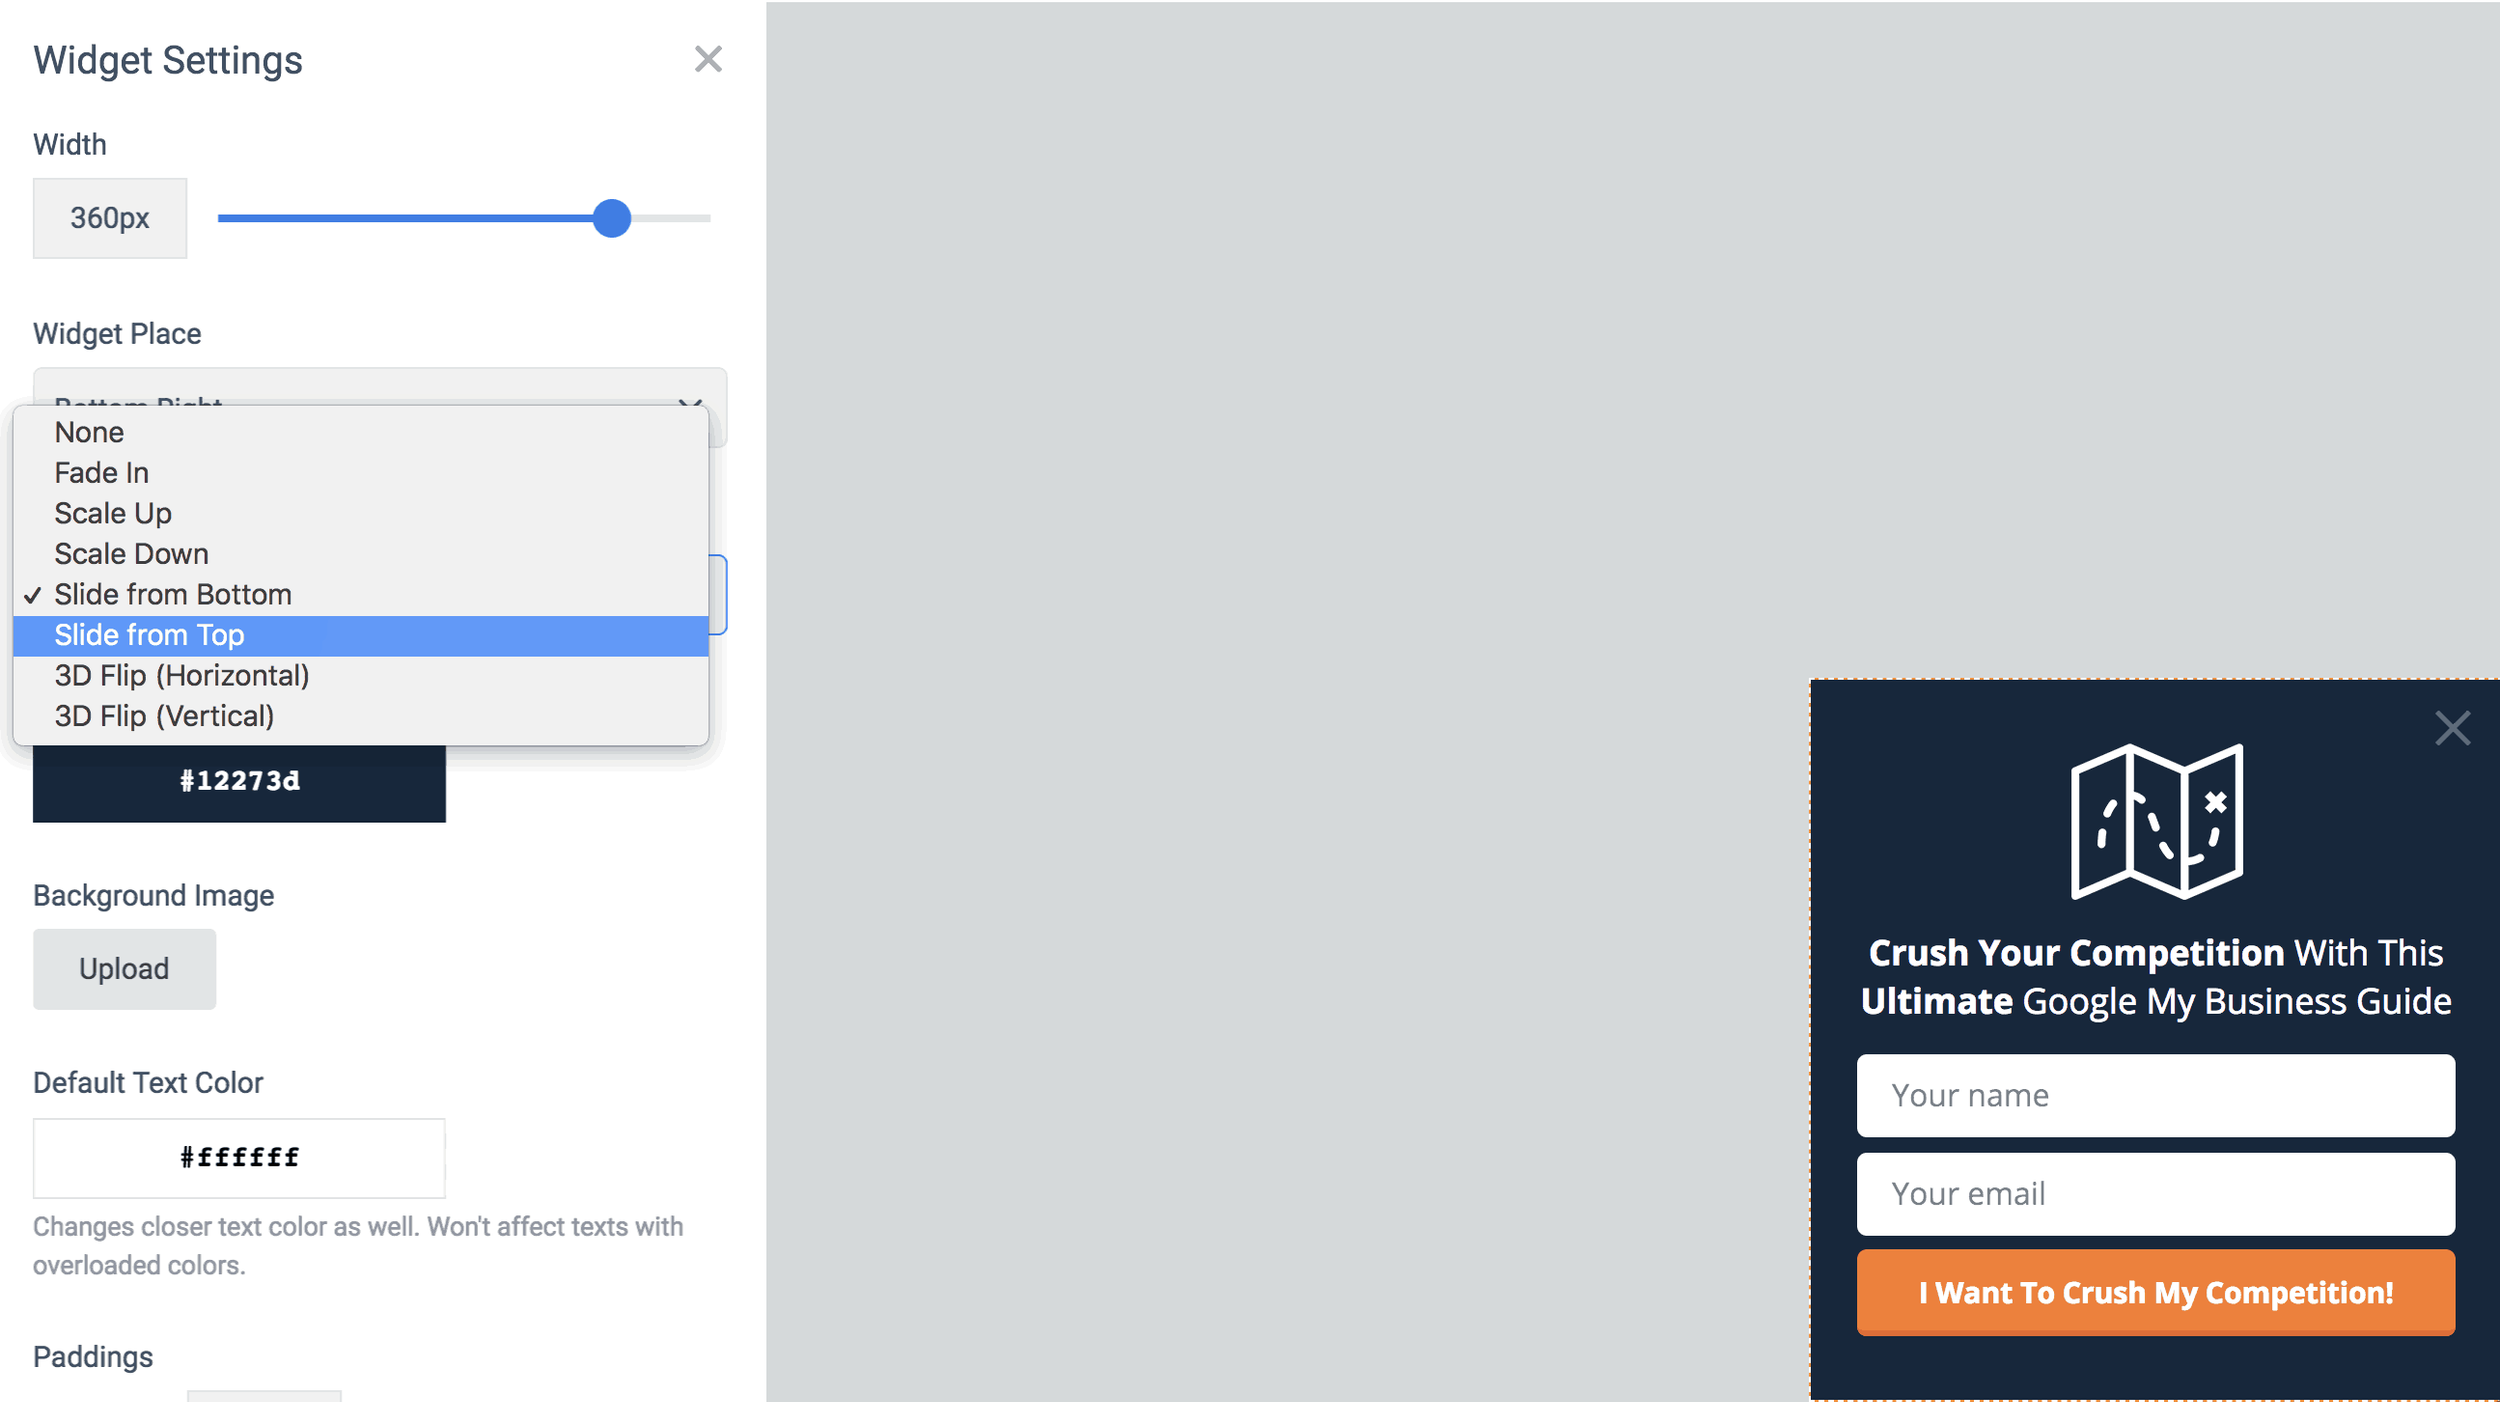
When using the scroll box, you’ll be able to control to whom and how this appears. Slide in from the bottom right is the default, but you can choose the position and the type of animation. Use this for any type of subscriber opt-in, from content upgrades, to growing your social audience, to offering discounts to first time visitors.

3. Popup
In general, this is the one that is most abused on websites. This is the one that immediately pops up in your face when you enter a website. (Keep reading the article for a MUCH better use of this and a MUCH more effective use) In either case how you use this, it will create a pop-up box. Use this type when you have a high impact offer that you’ll make irresistible to refuse.

4. Welcome Screen
Many have argued that the Welcome Screen is the most effective for capturing email addresses. The welcome screen has all of the same targeting and display options as the other opt-in widgets. The benefit is that it’s a full screen take-over. So, with the right messaging and call to action, it’s both impossible to miss and and to not opt-in.

5. Floating Bar
The floating bar is a strip that goes from edge to edge and can be positioned either at the top of the page or the bottom. Your choice. This is useful when used with short, persuasive copy, one single field of information and a submit button. This isn’t the place to ask for all sorts of information - we only want their email essentially.
The Floating Bar is also useful to use as a social media tool to increase your followers.
All of the widget types with the exception of the inline widget, can have display rules attached to them. So that means, the scroll box, pop-up, welcome screen, and floating bar can all be targeted by several different user behaviors.
3. Show your opt-in widget to targeted visitors
The power behind an app like Convertful is that you have very advanced targeting methods that are super simple to implement.
For instance, on the pop-up widget, stop showing that to people soon as they enter the website. It’s annoying. Google hates it by the way, especially on mobile. Your site is penalized if you show pop-ups to users if it’s within seconds of entering the page. Read it straight from the Google Webmaster Blog.
Here’s 3 better ways to use the pop-up widget.
Show it to people:
When they are about to leave
If they have scrolled a certain percentage down the page
If they click a specific button or link that you specify
Let’s break that down
1. When They Are About To Leave
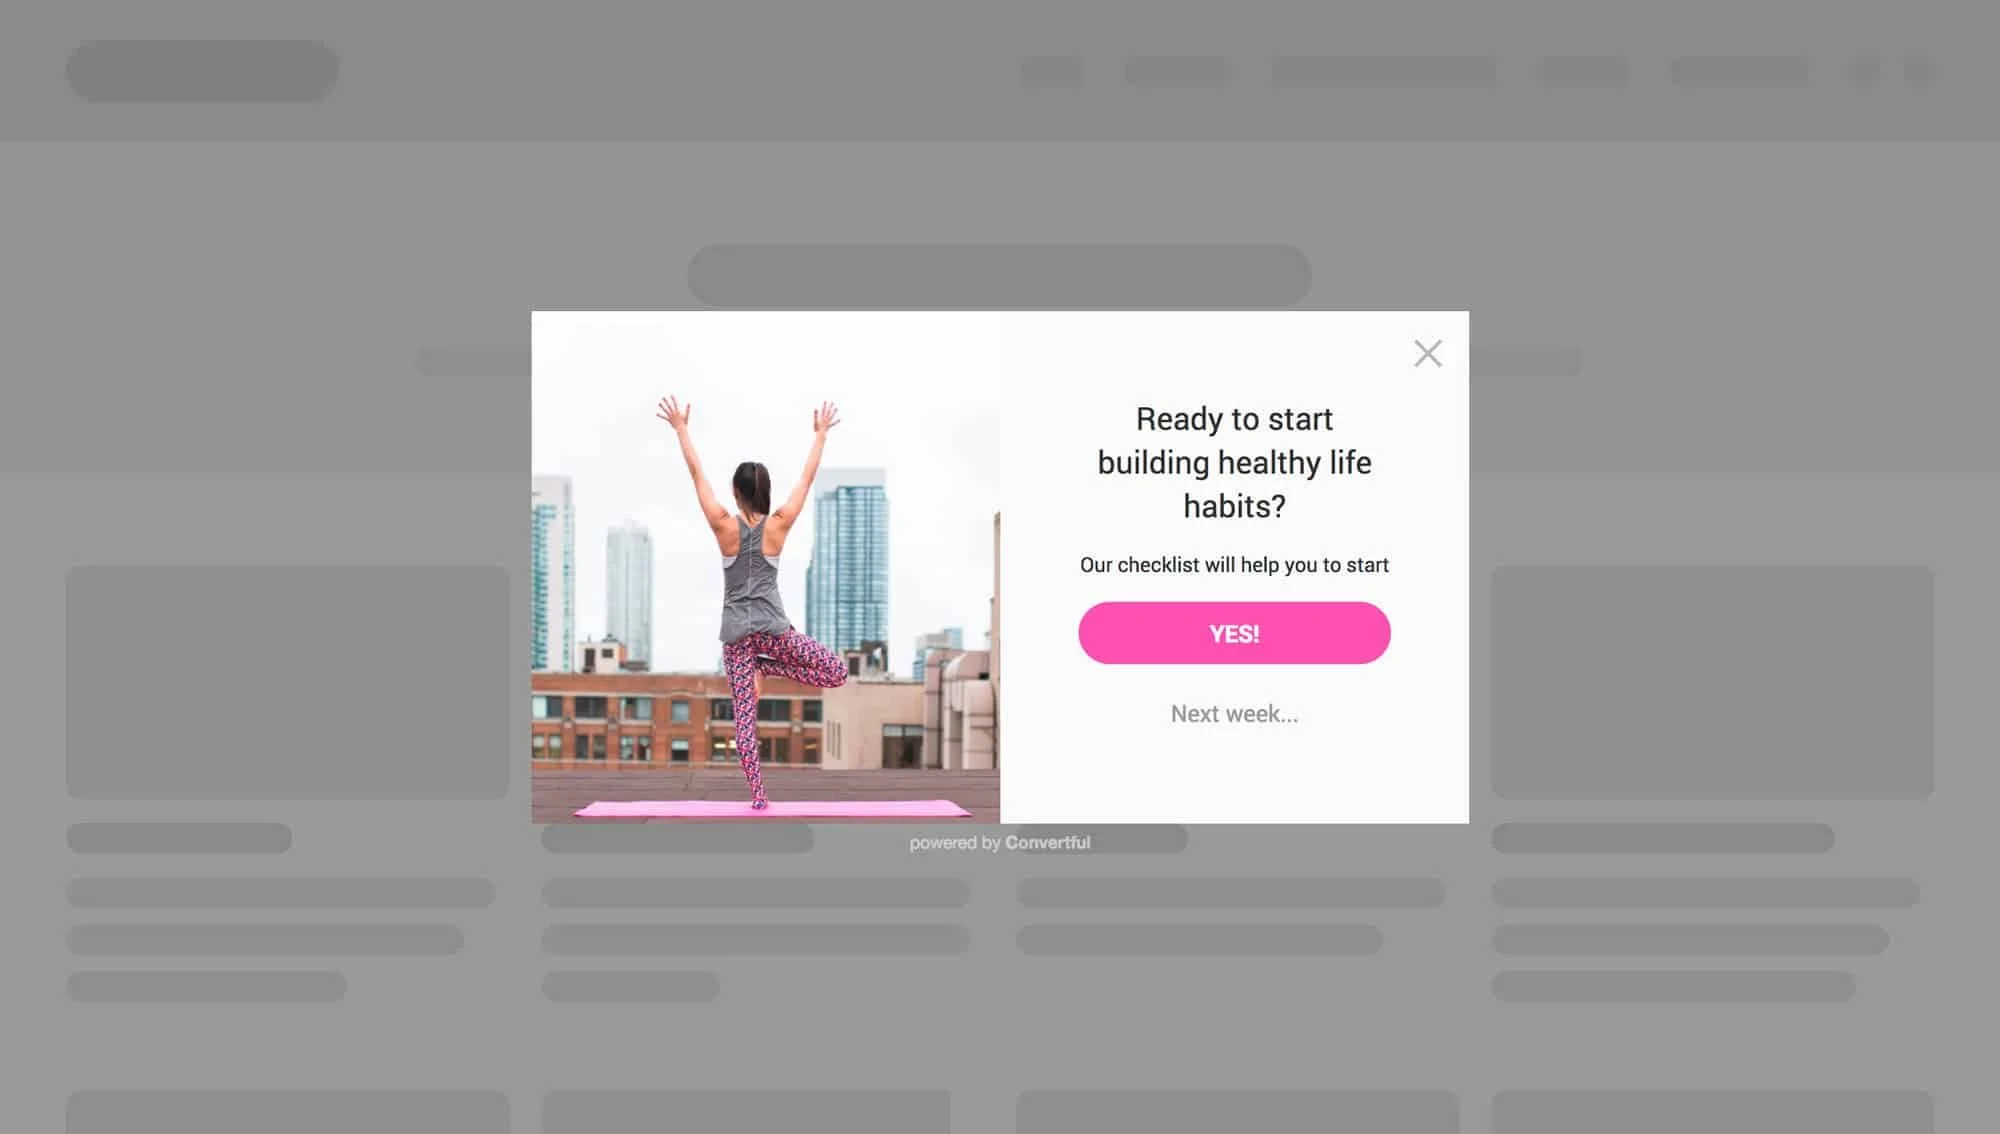
This is what we call the “last chance offer”. The app is so smart, it knows when a user is about to exit the website based on mouse movement and position. Soooooooo you’re about to hit that x-button to close the tab and then suddenly you are presented with an offer you cannot refuse. Well you can, but the copy is so good that you just have to say “Yes!”
You have to think about a few things here when using the “last chance offer”. Think of the exit intent. Were they just reading a blog article? Were they on your homepage and about to bounce? Were they viewing a service page and went to your contact page but then chickened out?
2. If they have scrolled a certain percentage down the page
This is highly effective for article pages, like this one! If someone is reading an article and they are presented with an offer while they are reading the opening paragraphs - That’s gonna be a no for me. If the reader is let’s say, 50% through the current article and they are presented with an offer that is relevant to the article they are reading, you have a much higher chance of converting that reader into a subscriber.
Now, you can take some guestimates as to how far into the article to place your widget, or you can scientifically know when to place it. We use HotJar to track article depth via their Heatmap tool. In short, HotJar records mouse clicks along your page but also will tell you the average read depth for a page. Take your most viewed articles and run them through a heatmap. If you see your top performing article people are exiting by the time they hit the 65% mark, then show them your opt-in widget at 60%, right before the average person leaves.
3. If they click a certain button or link on your page
This is another powerful targeting as the user is in 100% control of viewing the opt-in box.
It doesn’t matter if you are using a pop-up box, slide in, welcome screen or floating bar. In this scenario you are telling Convertful to only show the opt-in box IF the user clicks a certain link or button on your website.
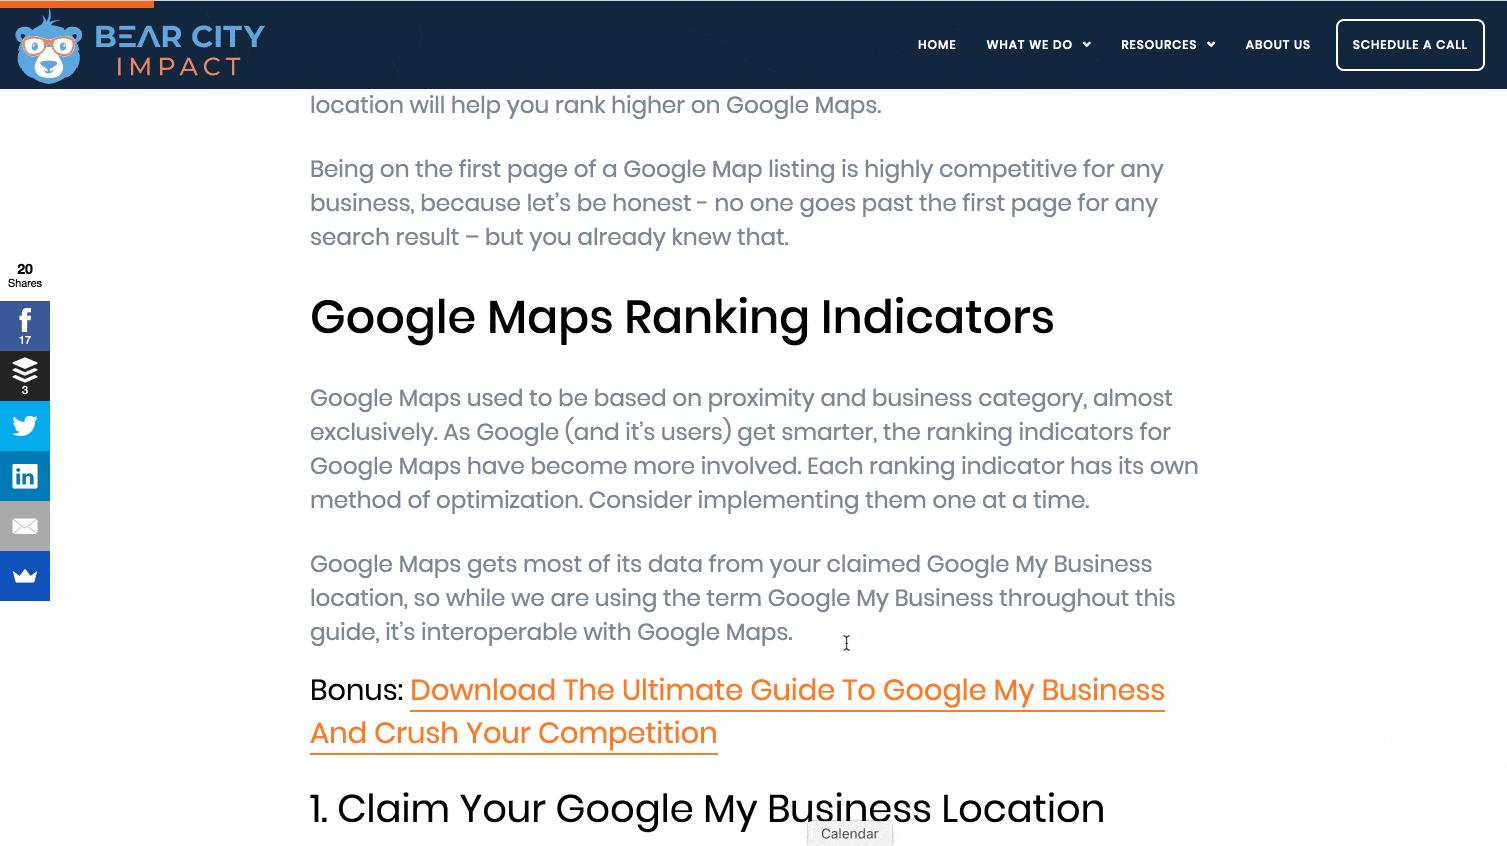
For instance, on our blog article 9 Tips To Rank #1 On Google Maps, we have a content upgrade to download a complete guide on using Google My Business. In order for this opt-in to be shown, you must click on the link: “Bonus: Download The Ultimate Guide To Google My Business And Crush Your Competition”.
Or, if you want to try it out right now, click this link and you'll see a pop-up appear.
4. Send your opt-in subscribers to your email service
Now that you have people opting into your email list, you’ll want to actually email them! Convertful makes it easy to send your subscribers to your email service provider of choice. They work with all of the major marketing providers such as Mailchimp, ActiveCampaign, HubSpot, and my new favorite, ConvertFox.
You’ll specify where to send the email data while you’re creating the widget. Just tab over to the “Success Actions” area, and choose your integration. Since this will likely be your first integration here, you’ll want to click on the “Add Integration” button, which will then pull up a list of supported 3rd party tools.
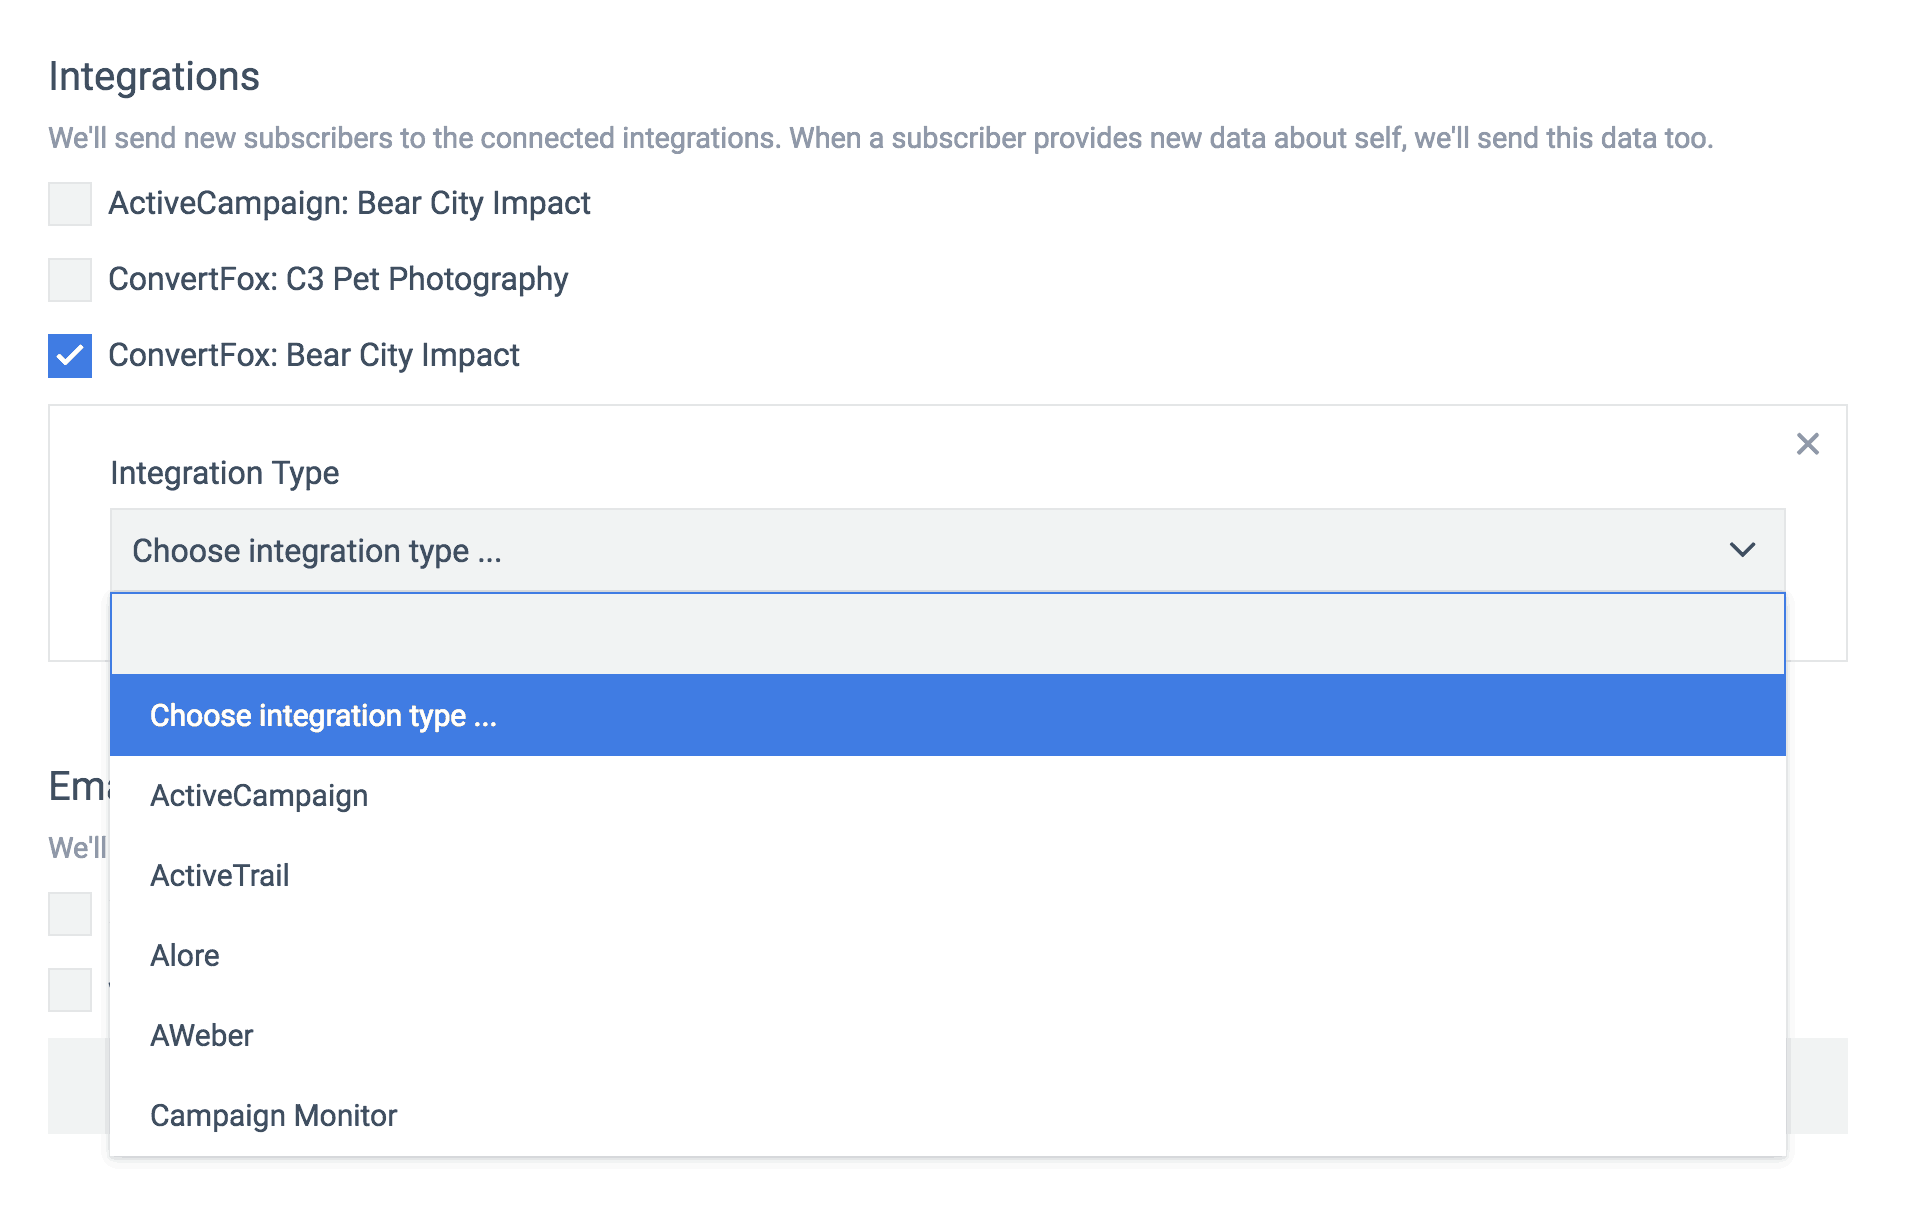
From this tab you can also set up notifications to your email, if you want to be notified everytime there is a new subscriber. Lastly, you have the option to redirect them to another URL or simply display the success message you might have created.
The option to redirect to another URL is useful for a couple of reasons.
The offer might have been to download a content upgrade, in which case you are placing the upgrade on a new webpage and also emailing it to them
You want to send them to a thank you page, for more information and/or tracking
Or, you want to send them to a tripwire page as part of your 5-step funnel system.
Combine Matching Conditions To Your Targeting
Since you are able to specify which pages you want the widget to appear on, you can choose advanced targeting methods to only show it if certain conditions are met.
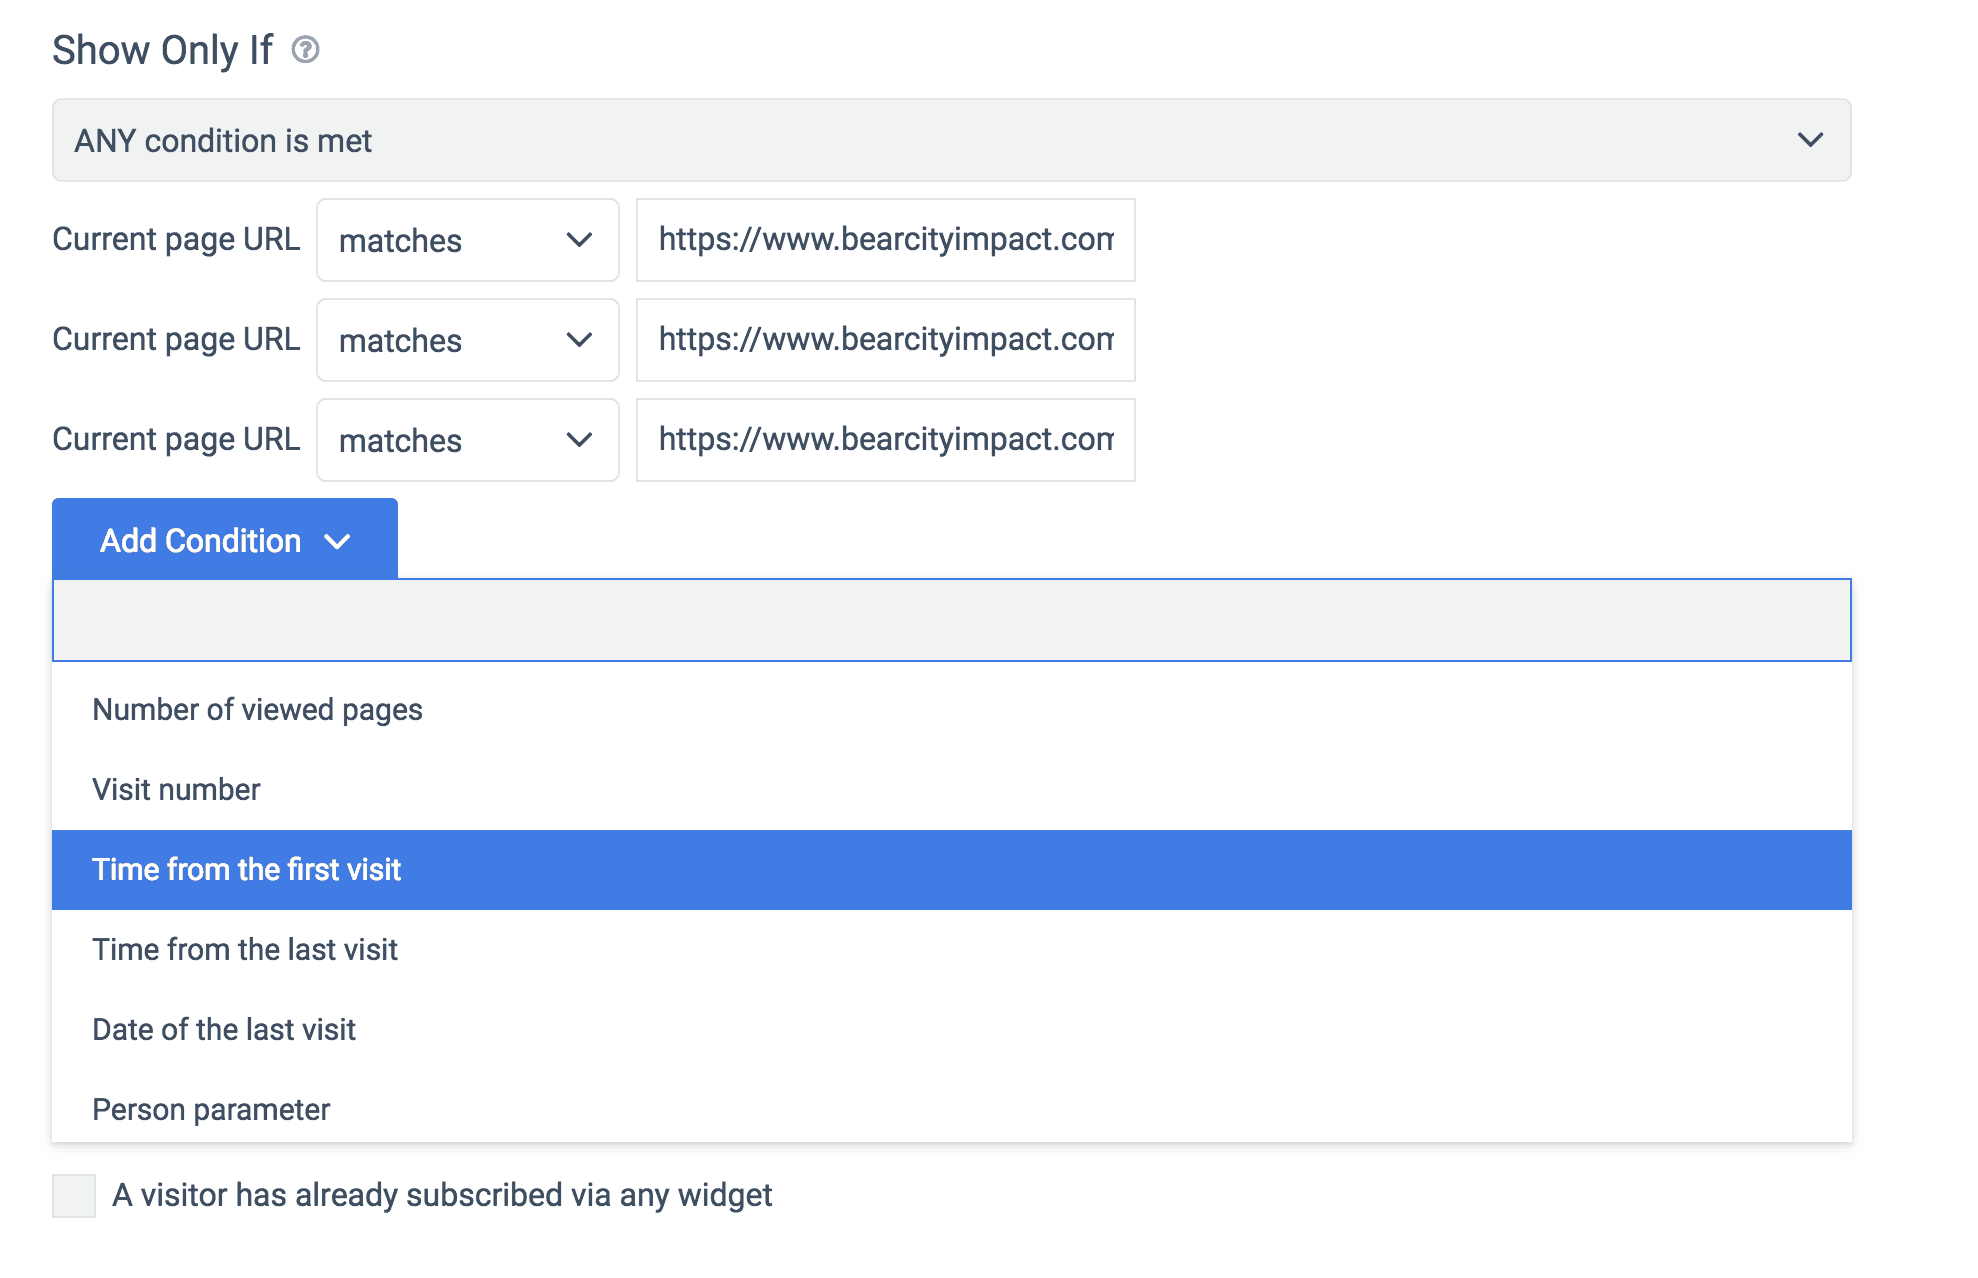
Here you can see we are telling Convertful to show this opt-in when a visitor intends to leave.
But we are adding the condition of time from the first visit. So here we would specify the amount of time we want the visitor to be on page to then trigger the intent to leave opt-in.
For example, if we set the time from first visit at 3 minutes, 30 seconds, and the visitor goes to that page and has only been on your site for 1:30, then it will not show the opt-in box, even when they are about to leave.

Lastly, you are able to exclude the opt-in box from showing based on several conditions as well.
For instance, the most important in my humble opinion, if any other floating widget it currently shown. This prevents having two different opt-in boxes from showing at the same time. I.e. a slide-in box and a pop-up box showing at once. Hello! Annoying!
Convertful has a good memory also, so if the person has already submitted their info within the past X-number of days, it won’t show it to them again until a time you specify, or if the person closed the offer box recently.
Get More Leads & Customers With Convertful
When you spend so much time getting traffic to your website, be it from social, paid ads, etc, you want to make those visits count. Using a powerful tool like Convertful will give your website it’s silent marketing partner. Combined with an irresistible offer, you can easily double or even triple the email signups you might be getting now.
Try out Convertful for free today.
Disclosure: Some of the links on this page are affiliate links. Meaning, at no additional cost to you, I will earn a commission if you click through and make a purchase.
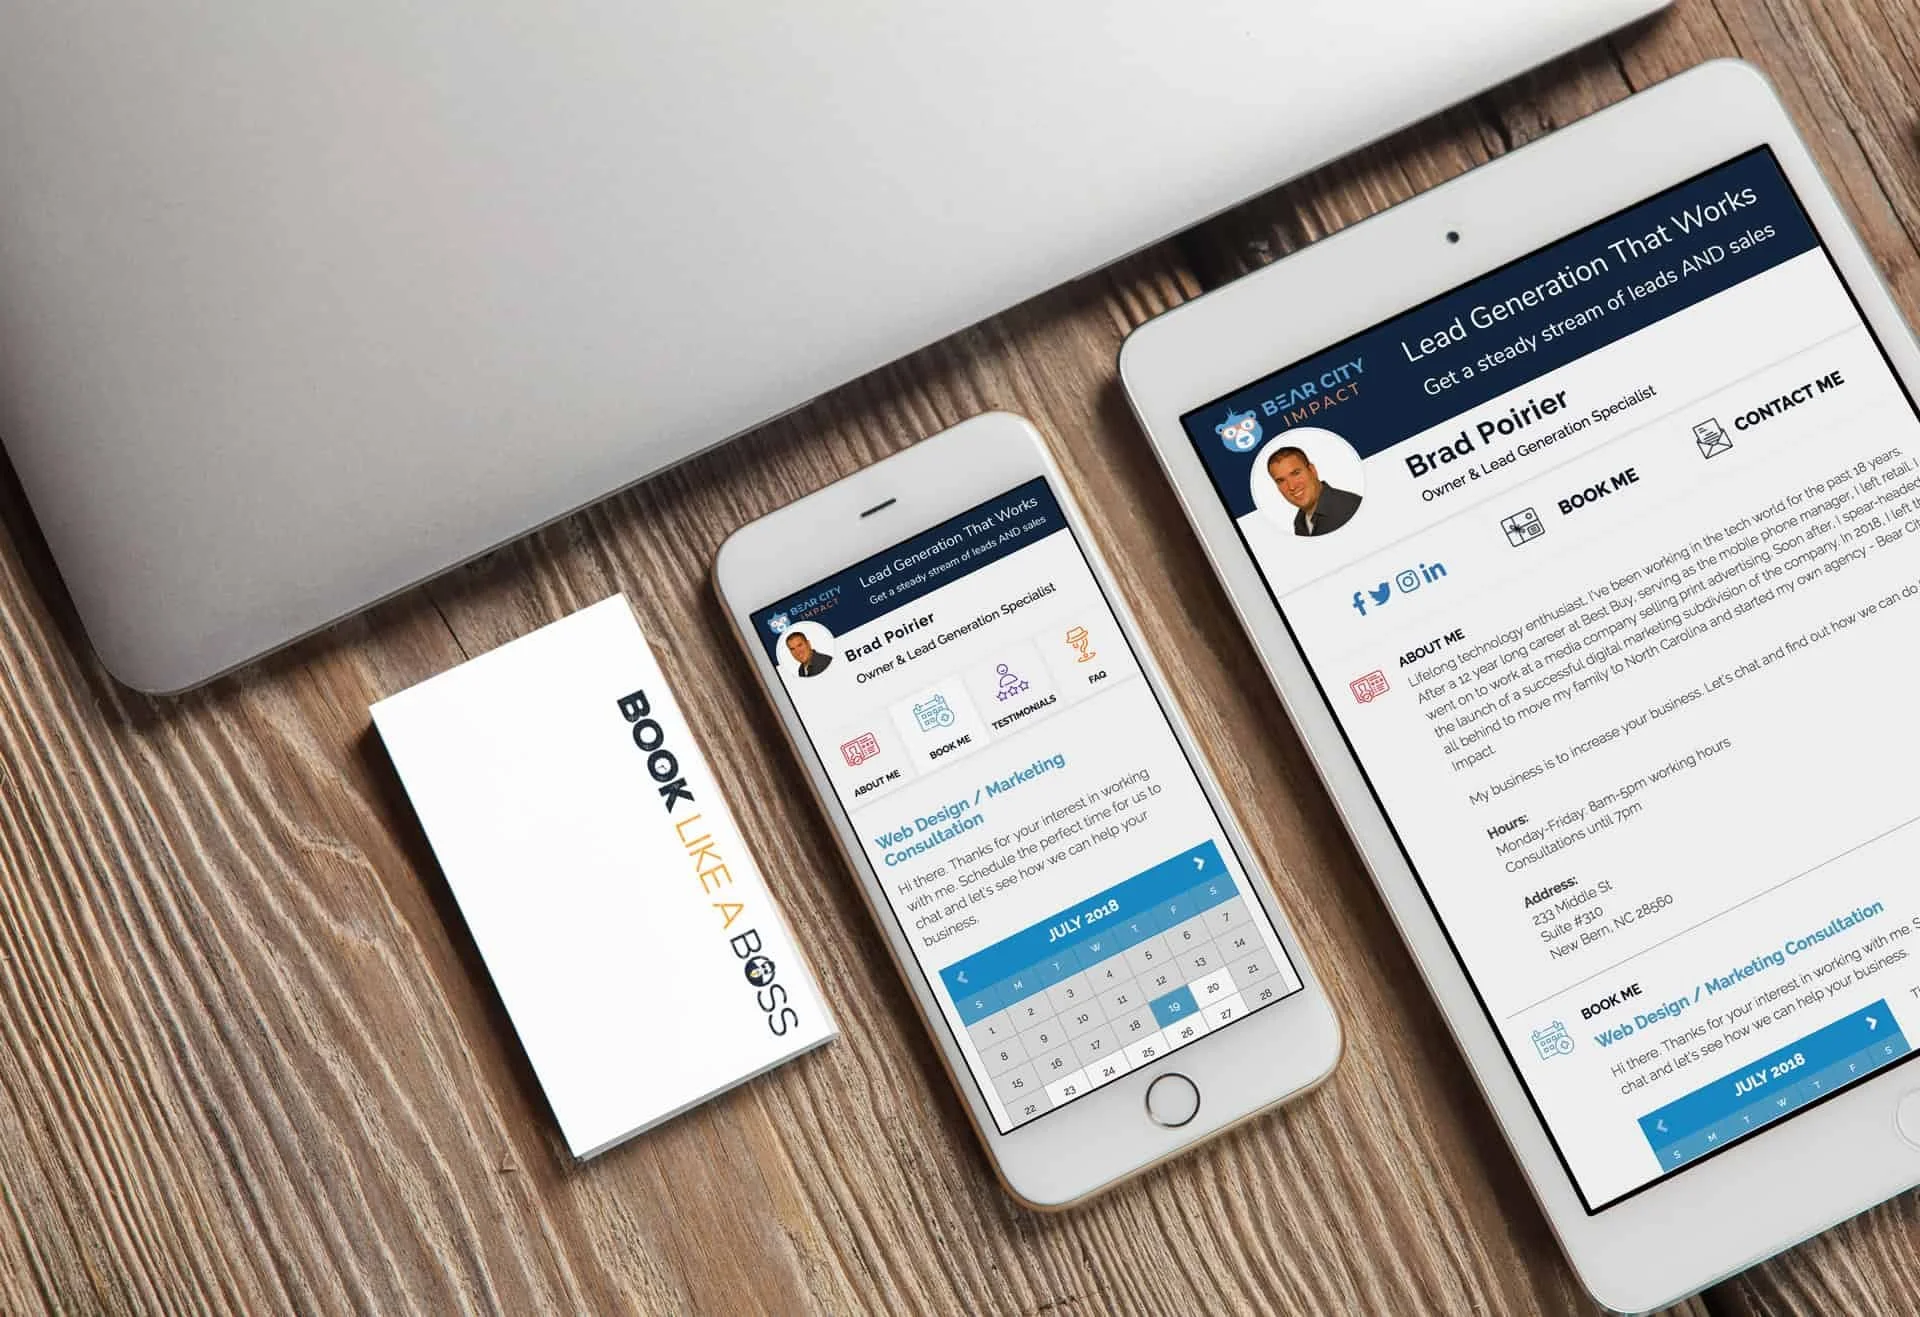
Book Appointments Like A Boss
If Rick Ross was in the service industry needing to take appointments, I’m 100% certain his scheduling app of choice would be: Book Like A Boss. Few things are more frustrating than the back and forth emailing and texting your clients trying to find a time that works for the both of you. Yuck. Meet: Book Like A Boss.
If Rick Ross was in the service industry needing to take appointments, I’m 100% certain his scheduling app of choice would be: Book Like A Boss.
Andddd if you don’t get the reference, here you are, you’re welcome.
Few things are more frustrating than the back and forth emailing and texting your clients trying to find a time that works for the both of you.
Not to mention, once you find that time, they have to reschedule and the fun starts all over again – and you still haven’t been paid for any of this!
Yuck.
If you haven’t been paying attention to the internet, I basically just described how client scheduling worked in 1999. Yes, as in when snake was still cool on your Nokia and gas was $1.20/gal.
It’s 2018 now. Get yourself a scheduling app or wreck yourself.
Book Like A Boss is all that and a bag of potato chips (smoky bbq flavor, mhmm)
So how can a scheduling platform help out kitchen designers? Book Like A Boss (BLAB) will make it significantly easier to take appointments. Oh, and you can set up several different appointments.
Think of your current workflow for taking in new potential clients:
Prospect visits your website
They go to your contact page and actually send you a message
You get this message at some point and call them back and email them
Takes a bit to get in touch with them
Finally you two schedule a time for them to visit your showroom for a consultation
They don’t show
You call them back and reschedule this
They finally come to your showroom
You find out they are a qualified customer and schedule an in-home measurement
The rest is $$$
Now, this is how it will work when you’re a boss and using online scheduling software:
Prospect visits your website
They go to your contact page and are presented with your calendar
They immediately find a time and day to visit your showroom, and they answer a couple of pre-qualifying questions
They get a reminder email about their visit and they actually show up
You find out they are qualified and schedule an in-home measurement
The rest is $$$
Boom. I just cut your sales cycle in half. LIKE. A. BOSS.
Yeah, let’s dig into this a little more.
Here’s what you’ll get with Book Like A Boss:
Calendar Integration – It connects to all of your calendars so that people can only book the times you are actually available. It works with Outlook, Gmail, Office 365 and iCloud.
Confirmation / Reminder Emails - They’re automatic too, soon as an appointment is made, your client will get a confirmation email. Then, a reminder email before the appointment.
Tracking - Connect your Google Analytics or Facebook Pixel to track progress and completion and retarget those that have not compelted a scheduling.
Support - Excellent support team and an active Facebook group with over 2,700 members to get success tips and help
Website Integration - Easily embed your booking page into your website. Skip the contact form. (Try it out here)

Those are the most important features in my humble opinion.
What if super easy client scheduling isn’t enough for you though?
What if you need to get paid for your service? (Greedy!)
You can do that too. With Book Like A Boss, you can get paid during the checkout process.
Do you charge for your in-home measurements? Just setup your service and assign a price to it, connect with either PayPal or Stripe and voila - you can get paid right when they book the appointment.
Hashtag MindBlown.
If this all sounds ridiculously easy, it actually is. Literally all you need to get started is to create an account, choose your page name, set up your available hours, list your services offered, and then BOOM - you’re good to go.
Optional fifth step is to add your payment options if you’re going to require payment to schedule any services.
I forgot to mention that… they have several plan options including a free forever plan.
It’s perfect if you’re just looking to explore what they offer and want to try out their scheduling platform.
The free forever plan includes:
Unlimited Appointments
Google Analytics
Facebook Pixel
Zapier Integrations
Want to learn more? Head over to their site with the link below and check out all of their plan options, including the free forever plan.
Or check out their intro video below.
Website to learn more: >> Book Like A Boss <<

How To Get Your Own Kitchen Remodeling Leads
If you’re a contractor or remodeler, generating leads can be a timely, costly and aggravating experience. Word of mouth and reputation can go a long way, but when the phone isn’t ringing like you need it to, harnessing the power of the internet to grow and position your company for long term success is critical.
If you’re a contractor or remodeler, generating leads can be a timely, costly and aggravating experience. Which is likely why you’ve ended up on this page in the first place.
Word of mouth and reputation can go a long way, but when the phone isn’t ringing like you need it to, harnessing the power of the internet to grow and position your company for long term success is critical.
Where to Start Getting More Remodeling Leads
One of the key problems faced by kitchen remodelers is knowing where to start with their online lead generation efforts. The internet is wrought with scammers, and full to the brim of shiny “new” and (allegedly) effective ways to make you millions.
Because of this, most kitchen remodeling business owners have a hard time discerning what methodologies represent the best use of time, energy, and hard earned dollars for their unique business.
Do you focus on your website, social media, search engines, or pay per click ads (PPC) like Google AdWords? You don’t have to do everything, but the best plan is usually a combination of the above, leveraging each to bolster the next with a holistic and well-rounded game plan.
Funnels
It’s not a great idea to pick a favorite child, but if online marketers did, it would probably be funnels. If that term is new to you, don’t worry. A funnel is essentially just a series of steps prospective customers take to find your business and take some sort of action leading up to a sale.
But just because you build a funnel doesn’t mean anyone will come to it. Below we’ve included a quick rundown of how the tools mentioned above can work together to “funnel” new remodeling leads to your business.
The Game Plan – How To Get Your OWN Remodeling Leads
Let’s say you want to generate kitchen remodeling leads. If you can just get prospects to call you, you know they’ll love what you have to offer, and will become satisfied customers for years to come.
But how do you get them into that funnel in the first place?
1. PPC – Pay Per Click Advertising
When someone is looking for kitchen remodeling, they usually start searching for contractors on Google. One way to get their attention is to use Google Ads, formerly known as Google AdWords.
Your ad will show up at the top or bottom of the search results page and, hopefully, get more attention than the regular results.
Pros – If you’re willing to pay a bit more, you can get results quickly and a treasure trove of data that can be used for other marketing channels like social ads and SEO
Cons – Some people ignore sponsored ads, and commonly searched keywords are very expensive to advertise. There may also be a testing period while the campaign is “fine-tuned”, during which you may experience a lower ROI, or even an initial loss.
How to make it work – Targeting and ad grouping is key. If you can target very specific keywords and demographics, the ad will be shown to people who search for those specific keywords in a geographic area that you service. Further segmenting this traffic into various demographics and interests will also help you find which type of visitor converts best.
Targeting and fine-tuning campaigns is imperative because you pay for every click, whether they buy from you or not. You don’t want unqualified or uninterested people to click your ads just because of a catchy headline only to realize the offer isn’t for them.
2. Social Media
Setting up social media pages for your business is another way to generate remodeling leads. It takes a little more time than advertising, but can be very cost effective and great for building a trusting and interactive relationship with your target audience.
It’s better to focus on one or two social media sites (like Facebook, Twitter, YouTube, or Pinterest) and build a solid presence rather than spreading yourself too thin trying to be on all of them.
Pros – A free or low-cost way to build your reputation and connect with clients. Most of your prospects are already on social media daily.
Cons – It can take a lot of time to build your presence enough for people to find you.
How to make it work – One great way to use social media is be providing helpful and valuable content. If you have insights on kitchen remodeling, you can create videos, how-to articles, or share pictures of recent projects or DIY suggestions. People love to share this type of information with friends, which can quickly spread your name and reputation if you play your cards right.
Another way to use social media is to ask your existing clients to review your business page or recommend you on social media. As you know, testimonials and reviews mean a lot in this business. Positive reviews on social media have extra power because they are shared with people your clients already know, boosting the credibility of the reviews.
3. Your Website and SEO
Your website is a powerful tool for reaching new clients, as well as growing your relationship with current clients. In fact, your website is likely your best performing employee, and you don’t even give it a raise.
Your company site is a 24/7/365 digital representation of a physical store and showroom. It is your sales team, helping to convert new visitors into paying customers, as well as your customer support staff, answering questions by providing information to those that need it.
But gone are the days when slapping a website up was a guarantee that traffic will appear from the ether. With competition as fierce as ever, the “if you build it they will come” mentality just won’t cut it.
Unlike social media or paid ads, people don’t run across your website during the course of their normal day to day activities online. Rather they generally find service sites like yours with a “Google search”. And if you’re not ranking on page one, you’re missing out on the 97% of web traffic that never bothers to click past the first page.
The simplest way to grow traffic to your website is to tell everyone about it. Print the URL of your site on your business cards and at the bottom of all your marketing materials. Put it on invoices and receipts, so your current customers can check it out. Place a link to your site on your social media pages and anywhere else you can think of.
But the most effective way to bolster your website’s online visibility and ranking is by employing a search engine optimization (SEO) strategy that focuses on website optimization as well as high quality link building and content.
Putting it All Together
Here’s where the rubber meets the road and you really start making progress.
By effectively employing the above tactics, either in part or as a whole, you can leverage the power of the internet to drive more remodeling leads faster than ever before.
Remember the sales funnels from earlier? At the very top of the funnel, you’ll bring a fairly wide group of people into your world. Sharing great content on social media is one way to do that. People see the value you offer and even share it with friends.
Paid ads are another way to get your business in front of people who aren’t already in your circle. In either case, you don’t want to go TOO wide with the funnel, so make sure your ads and content are relevant to the ideal client you want to attract. This is especially true with ads, where you will pay for the traffic whether they are a good fit or not.
Next, you can bring those remodeling leads further down your funnel and closer to becoming customers by getting them to your website. With ads, this is as simple as linking them to the appropriate page on your site when they click the ad. With social media content, you can provide a link to more information or start a story on social and let them click to finish it on your website.
The final stretch of this basic funnel is to make sure your website contains all the info they need (in the most compelling language possible) to convince them to do business with you. This is where can sell your services, and what makes you the best choice for their remodel, without spraying sales pitches all over people who haven’t yet shown an interest. By the time your readers are on your website, they are more likely to be receptive, interested prospects who are seriously seeking the best contractor.
Not Sure Where to Start? – We can help
Our agency has helped countless kitchen remodeling companies just like yours drive more traffic, generate more leads, and boost sales and revenue month after month, often for a fraction of what you’re spending on “traditional” marketing methods.
Give us a call today for a free consult to learn how we can help. We’d love to hear from you.

Best Ways to Get Your Own Construction Leads (Updated 2020)
Business in today’s economy is a cutthroat and competitive landscape. While marketing and lead generations come and go, with some tactics employed by entrepreneurs ranging from laughable to downright outrageous, one thing is a certain fact: no business can survive without a steady stream of qualified construction leads flowing in daily.
The average consumer today is nothing like who they were just 10 years ago.
They want to feel connected with the brands they shop with.
This means they want you to share the same values, desires for the future and solving problems that mean something to their everyday well being.
This is the direction of marketing you need to be heading in if you want to gain qualified construction leads that understand and like what you do.
You don’t need to reinvent the wheel, but you need to reinvent your narrative as the world changes around you. This is perhaps why content marketing has become the focal point for millions of business owners.
Changing with the times means you have longevity, i.e. staying relevant in whatever kind of consumer climate you’re in.
Never forget those who have been loyal to you, and produce content that will show them how you have advanced and improved your services and products for them too.
Importance Of Lead Generation For Construction Businesses
Leads are the oxygen your business breathes.
As more and more people enter into the middle-class, the world will begin to see millions of micro and small business owners.
Without a constant stream of new customers such as these, you won’t stand a chance against the competition.
They want to see what kind of offices, warehouses, retail stores, high-rise buildings and event halls you are creating.
They want to see with their own eyes, what kind of materials, styles, designs and interiors you create from scratch.
But only if they click on your content, read your story and watch you at work, will you convert your leads.
Leads are the oxygen your business breathes.
Construction Lead Generation – The Correct Approach
Say it with me now, “content is king”. This is a term that was used sort of a funny joke in the early 2000s. But sweet heaven above! Now it's like a battle cry or a mantra you must chant in your sleep every night! Well, okay, perhaps not that serious. However, you have to realize that consumers are no longer falling for clickbait, what they want is emotional marketing. They want to feel as if the products and services they use, matter in their lives; more than just pleasure, they want to feel a part of the growing world.
Let’s Have A Look At The Best Ways To Generate Construction Leads:
Blog Posts
Business blogs have become part of consumers’ daily lives.
They read them as frequently as you used to with a newspaper.
This means that the average customer who knows who you are will read your blog posts once a week at least. This could be at home just browsing before sitting down for dinner, it could be on the train heading into work or even as a dedicated read because you’ve just released some jaw-dropping news.
The best part of blogs is, they drive completely organic traffic to your website and can be from SERPs and social media.
On the other hand, you have new consumers who are not quite sure what you do. They should be seen as a juicy lamb to a wolf.
All they want to know is, how on earth will your products and services make their lives better?
If you’re wondering how to get construction leads, write fun posts about how your products have been used in the past, what your desires are for the future
For example, how people will use your products and services and how you intend to design them in the future.
Be honest, talk about the troubles you’re having when making or improving products. Consumers are very understanding and just like a rambunctious puppy, they wag their tail when you show them more about things that are normally ‘behind-the-scenes’.
Helpful Videos
Video content is by far the most popular of all the contents. Why? Well, it's kind of like audiobooks, why read something when it can speak to you?
This is why you need to have videos on your landing pages and homepage, to show customers exactly what you do.
On your services page, you need to have short videos, preferably around 1 minute or so, that show what it is you do.
Cover the process from start to finish
How do you plan things
How do you design things
How do you then set about achieving them, etc.
YouTube is the obvious platform where you should be uploading but also, using your 5-second to 15-second ads to drive leads from the traffic. Post your video content on your social media pages and watch direct messages from your accounts come rushing in.
Podcasting
One of the most underrated techniques for how to get construction leads. Podcasting shares the same value as blogs.
Everyone thought they were going away and that they were just a fad from the 90s. Wrong!
Now, a podcast is one of the best ways to become an industry authority. People listen to podcasts to chill out, listen on the way to work or just while they’re doing their laundry and ironing.
They are, however, nice relaxing places where you build a rapport with your customers by talking about fascinating insider-details about the industry you work in.
You should bring guests on to talk about their experiences in the same field you work in and have a genuinely interesting conversation.
It also gives you a chance to inject your personality into the content, which consumers love!
Photography
Photos are used even to this day but they have to be high-quality. With commercial photography, you’re trying to showcase your products in great detail, from all angles and show the customer what they would be getting. It also gives them a chance to see the dimensions, colors and style of what you produce. Higher quality images are shared more often on Instagram, than low-quality blurry embarrassments.
Remember, content is king. Don’t be afraid to be quirky, show your personality, talk honestly about the troubles and challenges you face in your business, but also, inspire your customers to be hopeful about the future with great blog, podcast and video content.

4 Ways To Master Instagram For Your Remodeling Business
As with any social media network, Instagram is about connecting people. In the case of Instagram, it’s about connecting people with pictures. So how can a home remodeler connect with Instagram users? In short, tell a visual story.
With the reach of Facebook consistently going down, home remodelers have been turning to Instagram to up their social media game. It’s no surprise, wIth over 800 million daily active users, Instagram has become the go-to photo sharing platform for all ages.
As with any social media network, Instagram is about connecting people. In the case of Instagram, it’s about connecting people with pictures. So how can a home remodeler connect with Instagram users? In short, tell a visual story.
There are several ways you can use Instagram, including the recent addition of IGTV, Instagram’s newest feature aimed at longer length video content. Here are specific ways you can use right now to master Instagram and get more remodeling leads.
What Types of Instagram Content Can I Create
Instagram Posts
First and foremost, you must post to Instagram, regularly. How often should you post to Instagram? As often as possible. This can be daily, or multiple times per day. Each post has a certain life span. There are over 95 million photos and videos posted per day on Instagram. So, chances are that a photo you post today, will reach its lifespan by the end of the day. Get into a rhythm of posting at least once per day.
Try to keep a consistent look and feel for what you are posting. Feel free to mix up the types of posts as well, but stick to a rhythm. Think like a magazine publisher. If a magazine were to publish different style editorial every month, people wouldn’t read it. People like reading a certain publication because they’ll know what to expect next.
When building a following on Instagram, keep within a particular style. This way, your followers will be in anticipation of your next post. They’ll know what to be expecting.
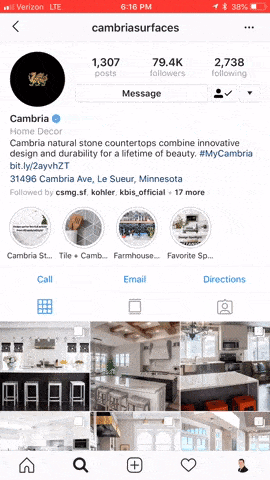
@Cambria has a consistent visual style to their posts
Instagram Stories
In August 2016, Instagram released their stories function, taking a stab at the popular Snapchat platform. SInce its inception, over 300 million people are using Instagram Stories every day. 70% of those folks watch with the sound on. Instagram is constantly adding new features to Stories. Back in May 2018 you now can natively take an Instagram post and reshare to your Story.
Normally stories only last for 24 hours and then they disappear. You can, however, setup Highlights which saves the story to your specified highlight for as long as you want it to stay there. You can create as many highlights as you want, and save as many stories to each highlight as you want.
Think of highlights as blog categories. You can create a separate highlight for bathrooms, kitchens, accessories, and perhaps one called showroom. In each of these highlights, you’ll want to save your best Instagram Stories that relate to that highlight, or rather, category.
Highlights are accessible at any time to your followers and potential followers, until you delete them. Between posts and stories and story highlights, you can just about create your entire website from just Instagram. Though for obvious reasons, we don’t recommend it. You get the point of its power though.
You can add to your story one of two ways. One option is to go to your profile and tap your profile picture to add a new story. Note, this only works if you currently have no active stories. So the best way to add any new content to your story is by going to the home screen, then swiping left to open up the story composer. Just snap a pic, record a video, or use existing media on your device to add to the story.
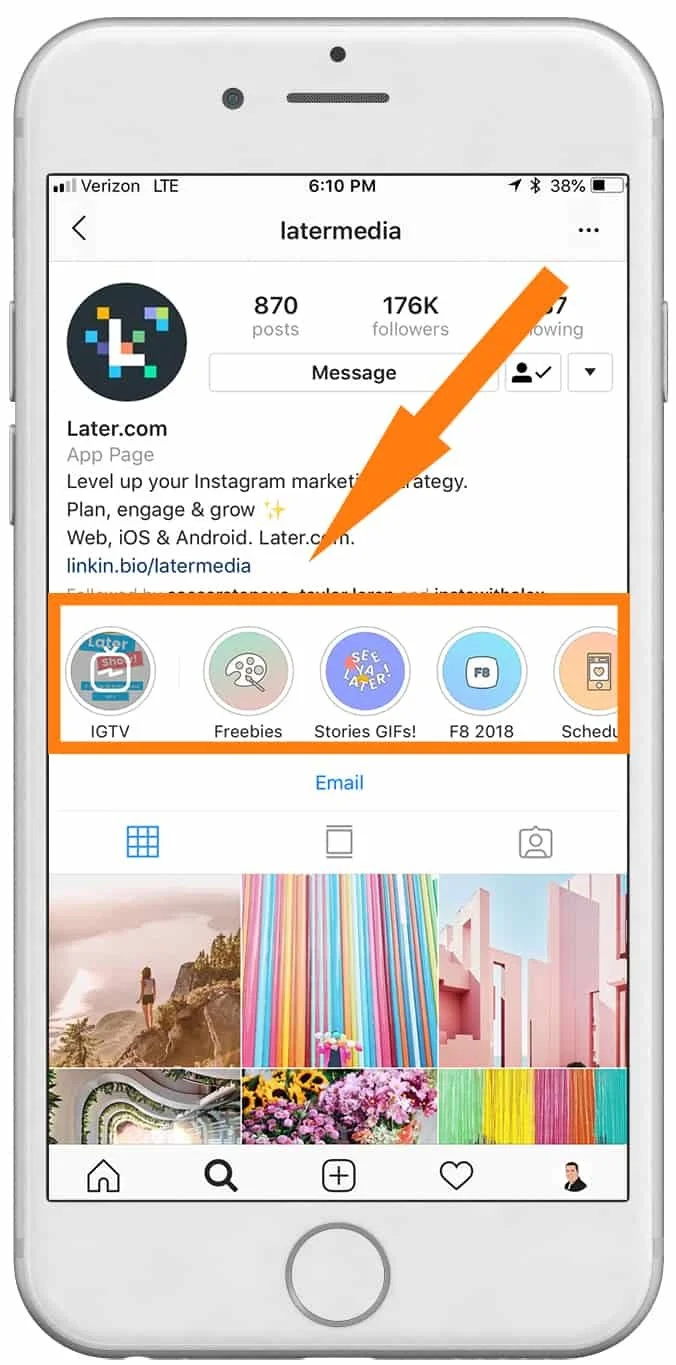
@latermedia Instagram Stories & Highlights
👉 BONUS: Get more strategies like this straight to your inbox each week. 👈
Instagram Bio
You only get one chance to make a great first impression. Think of your Instagram Bio as your company’s about us page on your website. Except, you have a limited amount of space available to you. Right now, Instagram gives you 150 characters to work with in your bio. That’s less than a twitter post so get crafty.
Here’s a nifty Instagram Bio hack for you, two actually. You can (now) insert #hashtags into your bio. So now, your entire account becomes more discoverable when users are browsing or following their favorite hashtag.
The second hack is in your name. Your name is the only thing that is searchable on Instagram, besides your actual @userrname. Your Instagram display name can have up to 30 symbols, including emojis and punctuation. Consider placing your number keyword in your display name. For instance you might put something like: “Company - Kitchen Remodeling”. That’s a total of 28 characters right there, so if your actual business name is longer than 7-9 characters, you’ll want to consider removing extra spaces or coming up with a different keyword.
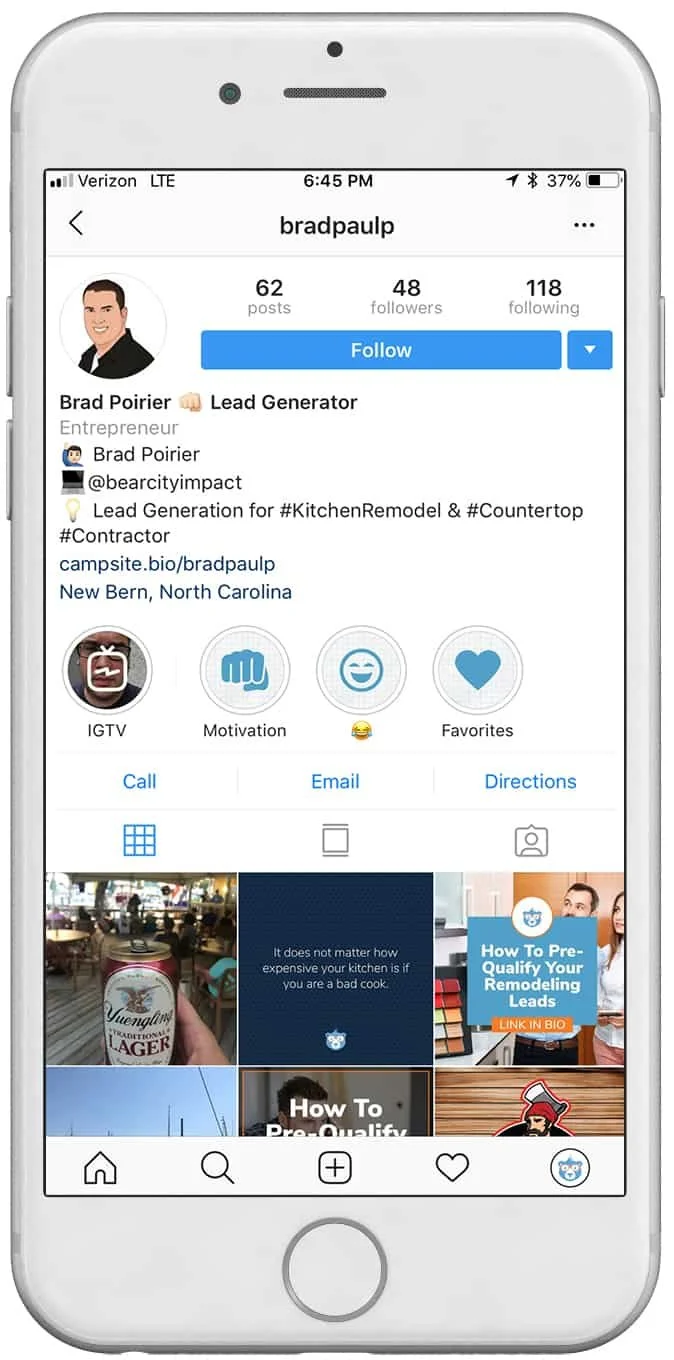
Instagram Bio Hacks - @bradpaulp
New: IGTV aka Instagram TV

On June 20th, Instagram changed the world of online media once again. They released IGTV. IGTV is aimed at content creators who want to upload videos longer than the current 60 second restriction on posts and the current 7 second limit on stories.
Of major importance to know: It’s vertical or bust for IGTV. Instagram is doubling down on vertical oriented video with IGTV. Videos can be anywhere from 10 seconds to 10 minutes in length, but the company is rumored to increase the maximum length in the future.
When a user first “turns on” their IGTV by tapping the IGTV icon in the upper right of their news feed, it starts off with a blank static screen, much like turning on an old television set before it was tuned to a station. As with any new feature, Instagram is going to heavily promote new content uploaded to IGTV. In fact, if an account you follow uploads a new video to IGTV, you’ll get a subtle alert in your news feed.
You can get started with IGTV one of two ways. Instagram has developed a completely separate app for IGTV, which is a free download on your app store. When you open the IGTV app, it will already know who you are based on your login with the Instagram app. From there, you will need to create your “channel”. A channel is simply your TV feed. Each time you upload a new video, it’s like a new episode to your channel.
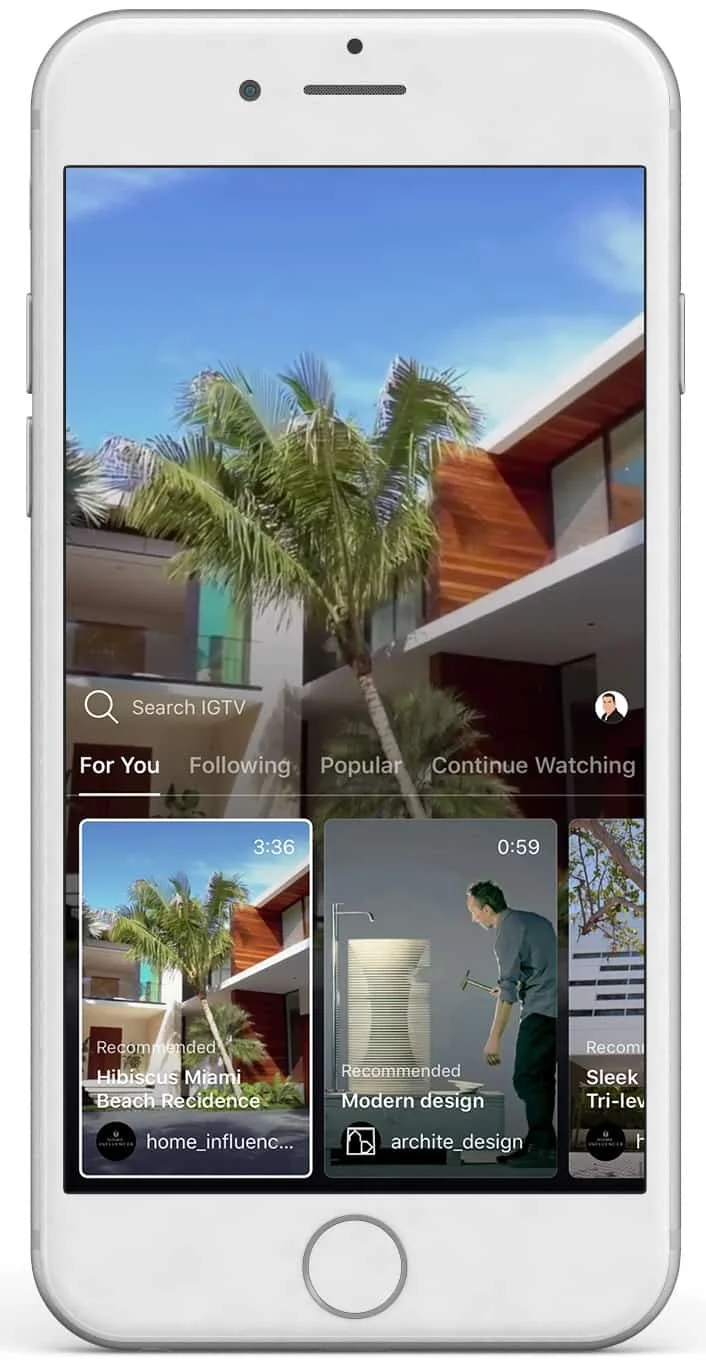
New IGTV by Instagram
Creating content for Instagram isn’t hard, it’s barely even time consuming. Considering the fact that you can snap, upload, and go – there’s no excuses. At minimum you should be optimizing your Instagram bio for your keywords and hashtags. If you want to master Instagram for your remodeling business, try working on each of the other three areas week by week. Get into a regular rhythm of posting content daily. Next, work on your stories content. Finally, dive into IGTV and explore the possibilities.
Want to learn about our upcoming article on How To Use Instagram Like A Boss? Click here to get an email alert when it’s published.

How To Pre-Qualify Your Remodeling Leads
When you focus your sales and marketing to qualify your leads that fit your expertise and availability, you’ll have better clients and better projects.
Question: Clicks or Customers?
What I’m asking is, do you want clicks or do you want customers?
If all you want is clicks, Google and Facebook are plenty happy to send thousands of clicks your way – you just have to whip out your wallet.
If customers are more your style, then lend me your ear for a second.
Here’s what a typical journey your remodeling prospect should be taking:
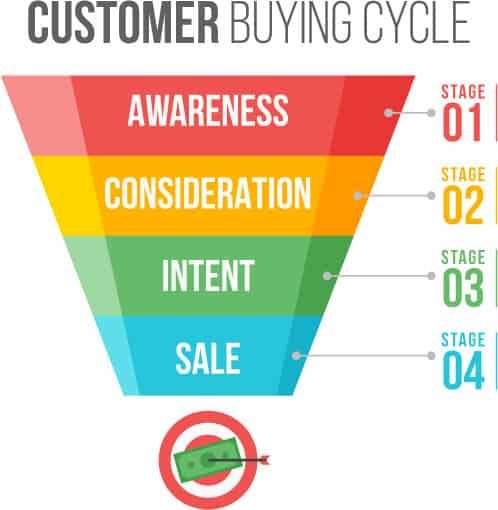
Awareness
Consideration
Intent
Purchase
Let’s break that down in real world terms
Person does a Google search for remodeling contractors
They come across your website
They contact you for more information
They contract you for their project
In a perfect world, those four steps would happen quickly and successively. But they don’t.
There’s a couple of steps in between 3 and 4, they are:
(3. They contact you for more information)
3a. You get in touch with your new lead
3b. You ask a few questions to see if you are a good match for them
3c. You go out for an estimate
3d. They kick the tires around for a bit
3e. They get other quotes
This isn’t all doom and gloom. It’s just a part of the buying process today. Even with a referral, people are still going to shop you.
What you need is a pre-qualification process. You need a way to make sure that every new lead coming to you is already pre-qualified.
Otherwise, you’re paying a lot for tire kickers. (Sorry Angie)
And, you’ll be spending (wasting) a lot of time going out giving estimates for leads that aren’t qualified for your skill level.
Here’s how to get your leads pre-qualified:
👉 BONUS: Get more strategies like this straight to your inbox each week. 👈
Start the pre-qualification process in the contact form on your website
While you don’t want to ask 15 questions to a website visitor, you do want to make sure you ask short, pointed questions.
To save room on your lead form, combine first / last name with just one field of Name. Also, don’t ask for their address yet.
Use a multi-step contact form. This way you can get micro-conversions. Micro-conversions are short steps a customer takes to get in touch with you. Not only does this boost your website conversion rate, but it actually helps pre-qualify your customer.
Your multi-step contact form can be just two or three steps. On the first step, ask a very easy, simple question. It doesn’t have to even be qualifying related.
For instance, ask:
“What’s your zip code?”
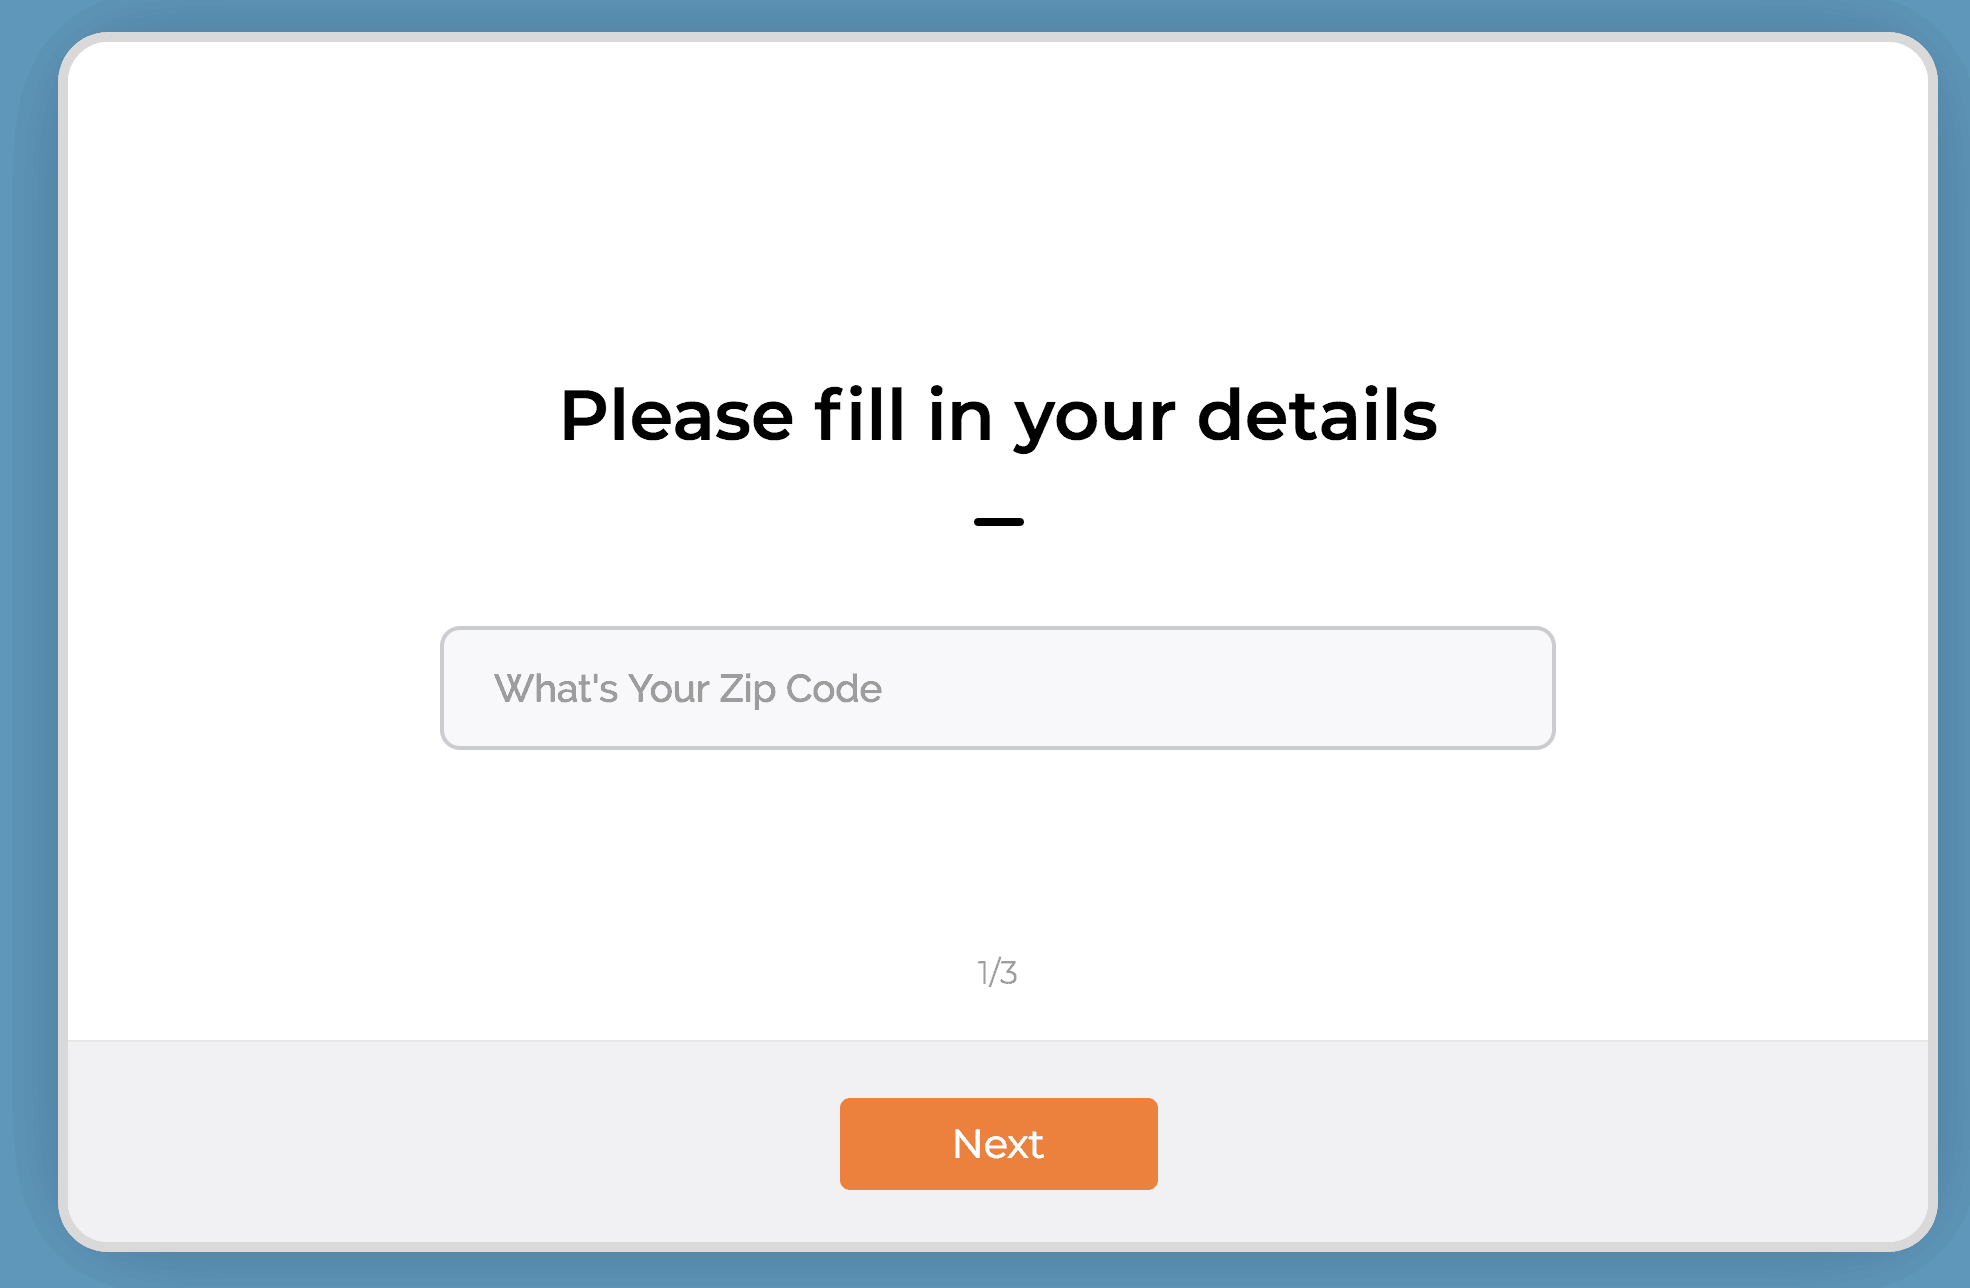
Now, does it really matter what zip code they are in? Within reason of course and your coverage area. But likely, you’re going to work in their zip code. So why ask this?
Micro-conversion. When they type in their zip code and hit “Next” - you just pulled a micro-conversion. For the win!
Now there is a higher likelihood of them completing the rest of the form and becoming more qualified.
The second question can be a little more pointed. Try this:
“What TV personality inspires you the most”.
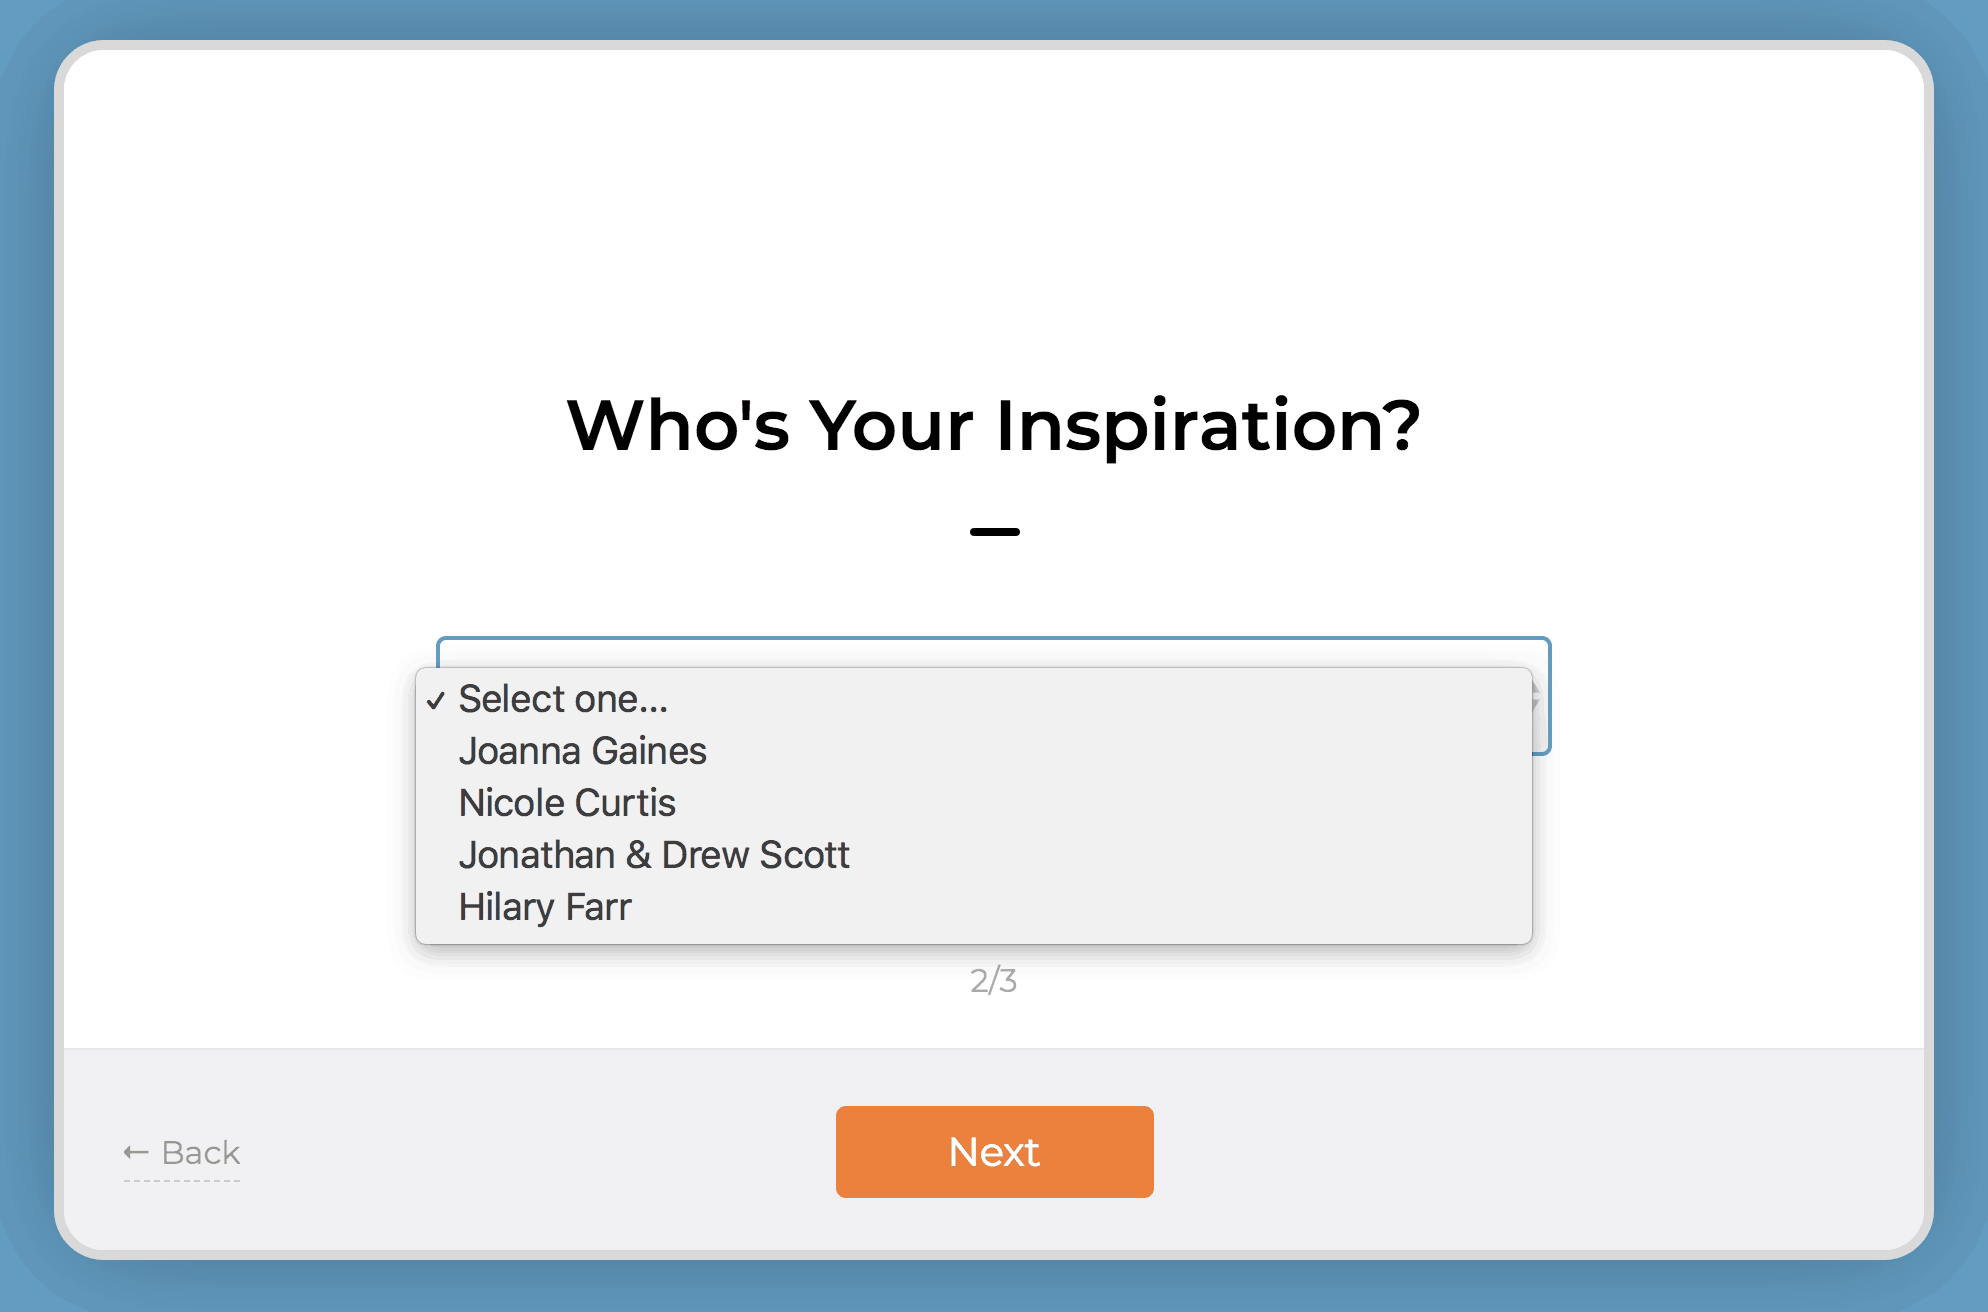
Use a dropdown box and fill it in with some home remodeling TV personalities. (Chip Gaines is my spirit animal btw)
Lastly, in the third step, ask for the juicy stuff - you know, their personal information.
Remember, name, email, phone numbers - that’s all currency in the world of lead generation. In order for someone to give up their email and phone number and be willing to be harassed (sorry) by a salesperson – you need to make them feel super comfortable.
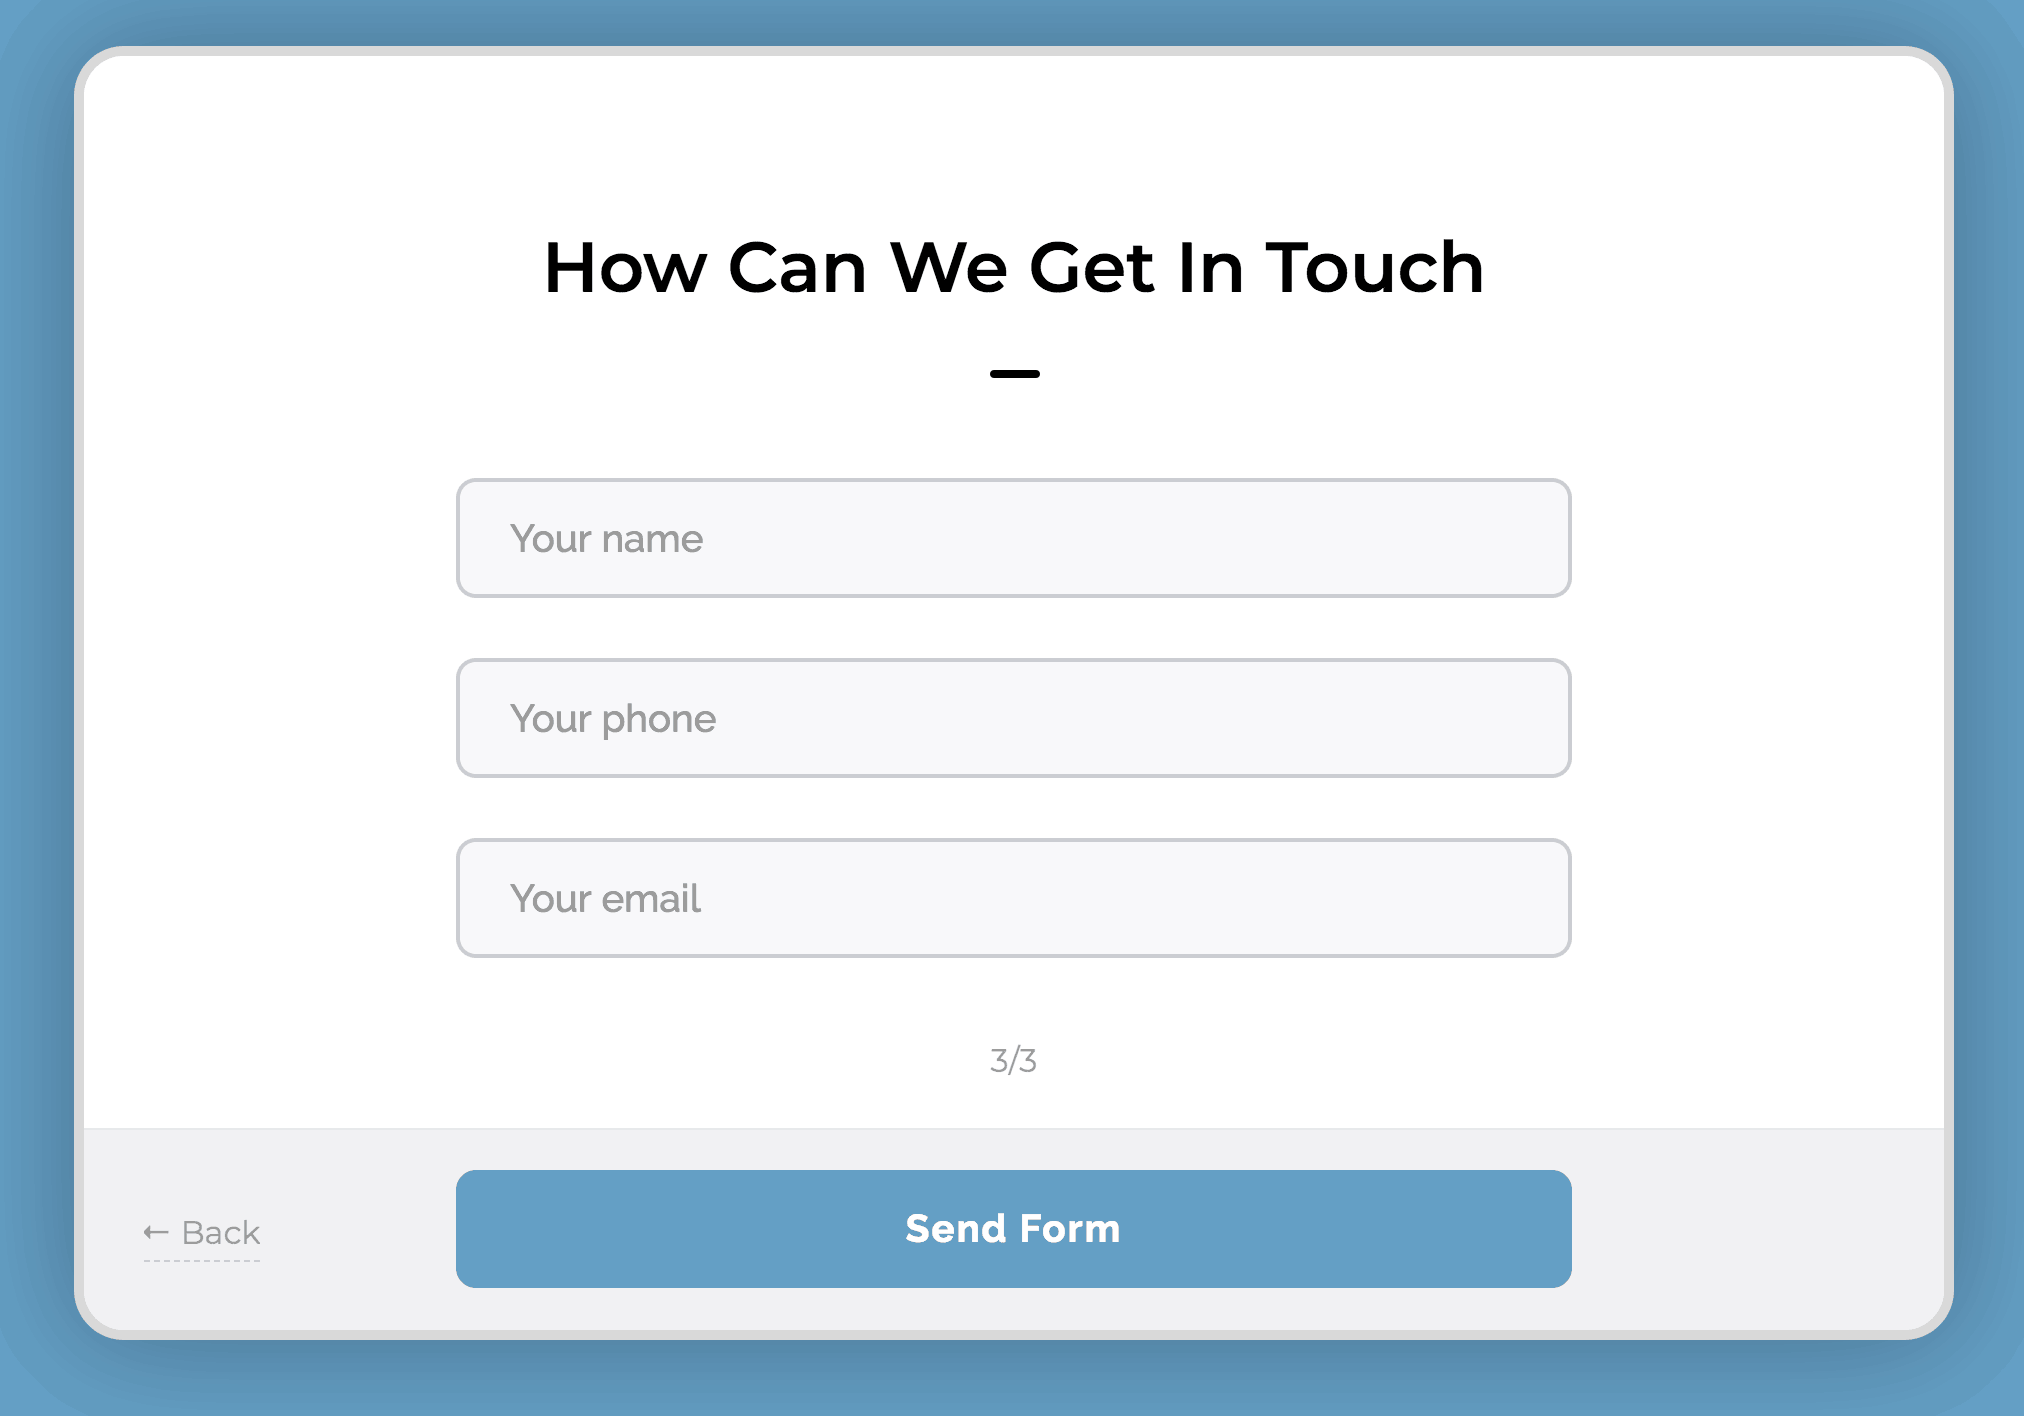
The micro-conversions do this for you.
Make sure to leave room for an open ended question like:
“Tell me about your dream home”
Finally, ask:
“Do you have a budget?”
These two questions are where you have an opportunity to pre-qualify them. Make this field mandatory. The budget question is often debated as to whether you should ask or not.
I’m not suggesting though, that you ask for their budget.
I’m simply suggesting that you ask them if they have a budget. Make this a yes or no toggle.
Why?
If they respond to those two questions in this manner:
Budget: No
Tell me…: I need my kitchen redone
It’s highly likely they haven’t done their research on how much an actual dream home will cost them. They are very much still in the “awareness” stage, though in their mind they want to be in the intent stage. You don’t have time for that.
Quick note on this, you’re going to get these requests no matter what. Treat everyone the way you’d like to be treated… even if they are unqualified to hire you, you want to make sure they have a positive experience during your phone qualification or in-person qualification. You’ll get better qualified referrals that way.
On the other hand, if the response is something like:
Budget: Yes
Tell me…: I’m looking to hire a contractor to redo my kitchen. Looking for someone to both design and build the whole thing.
This lead is definitely more qualified. I’ve seen this type of response come in many times to my remodeling contractors. Then I’ve seen them get in touch with the customer, send out a designer to get a measurement of the room and provide a quote - and then get the sale.
Qualify your new lead on the phone
Heads up – you should be calling your new leads within 5-10 minutes of the new lead notification. It’s highly likely that they are copy-pasting the exact message they sent you, to at least two of your competitors. It might just come down to whoever called them back first.
Call right away. They won’t care. They asked to be called.
Again, you want to be tactful. You’ll get more bees with honey than with vinegar.
Here are three questions to ask a pre-qualified lead on the phone.
Try to leave these all as open ended as possible.
#1: Tell me about your project.
They should be giving you a quick overview of the project. This will give you a little better idea of their personality and inspiration. Make sure you discuss priorities, their must haves and their timeline.
They say God gave us two ears and one mouth so that we can do twice as much listening and half as much talking. So, listen to their responses. Are they indecisive? Are they unwilling to listen to you when you’re talking? Are they demanding you give them quotes right over the phone? (It’s ok to give a range here, especially if they already indicated in the contact form an actual budget)
These types of responses though, can indicate a lead is unqualified.
#2: What’s your ideal completion date?
No, Mr. Homeowner, your project isn’t going to be done in two weeks. And no, it’s not going to be aired on HGTV.
TV Remodeling shows have done wonders for the remodeling business. It helps homeowners get inspired and get motivated. They want what other people have!
It does create some unrealistic expectations though. Not all homeowners understand the complexities of managing a full scale remodeling project. If you know your top-notch quality work for a 250 sq. ft. kitchen will take 3 months and they’re insistent it should only take you one month – run. Taking their deposit will mean taking their repeated phone calls as to why the project isn’t finished on time.
#3: Have you researched your project?
Homeowners that do their own research before calling a remodeling pro are much more likely to provide clear direction during the project. If the homeowner hasn’t done their homework, you will very likely end up with indecisive people and the plans will change – frequently.
When to move on
I know it’s tempting to just take any job that might come your way. In some instances, however, it might be better to just pass the job.
Pro Tip: Recommend another company that is smaller than you to them. They’ll appreciate the good recommendation and would be happy to refer your service to someone else, even though they aren’t qualified for you.
When you focus your sales and marketing to qualify your leads that fit your expertise and availability, you’ll have better clients and better projects. Take control of your lead generation today.
Want more strategies? Subscribe to our weekly email.

Fully Automated Social Media Content with Promo Republic
“I don’t have the time”, “I don’t know what to post”, Those are the two most common responses I get when I ask a potential social media client about their current social media business habits. Here's a great app to help you with BOTH.
Stop me if you’ve said this before:
“I don’t have the time”
“I don’t know what to post”
Those are the two most common responses I get when I ask a potential social media client about their current social media business habits.
In the past, I’ve preached to many of my clients to use social scheduling tools like Hootsuite or Buffer, or even just the built in scheduling tool from Facebook. These are indeed great options.
Basically what should be doing is dedicating some time each week to plan out a content schedule and create several posts to go out through the week, so you don’t have to post it one by one.
However, that still doesn’t solve the “what do I post” dilemma.
I’d like to think that if most people didn’t have a creative block, they would find the time to schedule out these posts.
So, the real ‘time’ issue, is actually the time it takes to think of content to post.
Enter Promo Republic
Amongst other great features, Promo Republic will suggest content to you based on topics that are most relevant to your business.
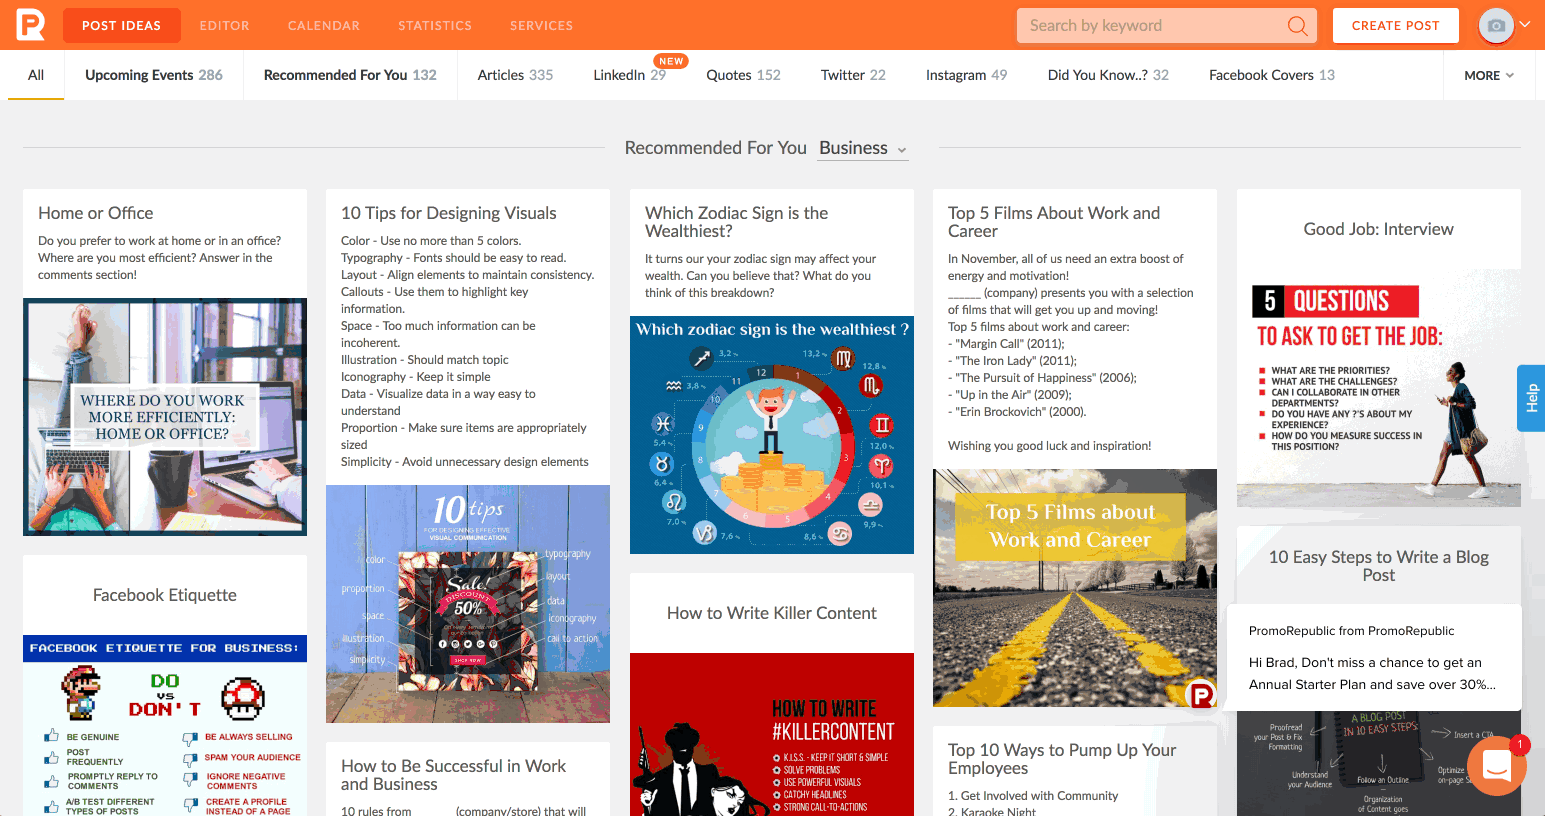
There are 20 different types of posts Promo Republic can suggest for you. Think of it like the Netflix for social media management. You can also search by keyword and it will pull from the 20 different content buckets.
Depending on which plan you choose, you can connect your Facebook page, Instagram, Twitter, Linkedin, Pinterest, and also Snapchat.
Promo Republic’s starter plan will give you the first four social networks, which are the most common anyway and with the highest active users.
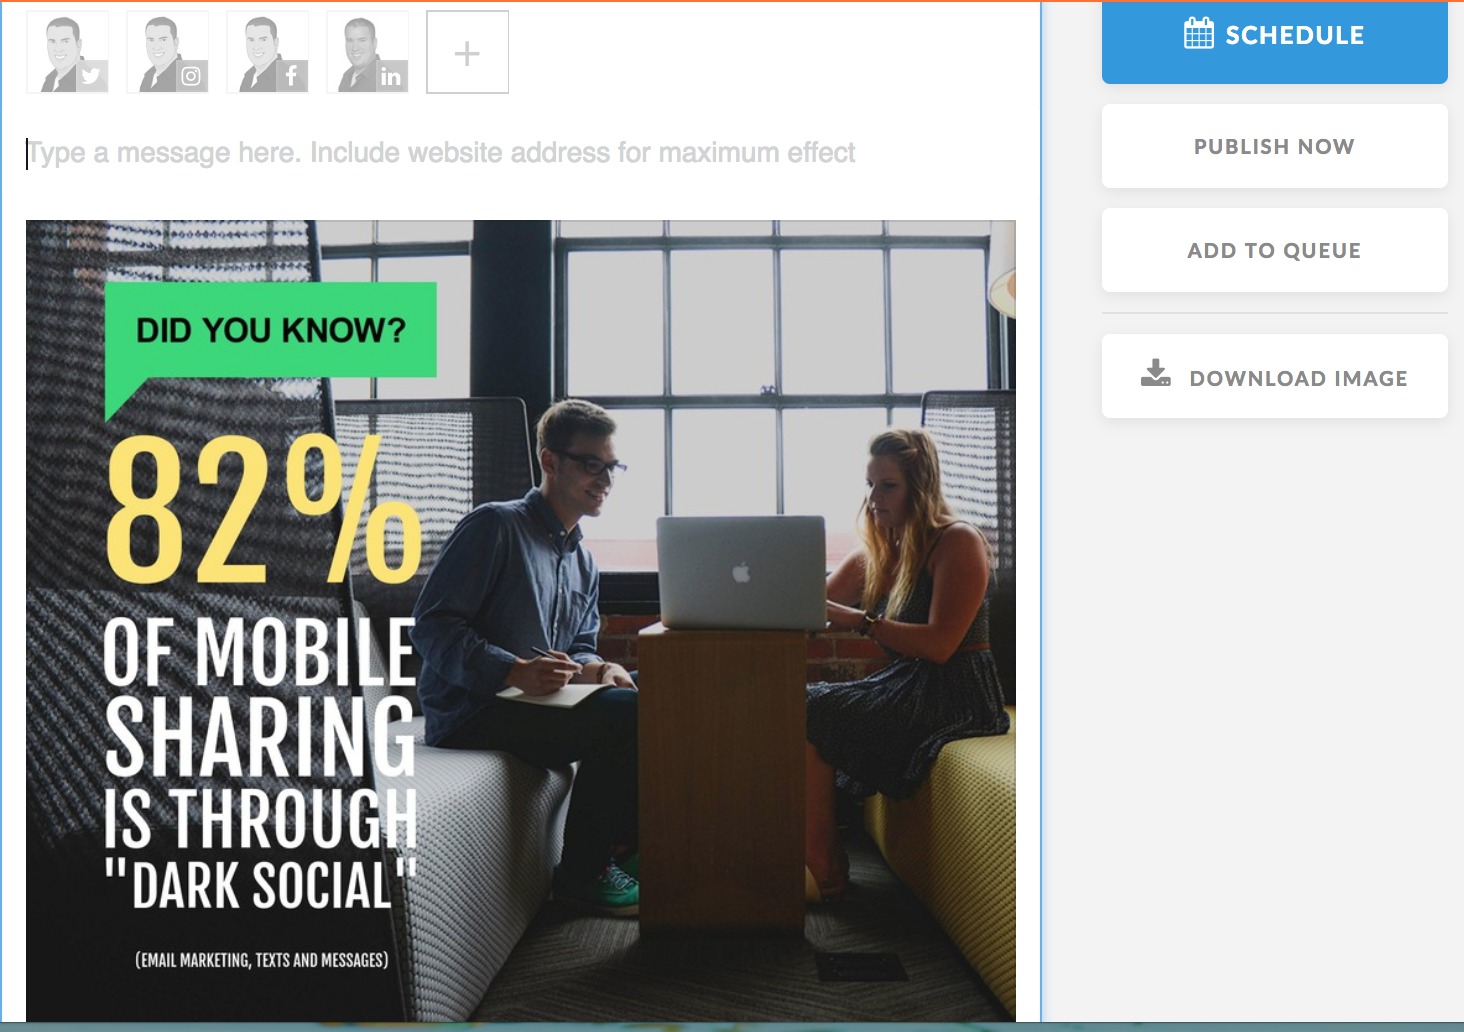
Once you find a certain post you like, you can click on it to optionally customize it.
Promo Republic has a built in photo-editor that will allow you to edit the suggested text, colors used, background images and more – if you want to. It’s completely optional.
Some of the post types will already have a suggested caption included, others will not and you can place one yourself. You can use the text from the image itself to use as the caption if you really don’t want to do much work!Once you get it the way you want, which is just a few clicks, you can schedule it to post on any of the networks you have connected. You can also immediately publish it if you’re ready for it to go out.
Promo Republic currently does not have Instagram direct publishing, but I’m told they are working on that.
Instead, you can download their iOS or Android app, will push a notification to your phone when the post is scheduled. From there, you it will copy the image and caption to the clipboard and you just have to open Instagram to post it.
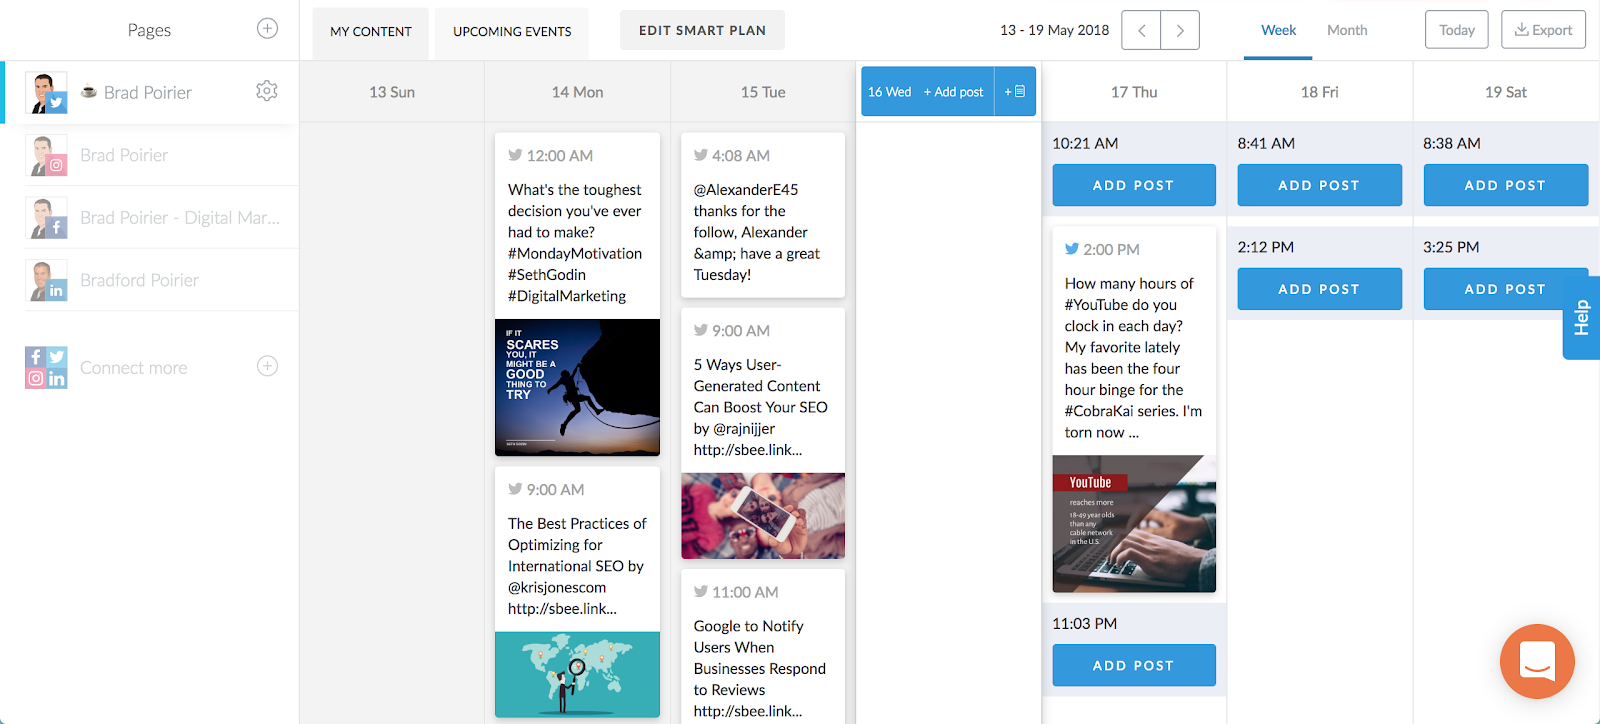
Additionally, you have a great content calendar included. Promo Republic will suggest time slots for you based on your industry category and the social network itself. You can quickly see upcoming posts for each network through the week. If you see that there are some suggested time slots with no posts scheduled, you can quickly add a post and it will search through the suggested buckets.
Analytics are included too. Tab over to the statistics tab and get a bird’s eye view of each networks performance. You can see the engagement for each post and each network.
If you notice that a particular post did really well, you can click on repost, and schedule it for another time.
If you want to eliminate the time and lack of creativity excuse, Promo Republic is a perfect fit for you.
9 Tips To Rank Number One on Google Maps
You search for your business industry. You get a search result with three map locations. But… your competitors are all showing up and they’re physically nowhere near you.
You search for your business industry. You get a search result with three map locations.
But… your competitors are all showing up and they’re physically nowhere near you.
Ugh! That sucks!
Well you’re not alone. Since, Google maps only shows three locations in the search results preview, knowing how to optimize your Google My Business location will help you rank higher on Google Maps.
Being on the first page of a Google Map listing is highly competitive for any business, because let’s be honest - no one goes past the first page for any search result – but you already knew that.
Google Maps Ranking Indicators
Google Maps used to be based on proximity and business category, almost exclusively. As Google (and it’s users) get smarter, the ranking indicators for Google Maps have become more involved. Each ranking indicator has its own method of optimization. Consider implementing them one at a time.
Google Maps gets most of its data from your claimed Google My Business location, so while we are using the term Google My Business throughout this guide, it’s interoperable with Google Maps.
Bonus: Download The Ultimate Guide To Google My Business and Crush Your Competition
1. Claim Your Google My Business Location
Claim your Google My Business page
Knowing is half the battle. Don’t leave it to Google to make computed guesses about your business location. You especially don’t want to leave it up to anonymous users (or competitors) that will ‘suggest edits’ to your location, that may end up auto-applying if there is no input. So, your first step to ranking higher on Google Maps is to claim your Google My Business location, which is right where Google pulls your Map information from.
You want to make sure your Google My Business is completely filled out including:
Contact information including your address, phone number, and your website. If your business is based out of your home, that’s ok – Google offers an option to place your business in a ‘service area’ instead.
Business hours. Nothing is more frustrating than having your website display one set of hours, and Google Maps showing another set of hours. Plus, Google Maps will let users know if you are opening or closing soon based on the time of day they are viewing your listing.
2. You Need More Google Reviews

Get More Google Reviews
Did you know that 84% of people trust online reviews just as much as a personal recommendation? If your business is lacking reviews on Google Maps, now is a good time to start getting more reviews. How do you do this? Just ask your customer when the project or sale is finished. Consider setting up email automation that can send out an email with a review link when the project is complete.
Keep in mind you won’t have control over which reviews get posted. It’s best to reply with kind words to any and all reviews. You should give careful consideration to any negative review that’s left for your business – your reply is publicly viewable. You won’t want new, potential customers getting a bad taste before they learn more about your business.
In reality though, unless you’re the worst business on earth, chances are the bad reviews will be few. Just get more reviews from your best customers and the good will always outweigh the bad. Also, a slightly imperfect score will actually make you appear more authentic. A company with many 5-star reviews may seem like the reviews were paid for.
If you’re not sure where to start, take your existing customer email list (the loyal ones that you’re sure will rave about your business) and send them an email just asking to write a review based on your past work.
3. Choose The Right Google My Business Category
Did you know that there are over 2,300 different categories on Google My Business? You’ll want to make sure that your primary category is very specific to your main service. For instance, you can choose Kitchen Remodeler as your primary category. Don’t stop there. You can add up to five additional categories. These additional categories should include your other keywords that you want to target.
For instance, in the case of a Kitchen Remodel company, you might want to choose bathroom remodeler, contractor, home builder, and countertop store as your additional categories.
4. Place Your Google Map on Your Website
This is a simple method to let Google know that the address you have claimed on Google Maps is the actual address of your business. (Service areas OK also). You’ll want to at minimum, embed the Google Map on your contact page, sometimes also called a locations page. Make sure you list the address exactly the same way it’s listed on your Google Maps location.
Embedding a Google Map is very simple. To embed a Google Map on your website, search for your business name in Google Maps. Click on the “Share” icon and then select the tab that says “Embed a map”. Paste this code into your website per the instructions of your website CMS.
Place your google map on your website
5. Optimize Your Google My Business Description
Google My Business has a 750 character limit, but only the first 250 will show up in the knowledge graph area. (The area on your preview).
This isn’t the place to keyword stuff. Choose your words wisely. Write a description that answers a question you can solve, rather than just a list of your keywords you want to rank for.
6. Use Your Actual Phone Number
Call tracking is good to have, but if your system utilizes toll-free numbers (800, 888, etc), this isn’t the place to use that number. You should either obtain a local tracking number, or just forgo separate tracking all together. Google doesn’t like toll-free numbers, since they are very easy to obtain and are very often used for SPAM. Also, nowadays, toll-free numbers are being recycled, so chances are your number might have been connected to another business previously.
Speaking of tracking, no need to worry about that. Google My Business tracks all clicks made from your search listing, including phone calls places, directions, and clicks to your website.
Lastly, Google is looking for uniformity as a ranking indicator. So, having two different numbers listed between your Google My Business page and your website, or other social media profiles is an indicator to Google that these are two different businesses – which they obviously aren’t.
7. Add Photos to the Listing
Most people who take the step to claim their Google My Business listing will add a profile picture, which is the preferred thumbnail picture Google uses for your location. However, few will take the additional step to include several more pictures and place them in the categories that Google has set up.
You can add photos into their categories of team, at work, identity, or just the overview tab. Recently, Google My Business added the option of adding your own video.
8. Write A Post Using Google My Business
Google My Business recently added a great business marketing feature, Posts. They work very similar to other social media networks like Facebook and Instagram. There’s one very valuable difference: they have a longer expiration date. While the half-life of a post on Facebook or Instagram can be just one day or less, Google My Business posts will stay current for up to 7 days. Posting on a weekly basis will help your location show up higher in search results.
9. Add Messaging To Your Contact Options
Long gone are the days where your customers would just pick up the phone and call you, or just drive directly to your showroom. There are a plethora of options businesses have to connect with their customers.
Google My Business lets you add a special messaging number to your profile. When you add this option, you will set up a forwarding number – so you have to make sure that it’s a real, active cell phone. When someone clicks on the message option from your business listing, they will be texting a different number than your actual cell phone, so it stays anonymous.
By adding messaging to your Google My Business profile, you’re giving Google yet another indicator as to why your listing should show up in front of your competitors.
Implement These Google My Business Strategies
A good plan executed today is better than a great plan never executed.
Set a goal of putting these 9 steps to ranking higher on Google My Business into place. It may seem overwhelming to do all of these at once. My suggestion is to try a couple of these per month.
You will need to start by claiming your Google My Business listing. Next, try emailing your current customers and ask them to send you a review. Next month, start making posts to Google My Business, even if you only do this once or twice a month. You’re establishing a routine here, not perfection.
What other suggestions do you have for Google My Business? 👇

4 Ways To Setup ONLINE Gift Cards - EVEN IF YOU DON'T HAVE A WEBSITE.
Ok, it's apparent to me that things that seem "easy" to me, are very hard for others! I feel you! I'm showing you step by step how to create new gift card accounts or activate gift cards in your existing POS systems.
Time stamps to each of the options below:0:00 - Introduction and preface3:30 - Giftfly - This is a great option if you are using CLOVER POS in your store.12:25 - Gift Up - This is an option if you want to use on Shopify but aren't on their $79 plan that has gift cards built in.17:55 - Square - This is perfect if you are already using Square for your POS. Since you have an account already, it's a couple of clicks to add egift cards, and then they supply you with a link to check out online, you don't even need a website.20:58 - Shopify - Again here, you'll need to be on the $79 plan or higher. If you are, it's easy as like 2 clicks to setup gift cards with Shopify.Ok, it's apparent to me that things that seem "easy" to me, are very hard for others! I feel you!I'm showing you step by step how to create new gift card accounts or activate gift cards in your existing POS systems.If you need further help, reach out to me at brad@bearcityimpact.com, I'm more than happy to help.Also, the first two options are great options if you do not have any sort of digital POS system, IE old school cash register, and credit card machine.- Just a note on the legacy POS systems, you will have to keep a MANUAL log book of customer gift cards, because they will get the gift card via email, and there's no way for you to deplete the balance. This will require a manual logging of card balance when they come in and shop.Ok, I really hope this was helpful. If you have additional questions just reach out!#shoplocal #supportlocal #coronavirus