

How To Develop A Content Strategy
Marketing is so important when it comes to building a successful company; the world of business is incredibly cut throat, so no matter what you do or sell, you will be up against competitors.
Marketing is so important when it comes to building a successful company; the world of business is incredibly cut throat, so no matter what you do or sell, you will be up against competitors. Clever marketing in general gets your name out there to the right customers, and shows them why they should choose your business over other, similar companies. But it’s not easy to do this, a good marketing strategy should be multifaceted and utilise lots of different methods to sell your project. Content marketing is one element of this, which is complex within itself.
What is a content strategy and why do you need one?
Creating great content is one of the best ways to reach out to prospects and generate leads, and content strategy is the planning, development and management of content. This not only includes the words on the page, but also images and multimedia such as infographics, videos and more. The goal of content strategy is to create meaningful, cohesive, engaging, and sustainable content that people genuinely find useful and want to share. This helps your content to snowball and in some cases, even go viral. Some of the principles to remember when it comes to content marketing include:
Create quality content to attract customers, engage and build trust.
Don’t be tempted to produce low quality work because it’s quick and easy, tactics like keyword stuffing are banned and easily picked up by Google- this will hinder your progress rather than help. Cheap article writing gigs can be found on any freelancing site these days, but always choose quality over quantity. Either hire writers yourself, or work with freelancers with a proven reputation, who can create the high quality content you need.
Quality content avoids blockers
Research shows that ad blocking software is used by around 30% of Internet users, meaning a third of people will never see the paid advertising messages that are targeted to them. It goes to show the way we need to market our businesses is evolving, no longer is a flashing banner on the screen enough to grab an audience’s attention or sell a product. We have to be smarter- and good quality and valuable content is one example of this. It’s not simply an ad or an annoyance, content marketing provides value to the reader and promotes a product in a way that isn’t pushy or forceful.
Pleases search engines as well as the user
To be successful in marketing, you need to please the user (your audience) as well as search engines. Users will expect high quality content that’s informative, and perhaps even humorous and witty. Search engines algorithms use things like proper backlinks and correct keywords to rank your content. By producing high quality content you can appeal to your user as well as rank highly within search engines.
Getting to know your customers
In order to solve your customers problems through your marketing strategy, you firstly need to fully understand them. Modern marketing now relies less on traditional market research methods such as surveys or focus groups, and pays close attention to things like smart online platforms and tools that tell them everything about their customers’ demographics, online behaviors, and conversations. When you understand how users think and speak about a subject it puts you in a powerful position to tailor content towards them. Some of the ways you can go about this are by:
Developing personas
Buyer personas are semi-fictional representations of your customer, based on market research and real data that you have about your users. This involves gathering insight from different platforms such as website analytics, social media channels, customer reviews as well as actual conversations with prospects and customers. They help you better understand and get closer to customers, as real humans as you understand who your buyer is. Personas help us to understand what customers need, where and when they need it, how you can help and what solutions you can offer to their problems. They can also give you an idea about location (are they local or global customers?) their age (certain age groups respond better to certain marketing methods) and even if they’re likely to be married with a family. All of these things can play into the way you target your content.
Analysing the market and your competitors
If you want to succeed in business, you need to have expert knowledge into what’s happening in your market which includes how your competitors are doing. It’s important to know what’s working for them and what’s not so you can either emulate their successes or avoid their mistakes. Keep your ears and eyes open for what’s happening in your industry which helps you to identify gaps in the market such as needs that aren’t being fulfilled, common frustrations, or trends. It’s crucial that you stay up-to-date and and remain factual based on what’s going on in the world to avoid putting out outdated information. When new information becomes available, update your content or archive it.
Determine marketing strategy objectives
Objectives specific measurable outcomes that will be achieved within a particular time frame and they help individuals evaluate the success and effectiveness of a particular marketing strategy. They aid marketers to align expectations and plans, coordinate efforts, and hold teams accountable for achieving results
Types of content marketing and their effectiveness
There are a number of methods of content marketing you can utilise, but there’s no ‘one size fits all’. It will all depend on your business and your audience, and finding the best methods can often be trial and error. Here are some of the things you could consider incorporating into your content strategy, and why they could be effective for you.
Blog Posts
Blogging allows you to constantly refresh the content on your site, which search engines value. It establishes authority in your given area and builds trust, and a stream of new and fresh regular content gives your audience a reason to visit your site and keep coming back. Blogging is an opportunity to offer more value to your readers and enables you to promote what you do without simply spamming links to products on your social media. For this reason, research shows that you'll generate 3x more leads via blogs than through ads and it’s the perfect opportunity for SEO too, which is why it provides 4x the likelihood of being found in organic search (source). As well as publishing content on your own blog, incorporate guest blogging into your strategy as this can be incredibly beneficial. If you work with bloggers who are well established, the backlink will improve your own domain authority and the content will be seen by the bloggers own network which can help you to expand your own.
Infographics
Infographics are a mix of design, writing and analysis- they are ideal for an age of big data and when users are wanting fast, snappy and relevant information. People love facts, figures and statistics but in a bite size and easy to understand format which makes infographics perfect. They’re easy to scan, view and process and as a result, they’re more likely to go viral than other forms of content. They show an expert understanding of a subject but without having to go into as much depth as you would with typical written content.
Videos
Video is an incredibly important part of your content strategy and is something that most businesses will need to utilise. No longer just one piece of your overall marketing plan, it’s central to your outreach and campaign efforts, particularly your social strategy. Video has absolutely dominated society. According to a research, four of the top six channels on which global consumers watch video are social channels (source). From entertainment to ads, to landing page videos and how-to tutorials for your products, there are plenty of ways this can, and should, be incorporated into your content strategy.
Ebooks
The popularity and perceived value of eBooks has made them a favourite of online marketers; instead of feeling like yet another blog post or video, a downloadable eBook feels far more like a real object of value. Writing an eBook also gives you the ability to showcase your authority on a subject in greater level of depth than a blog post allows. One of the main things that people look for when buying from a brand (especially when buying from them for the first time) is that they’re reliable and genuine, and an eBook can certainly help you to gain that authority. However, eBooks aren’t for every business and audience, so it’s important to know if this is the right direction for you to go in. This is because writing an eBook takes time, you don’t want it to be wasted if it’s simply not a good fit for your audience.
Podcasts
There has been a rise in audio content, it is becoming more and more popular over time. While it’s unlikely to ever overtake video, it’s still an excellent medium to advertise in some cases. It provides an opportunity to engage people- but only if this suits your type of product and audience. One thing to be aware of is the research- it shows that listeners of podcasts tend to be more educated and have a higher income. If your research on personas shows that your audience is likely to be a good fit then this is something you could try. The downsides to using podcasts as a content marketing method are that metrics can be difficult to measure (since you can see downloads but not engagement) and you need to have lots of information to make them work. As with anything you’ll want to be consistent, and consistently releasing podcasts will require a lot of time, effort and information. However, if they’re right for your business they could be an excellent way to engage your audience.
Social Media
Social media is a powerful tool to engage your audience and turn them into leads or buyers. The key to good social media marketing is to use your platform as a way to be social, and not go for the hard sell. It’s best for building up trust and brand awareness, as research shows it doesn't tend to be people’s favourite platform for buying. 2 billion people per month use social media yet conversion rates remain low which is interesting. This being said, it’s a highly important part of your content strategy as building up a following is one of the most valuable things you can do for your business. Use your platform to engage, find out information about your audience that you can then use to target your content. Share blog posts which in turn will hopefully be shared by your followers.
Publishing schedule
It’s content which fuels online marketing- but if you don’t have a content strategy, you will struggle to generate leads. An effective content strategy requires a well planned editorial calendar which is a schedule of content to be produced and delivered to your prospects through different channels. This includes your blog, social media channels, email newsletters and more, all over a specified timeline. As a brand, it’s important to be consistent, your audience will expect this of you and it also helps you to look more reliable and trustworthy. Following style guides for things like language and design helps people understand and learn what you are trying to communicate, and doing so on a consistent schedule lets them know what to expect. Here’s how you can go about it;
List the content that should be published based on your content strategy.
This can include everything from yet-to-be developed content to existing content, or content that will be repurposed for your audience. Certain pieces of content you already have can easily be changed up and republished, allowing you to get the most out of it while keeping to your schedule. For example, seasonal content can often be repurposed each year with a few tweaks.
Content creation and publishing dates
This includes when the content should be created and when it will be published. It can be useful to use an editorial calendar to ensure the right content is being delivered in a timely manner without the hassle of manually going through everything.
A list of channels for delivering your content
You might for example want to deliver part of an eBook and then distribute other relevant content through social networking sites, newsletters and other channels. Think about the way your audience uses their platforms and how best to grab their attention.
As you can see, developing a content strategy is no mean feat; it’s incredibly complex with lots of room for error if you don’t know what you’re doing. Working with an expert or marketing agency can save you time, effort, stress and money. It’s not something you can just guess at.

Content Strategy vs Content Marketing
Contrary to the opinion of many, content marketing and content strategy are not the same thing. In fact, they are interrelated but serve separate purposes. Something essential to understand if you are to be as effective with your business's marketing as possible.
Contrary to the opinion of many, content marketing and content strategy are not the same thing. In fact, they are interrelated but serve separate purposes. Something essential to understand if you are to be as effective with your business's marketing as possible.
Robert Rose writing for the Content Marketing Institute uses the great metaphor that content marketing is like drawing on the wall with magic markers. Whereas content strategy is like writing things down in a fine nib pen.
What he means is marketing takes a more macro view, whereas content strategy is focused on the micro, a subject that will be explained further in the post below.
Content Marketing in the MACRO
Content marketing takes a macro approach because it is concerned with three main things:
Telling the story of the organization or product
Engaging an audience
Using content to change behavior.
Telling a story
There are two critical aspects of telling a story that content marketers focus on. The first is who they are speaking it to. That is the specific demographic of people that they are looking to appeal too. Something fundamental to get right, if the marketing they create is to be effective.
Additionally, the ‘why’ of telling a story is important here as well. That is why you are creating the content, who it will help, and why your business is in the best position to offer something to customers that no one else has.
Engage an audience
Another part of the macro content marketing approach is a focus on engaging the audience. That is, getting the demographic that you want to appeal to, to sit up and notice what you are trying to say.
Of course, there is a range of techniques that content marketers use for this purpose, including things like using engaging and emotive language or images, ‘and hooking’ consumers in with controversy or subversive content. Many content marketers also use more traditional storytelling methods for this purpose.
Additionally, content marketers need to stay ahead of the critical trends of how consumers access the content they are creating. For example, the rise of subtitled soundless videos is enormous at the moment. The reason being that many people watch them as part of a social media feed without actually clicking to fully open them.
Content to change or enhances a behavior
Finally, content marketers are concerned with the way content can be used to modify the behavior of those that consume it. In fact, in most cases, this is a matter of either enhancing a current behavior or changing a behavior entirely.
A great example of the latter being the governmental health warnings on Covid-19 behavior, as these are designed to reinforce social distances and enough people to stay in their homes. These being things that quite obviously fulfill the overall goal of why the content has been created.
In summary, therefore, content marketing can be described as a form of strategy in itself. That is an approach that uses content to engage, appeal, and create a relationship with consumers. A condition that can be used to change or enhance behavior as the business in question requires.
Content strategy in the MICRO
On the other hand, content strategy is a much more micro approach. It is the bread to the bakery of content marketing if you will.
Creation
To that end, content strategy is concerned with the actual creation of content. Of course, as you would expect from such a well-established tradition, there is a recognized process used to do this.
Generally, such a process will start with the organization working out what they want from their content. That is what the overall goal of creating it is. Whether that is to save lives as in the example above, increase sales, or anything else as defined by the parties involved.
Once an organization has defined its goals, it must then do the work of getting to know their audience. This means market research and lots of it. Something that should help to inform you of the type of content to use. Of which there are many, including podcasts, videos, silent videos, blog posts, articles, games, and images. Additionally, your market research should also inform the platform that it is best to publish on.
The next stage is to actually start to craft the content your business will be releasing. Something that should include reaching the right keywords, tags, and long-tail phrases that are most likely to get your content in front of the people you wish to target.
Publication
Next, it's time to publish the content that you may choose to do organically through one of the social media channels mentioned below, or by paying for its display. In fact, many organizations use a combination of both of these tactics. Although, whatever they choose will be backed up by research into what will most appeal to their target demographic. With some of the most popular platforms for content publication, including Twitter, YouTube, and Google Images.
Managing content as an asset
Finally, another micro aspect of content that strategists concern themselves with is helping organizations to manage content in the right way.
This is because to be as effective as possible, your content needs the correct metadata classification for you to be able to access and use it right away. That is, you need to know what consumers its aimed at and what is within the content. Then you will be able to deploy it most successfully. Something that the content marketers will thank you for because it will make their more macro tasks easier to complete.
Next Steps
In summary, content marketing and content strategy are linked, but definitely not the same thing. In fact, content strategy is concerned with the finer points of creation, publication, and management of content.
While content marketing, on the other hand, is all about the macro functions of telling an organizations' story, engaging an audience, and using content to change behavior.
Yes, they are inter-linked as we have seen, but they are most certainly not identical. A fact that it's well worth knowing if your organization needs to utilize content effectively, as most in the current market do.
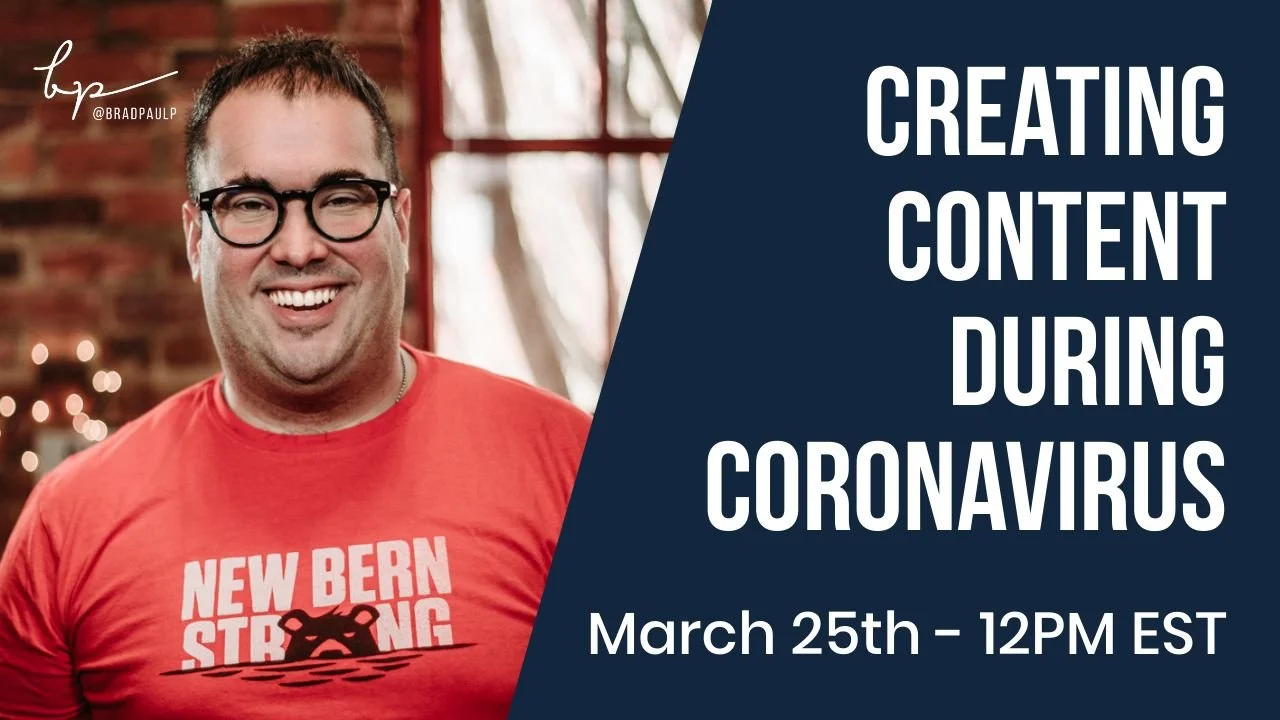
Content Ideas for Small Businesses during Coronavirus
You might be unsure whether you should keep creating marketing or sales content right now in light of the coronavirus pandemic. Perhaps your business is closed or in a limited capacity. I'll discuss some ideas and tips for creating content right now, what types of content to create.
STREAM STARTS AT 3:23 Mark...
You might be unsure wether you should keep creating marketing or sales content right now in light of the coronavirus pandemic.
Perhaps your business is closed, or in a limited capacity.
I'll discuss some ideas and tips for creating content right now, what types of content to create.
There will also be additional time for questions and answers!

The Best LIVE Stream Software for Mac OSX
This is the 2nd app of three that I use DAILY, although this one I use about every other day. In this video I breakdown 5 ways that I use this program and show some examples.
Get a Free trial of Ecamm here:
https://bit.ly/ecamm-trial
This is the 2nd app of three that I use DAILY, although this one I use about every other day. In this video I breakdown 5 ways that I use this program and show some examples.
Here it is in case it is TL;DW:
1) Scheduling Live Streams - Each week I schedule the live stream for The Morning Impact by using Ecamm Network. This way, it gets posted to Facebook as a preview post, alerting my audience of the new episode, and also alerts my guest so that they can start a watch party!
2) Broadcast Studio - Hands down this is the way to live stream if you have more than yourself on camera. Ecamm let's me hook up multiple camera sources, and then my buddy Dave is on the switcher changing the cameras based on who is talking - JUST LIKE IN A REAL TV STUDIO! This stops the boring one camera angle. Also, I can add in things like titles, overlays, and logos.
3) DSLR Recorder - I record directly from my camera to Ecamm when doing talking head videos, like this one you are watching. This is because Canon is a memory hog when it comes to 4K recording. For reference, for the same 7 minutes of footage, my Canon will store it as 25GB whereas Ecamm records it at 800MB... I dont know about you, but I don't notice the compression when watching on a PHONE (Like 99% of everyone does)
4) Screen Recordings - I also use this sometimes to create tutorials on my computer, where I record my screen and what I am doing, and then can also have a little camera bubble in the corner.
5) Green Screen - This is less common, but has been neat to do. I had a demonstration table at a recent career day for @cravencountyschools, and we made 15 second career videos for the 9th grade students. I set up a green screen, and then had 9 pre-made backgrounds to superimpose the students into! It was a blast!

Budget Alternatives to Adobe CC Suite
This is part one of a three-part series on the three tools I use in my content marketing DAILY. This first video is about the Adobe Creative Cloud suite of apps. I use everyday Premiere Pro, Lightroom, and Illustrator. In this video I'm showing you alternatives for each of these apps, that are made by Adobe - but considered a "light" version of the pro apps.
This is part one of a three-part series on the three tools I use in my content marketing DAILY. This first video is about the Adobe Creative Cloud suite of apps. I use everyday Premiere Pro, Lightroom, and Illustrator. In this video I'm showing you alternatives for each of these apps, that are made by Adobe - but considered a "light" version of the pro apps.

How To Create Content For Your Business in 2020
If you're tired of hearing people say "you need to create content for your business" but then leave you high and dry without actually explaining WHAT TO ACTUALLY CREATE, then this video is FOR YOU my friend
How can I go about creating more content for my business? What the heck do I even post on social media?
These are the questions that I get from business owners constantly. Most of the time, most people just don't know what to post.
In this video, I'm going to show you three quick and easy steps to creating content left and right for your business so it can explode.
Step 1 - Set A Plan
The first step is to set a plan and this cannot be overstated.
Here's what I want you to do:
Take your service or product and then break it down into categories
Then break those down to micro topics.
Under those micro topics, you're going to create a problem, you're going to agitate it, and then you're going to provide three or four tips as solutions to that problem.
This is known in copywriting as the Problem-Agitate-Solve copywriting formula.
But for you to make this really simple so you don't have to overthink it, you're just going to take categories, micro topics and then break that down to a problem and solutions.
As an example, the video that you're watching right now, the micro topic in this case would be how to create more content and the category would be content.
Right now I'm showing you those three ways to help solve the initial problem that I presented in the beginning of this video.
Step 2 - Don’t Overthink The Content
Step two is do not overthink the content that you're creating. It does not have to be a super high production. In fact, I'm going to show you a quick behind the scenes here of how I'm filming this.
All I'm using is my iPhone set up on a tripod and I do have a microphone system and lighting system.
However, for you to get started right now, all you need is your phone.
Even if you don't have a tripod, what I've recommended to people, just prop your phone up on something, prop it up against a book, prop it up against a mug or your computer. Just prop it up against something and just start filming.
The second thing I'd recommend you do is just get yourself a good microphone. You can get a really good microphone by Deity Microphones for $50. This is not sponsored by them, but I use their products religiously. I'm very, very pleased with them. They have a wired mic that's about 50 bucks and it gives you like 20 feet worth of cord.
It will make your video sound a lot better, which arguably is much more important than the quality of the video itself.
Now, if you want to put on a tripod, I'll leave a link in the description in the caption here with one that I've recommended to many clients. It's under 30 bucks, and it gives you a phone holder plus a tripod that can go on your desk or can be floor mounted. It gives you a lot of versatile options.
The other thing you'll notice here as I'll show you in the behind the scenes, I'm swapping up posted notes here. As I've planned out this content, I just wrote down the outline as kind of like bullet points so that way I could just reference the Post-it Note right below my phone every now and then as I'm cutting the video.
Step 3 - MAKE THE CONTENT!
Step three is to just start making the content without overthinking it.
I would recommend using stories as a starting line. They're 15 seconds long, they disappear after 24 hours, so you don't have to worry about it living on your feed. Just start with Instagram Stories to kind of get yourself familiar with video if that's the route you're going to go.
You don't have to create talking head videos like this by the way. You can just create a video showing the service that you're doing or showing a product. You don't have to be in the video. You do not have to do a talking head style video.
If you are going to do any sort of video, even if it's just you narrating over something that you're just kind of showing people, what I would recommend doing, starting with just a one take video.
That basically just means you hit start, you talk for a bit, and then you hit stop and that's the thing you post. You do no editing to that at all
You can make that successful if you follow the outline that I just showed you, which is one sentence, one problem, one sentence, one agitation equals one sentence, and then provide three tips or three solutions, and each of those are about one sentence.
You can pretty much get 60 seconds of video from basically those five sentences that you're going to talk about if you plan it out correctly. Now, if you do want to take it to the next level and start producing and editing videos, then you could do something like what I'm doing right now.
I'm taking each bullet point or each step and I'm hitting stop, start, and stop on my iPhone and then I'm going to take that into Premiere and edit it right after.
Now, video editing does not have to be complicated. It does not have to be overwhelming. In fact, you can use things like Premiere Rush, which is my go-to for beginners. It's super easy.
You can just take your iPhone footage, put it right into Premiere Rush, and start editing a whole bunch of these clips together.
If you want a personalized one-on-one session on how you can do that, wink, just drop a comment and then I'll reach out to you. But otherwise, you do not have to have a highly produced video. You can just literally hit start, stop, and then you're good to go.
BONUS STEP
Okay, those are three steps. But now as a bonus step, as a fourth bonus step, I'd recommend leaving a CTA at the end of the video, which is a call to action.
This is basically the next step you want your viewer to take. Again, whether you're doing a talking head like this or you're doing kind of a product overview video that you've talked over, either way, at the end of that video, you want to let people know what the next logical step is to take.
The CTA would look something like this:
"Hey, if you've enjoyed this video and you want to learn more or perhaps have a one-on-one video coaching session, then reach out to me in the comments and I'll get back to you and show you how you can easily produce more video content this year so you can explode your business and your goals."
That's it. That was my call to action. That was both a demonstration, but also an actual call to action.
If you wanted more help, reach out to me. But otherwise, that was how you're going to structure your video so that way you can make a whole bunch of these videos.
Again, what I want you to do, create a plan, create a plan of a whole bunch of these micro topics, write an outline for them, and then just start recording, hitting start and stop, and do not overthink it.
Just make the video. Throw spaghetti on the wall, see what sticks. As it starts to stick, then start adding stuff to it, such as editing extra B-roll footage, just this behind the scenes stuff, titles and all that kind of fun stuff. But for now, just start, stop, and post.
That's basically it. If you saw value in this video, go ahead and hit a like button, and I'll see you in the next one.

Why Using a PDF Menu On Your Website is DEADLY
Why is your website using a PDF version of your menu? Heads up: It's difficult for visitors to read by pinch and zooming the menu from a smartphone device, and Google does not read text from an image so you lose all of that SEO juice.
Why is your website using a PDF version of your menu?
Heads up: It's difficult for visitors to read by pinch and zooming the menu from a smartphone device, and Google does not read text from an image so you lose all of that SEO juice.
Try this instead: Create an HTML (text) version of your menu.You can still make it look beautiful and fancy just by designing it properly, but designing it for a rich web experience.
A PDF that your menu designer makes is intended on printing, not viewing on the web.
This is a new series I'm trying out. Quick(er) videos, one take, on short subjects.
I get asked these kinds of questions all the time and I catalog them into my notes app. I never discuss them because they don't really fit into a "tutorial" style video.
I think a video to just briefly discuss and answer the question is useful though.
What do you think? Drop a note in the comments if you like this style.

Why You Should Update Your Google Hours
NOTHING is more frustrating than going online to see if a business is open and then going to that business, only to find out they're actually CLOSED because the hours were wrong online. Here's HOW and WHY you should be updating your hours on Google.
Hey, good morning, everyone. So this is kind like a bonus of Facebook live episode we're doing here. So just wanted to talk to you about updating your Google my business hours. So what? Google my business basically, as is your Google map listing for the business. So if I go look up right now, Bear City Impact and I just Google that it's going to give you my address, phone number and then the current hours for Friday and then you can see more hours. So nothing is more frustrating than when I go to visit a business. And I looked up to see if they're open currently. And I see it says, oh, hey, they're open till 6:00 p.m. on Friday. And so I go there perhaps at 5 0 5 and they're closed. And this is because that business has not updated those business hours on Google. Perhaps those are old hours. Maybe they took the business over. Who knows? Who cares? The hours are wrong. And what's even more frustrating is when I've talked to different business owners about this to help them out. Often the comment that I get back is like they're very frustrated with Google or oh, that's just what Google. It's wrong. And that's true. So fix it. It's not super complicated. It's actually not complicated at all. Basically, all you need to do is just go to business, dot Google, dot com. I'll leave it in the descriptions business that Google dot com and you go there and you may need to claim your business, which basically means there is an auto-generated version of your business on Google that you just need to claim as, hey, I'm the representative for this business, or you may have already claimed it some time ago, but you've just neglected to look at the current information and just need to update it.
In either case, you want to log into business that Google dot com and update those hours. Now on the other side to it. So that was the first example where you're saying you're open later, but you are really closing earlier. So that creates a super frustrating experience for people on the other side. You might be losing out business because you might say that you're only open till 5:00, but in reality, up until 6:00. So I might have looked up your business and go, oh, while they close at 5:00, I'm not going to have a chance to get there. In reality, you're open for a whole nother hour, twiddling your thumb, waiting for people to come in your store. But you've told Google and Yelp and Facebook and Apple Maps and all these other places that you're not open told, you know, the time that you're actually open, what it says on the window of your store. So Google Maps is by far the most important one to get updated and get accurate. But you can update other ones like Apple Maps, Yelp, Super Pages, Yellow Pages, Foursquare, those different directory listings. It's kind of a pain in the butt to order them each individually, one by one. You can use different services. Bear City Impact does this as well, where we'll go through a client's business and do a kind of a sweeping update across all the directories or the ones that they choose to update business information across the board. This is known as creating a universal name, address, phone and business info across Apple Maps, Google Maps, super pages, all those different directory listings. But the most important one to do right now is business that Google dot com, which is your Google map location.
You know, there's about 12 days left in the holiday shopping season, so it's probably too late to talk about this. But since there is a couple of weeks, I thought it was important. Anyways, you really don't want to miss out on people that might want to be coming to your business later in the evening. If you're open later, you know, for your holiday hours and certainly you don't want to irritate people that are looking to shop during the holiday season and they find that you're closed even though it said you're open. So that's just a quick little tip. Hope you enjoyed that and hope that was beneficial. If you did find it beneficial, feel free to share this post on your feet or your business page feed. That would really help me or tag another friend in the comments here that owns a business. And don't be afraid to do like a shameless. Hey, your hours are wrong. This is how you can fix them. So, you know, some fun banter is always good. But otherwise, again, I hope that was valuable to you. And if you did like this, by the way, just drop a quick comment if you like this. You know, I'm considering doing these like a little mini live sessions that are like two to three minutes with just like a really quick like. Just one tip. You know, I could perhaps do this every day. It's just a couple minutes or just a couple times a week. But just let me know if this was something that was interesting or not. So I don't certainly waste my time. I just want to be able to help you. That was it. That was your morning impact for Friday. December 13th.
For a more complete article on Google and SEO, check out the article 9 Tips To Rank Number One On Google Maps.

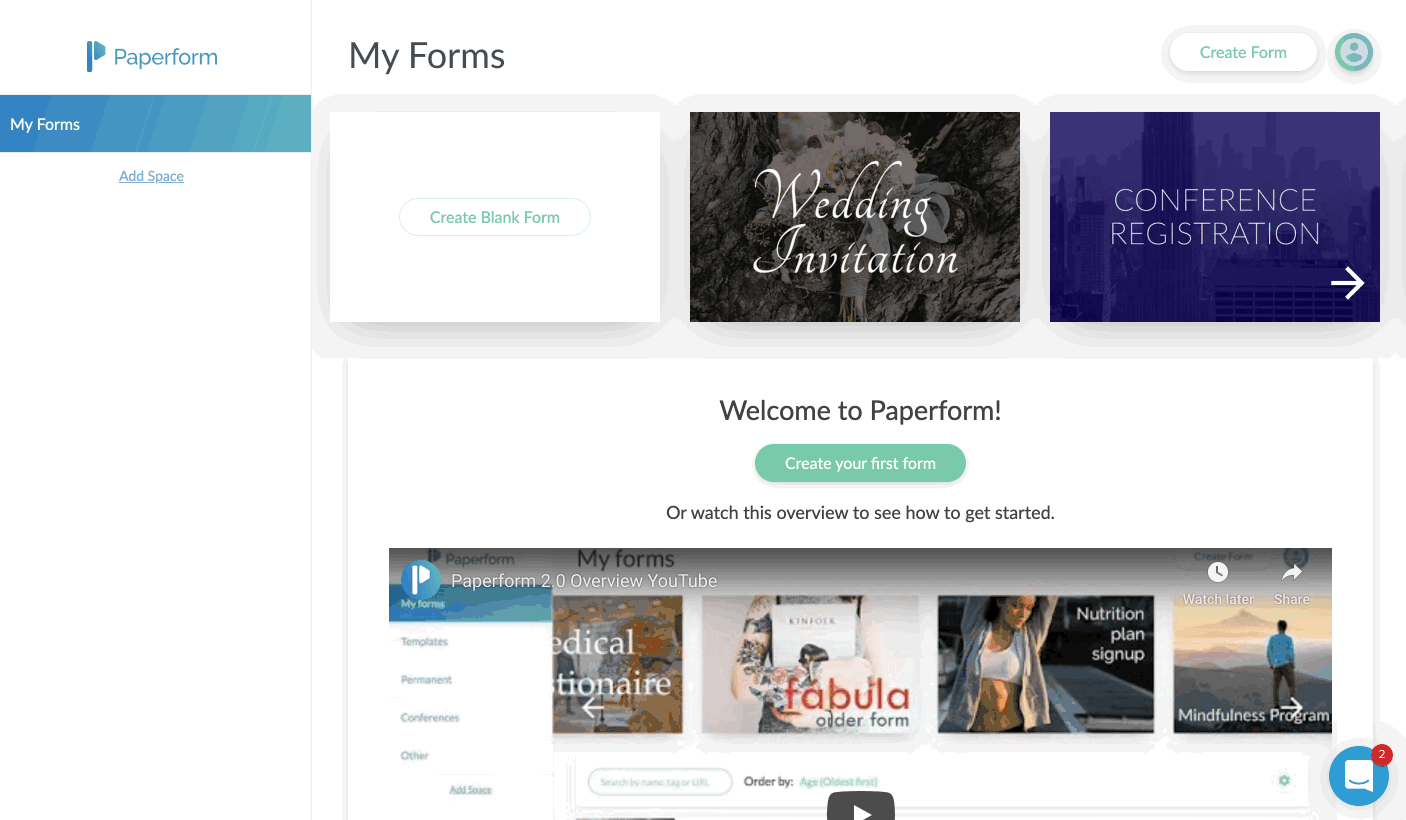
How To Create Web Forms Easily and Quickly
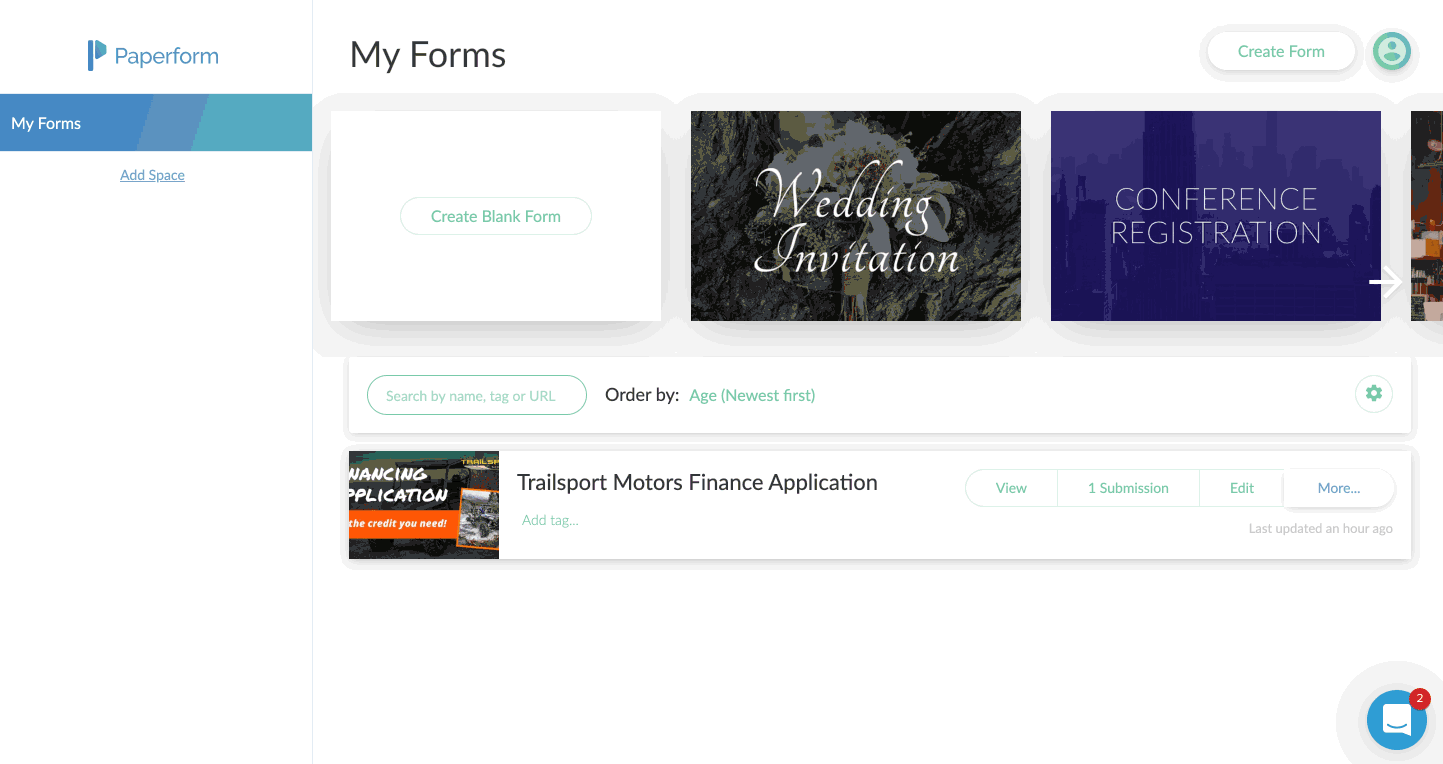
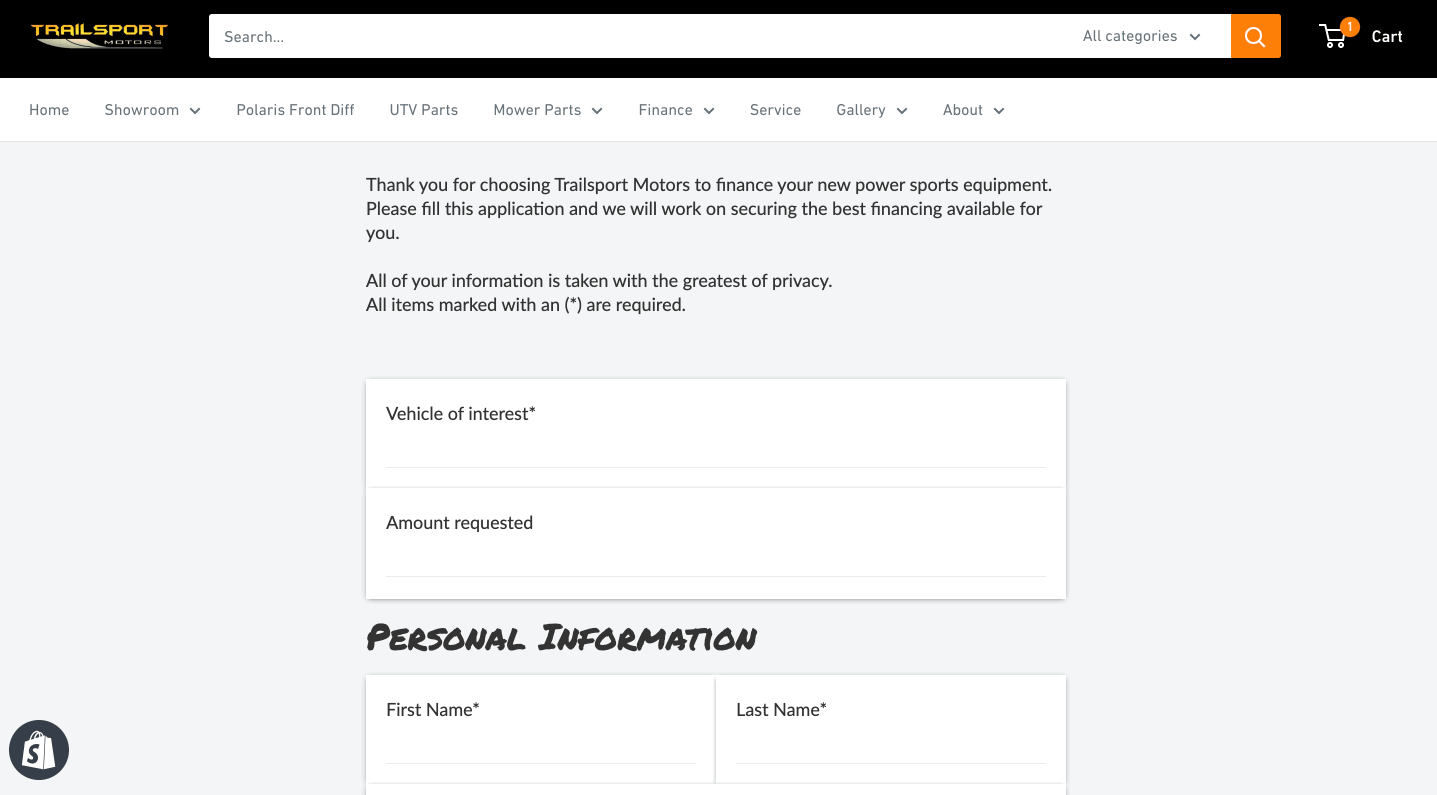
I recently had a chance to dive into Paperform, an online form creator that allows you to create beautiful forms, that according to them, is as easy as writing a word doc. They’re right. I made an entire finance application for a client in less than 15 minutes.
Name, Email, Phone, Message.
How many times have you seen this on a website?
That’s probably the most vanilla way to get information from your visitors.
The world wide web needs more birthday cake ice cream and sprinkles.
I recently had a chance to dive into Paperform, an online form creator that allows you to create beautiful forms, that according to them, is as easy as writing a word doc.
They’re right. I made an entire finance application for a client in less than 15 minutes.
Including customizing the style to match their branding, and placing it on their Shopify website.
In this article, I’m going to show you:
Why you should use an online form builder
How to use Paperform as a marketing and sales tool
A step-by-step guide to creating a form
Why use an online form builder
It’s quite possible that your website platform already includes a form builder. Popular sites such as Squarespace, Wix, Weebly all have their own. Rocket Websites by Bear City Impact also include a form builder, that’s native to our platform.
However, almost all form builders are very basic, eh hem, vanilla. Usually, there’s no customization, and it’s limited to just simply adding a form field and letting the visitor enter information.
An online form builder, such as Paperform will not only let you customize the look-and-feel of your form but also include powerful tools to use it as a marketing and sales tool.
Basically, it lets you turn your vanilla form into a pint of Chunky Monkey Ben & Jerry’s.
Here’s what Paperform will let you do instead.
How to use Paperform as a Marketing and Sales Tool
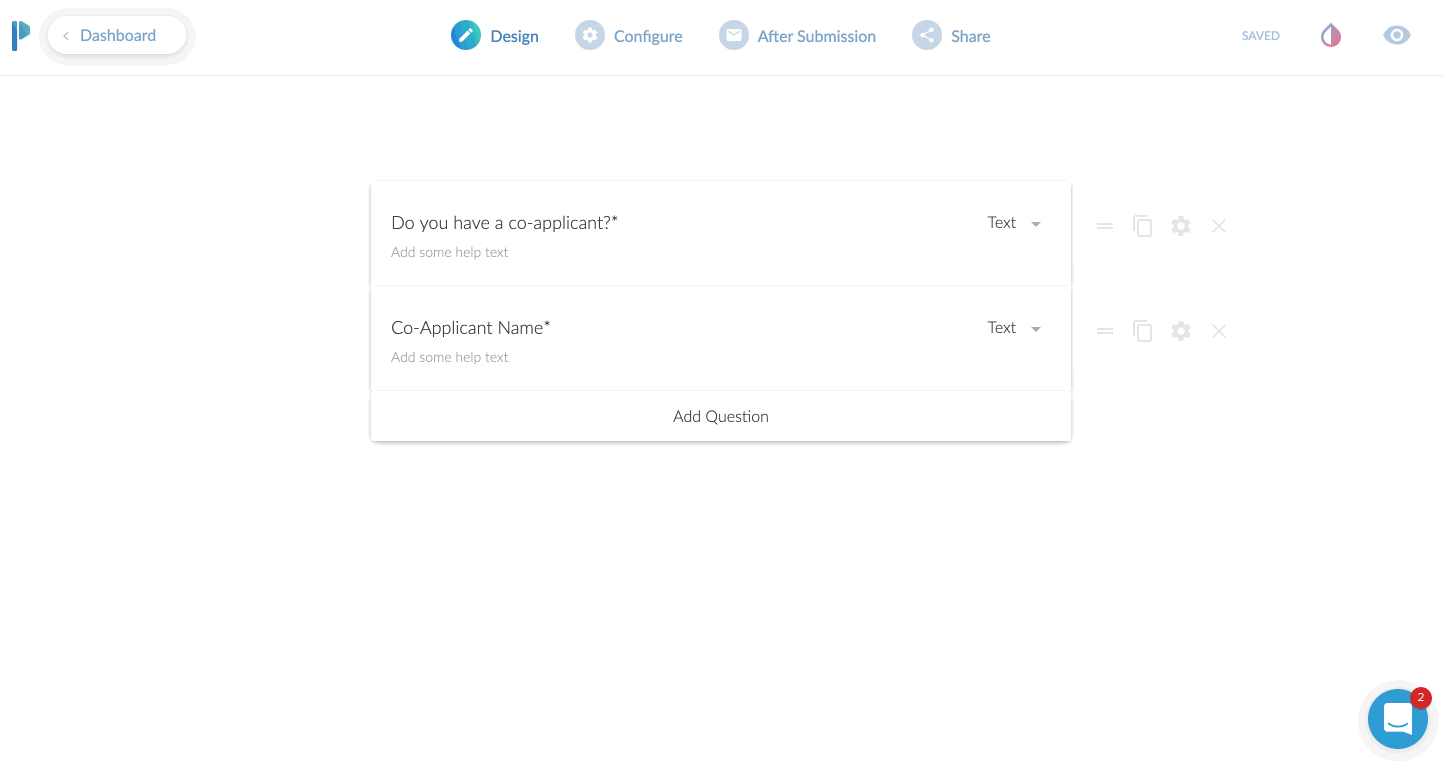
Use conditional logic
This is an extremely powerful feature. In short, what this does, is only show a field based on the input of another field.
Case use: Ask a Yes or No question such as “Do you have a co-applicant”, and if the user responds YES, then and only then, do you ask for the co-applicants information.
Why even do this? Well, long forms can be super intimidating. So the less information you can show to someone, the more likely they are going to fill the entire form.
Even if your form is relatively short, it still makes the form less intimidating. Create as little friction as possible.
Take Payments
YES! You heard that right. You can use Paperform as an online order form, or to take donations or create subscriptions right from within the form. They have claimed to take over $10,000,000 so far in credit card payments.
You can have a form that sells just one product or a menu list of products to order.
Or, set the form up to create a subscription service.
Taking donations, but want to let your donors pick their own amount? Perfect. Just leave the field blank and let the donor enter their own dollar amount to charge.
They integrate with all the popular services, Stripe, Braintree, PayPal, and Square.
Custom Email Notifications
I think this is a fantastic benefit to using Paperform.
99% of the forms I’ve ever used only allow me to adjust the email address the form details should be sent to. You get what you get.
With Paperform, you can set a primary recipient, plus an additional CC AND a BCC recipient.
This is very useful for sending to multiple team members.
If you had a lot of fields on the form, you can have a PDF version attached in the email.
Here’s a super nerdy hack-use-case for this:
Most printers today have the ability to print from the cloud or email. For instance, if I send an email to my printer’s email address, it will print that email or document!
Set your form to email yourself, and then CC your printer’s email so it can automatically print out all new leads for you and give you a personal notification!
You can also specify the “reply-to” address. Why do this? Well, you can actually use an email from the form itself to reply to.
Case use: Using as a lead gen form, after getting the form submission sent to you, when you hit REPLY on your email, it is replying to the new lead directly!
App Integrations
Everything is more fun when you play nice with others.
Sure, it’s cool that you can send the details of the form to your email.
Buttt, what if you could send all of the data, or even just some of it, to an app that you already are using.
Case uses:
You’re collecting survey data, and you want to send it all to a Google Sheet
Create a newsletter signup form, and send the data to your favorite email app such as Mailchimp or Hubspot
Use Zapier to send the data to 1,500+ apps
Share as URL or Embed
Once you create the form, you’ll need a way to get it in front of people.
The most common method will be to embed this into your website. In other words, you want the contents of the form to seamlessly live on your website’s contact page or somewhere else.
Here’s another method. Just share the direct URL. Every form you create on Paperform will have its own unique URL. You can customize the URL to your liking as well.
It will look something like this: https://your-form-name.paperform.co
This is awesome because you basically don’t even need your own website to capture new leads or sell products. All you’ll need is the URL of your form, and then share it on social media, send it in email newsletters, text it to your grandma, whoever!
Templates
Personally, I’m not usually a template fan. I feel like templates are just soooo generic. Aka, vanilla. (Notice a trend here?)
Here’s why I really like Paperform templates though:
There’s a wide variety to choose from
You can interact with the template before using it
They feature rich content including images and video
They’re free and included on all plans
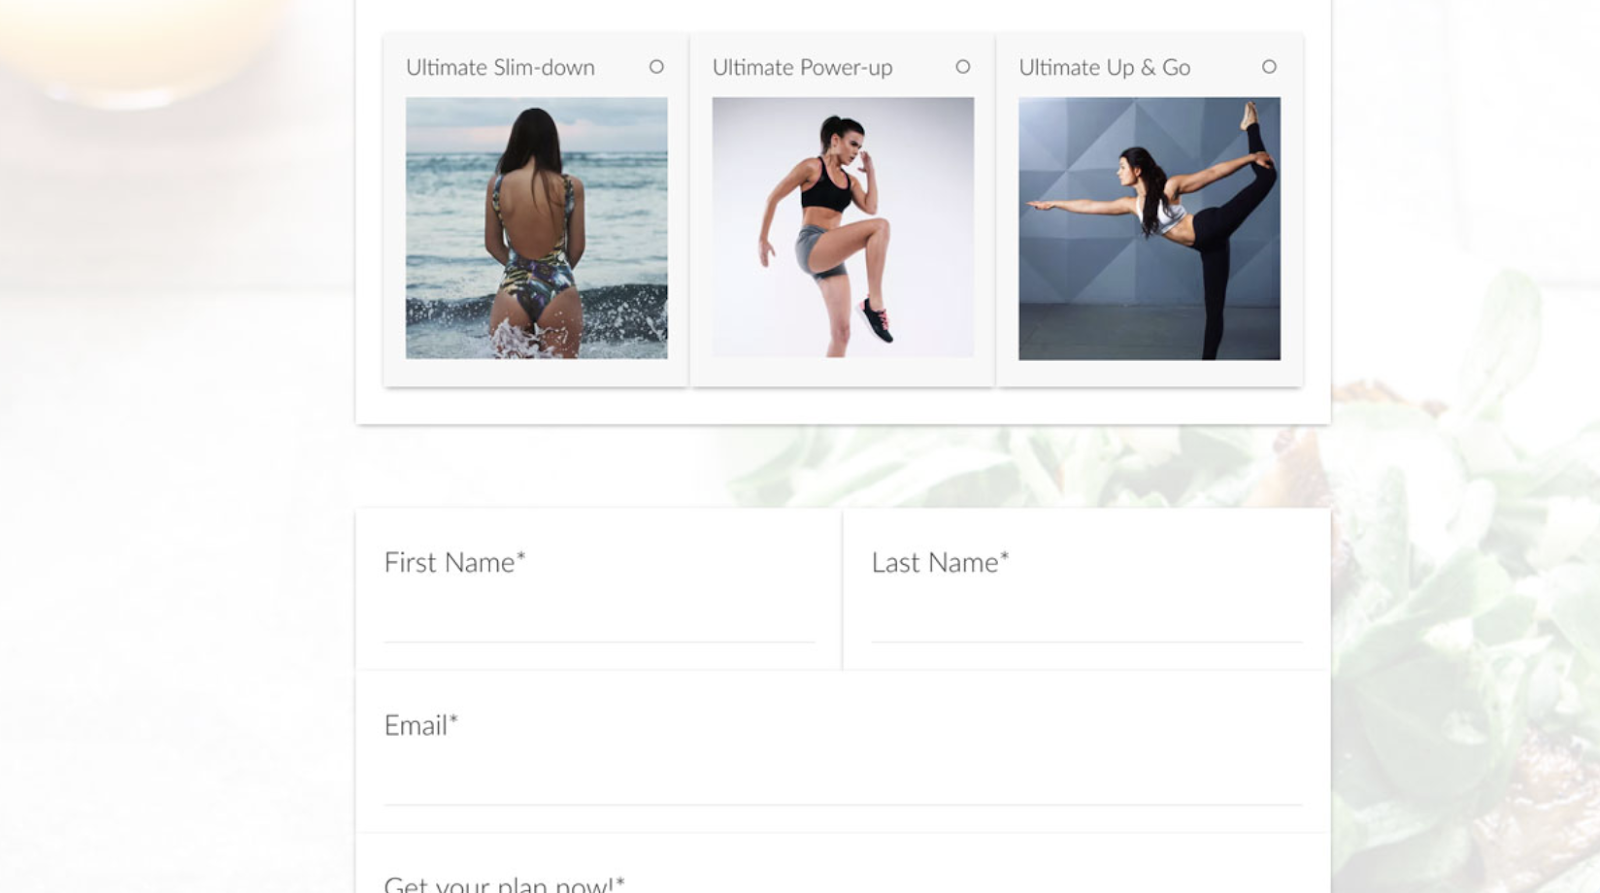
Using the templates by Papeform will be very helpful if you’re planning to use this as a direct sharing URL, or basically as a mini-webpage.
By using one of the templates, you can create a highly engaging visual experience that feels like a webpage, because well, it is a webpage.
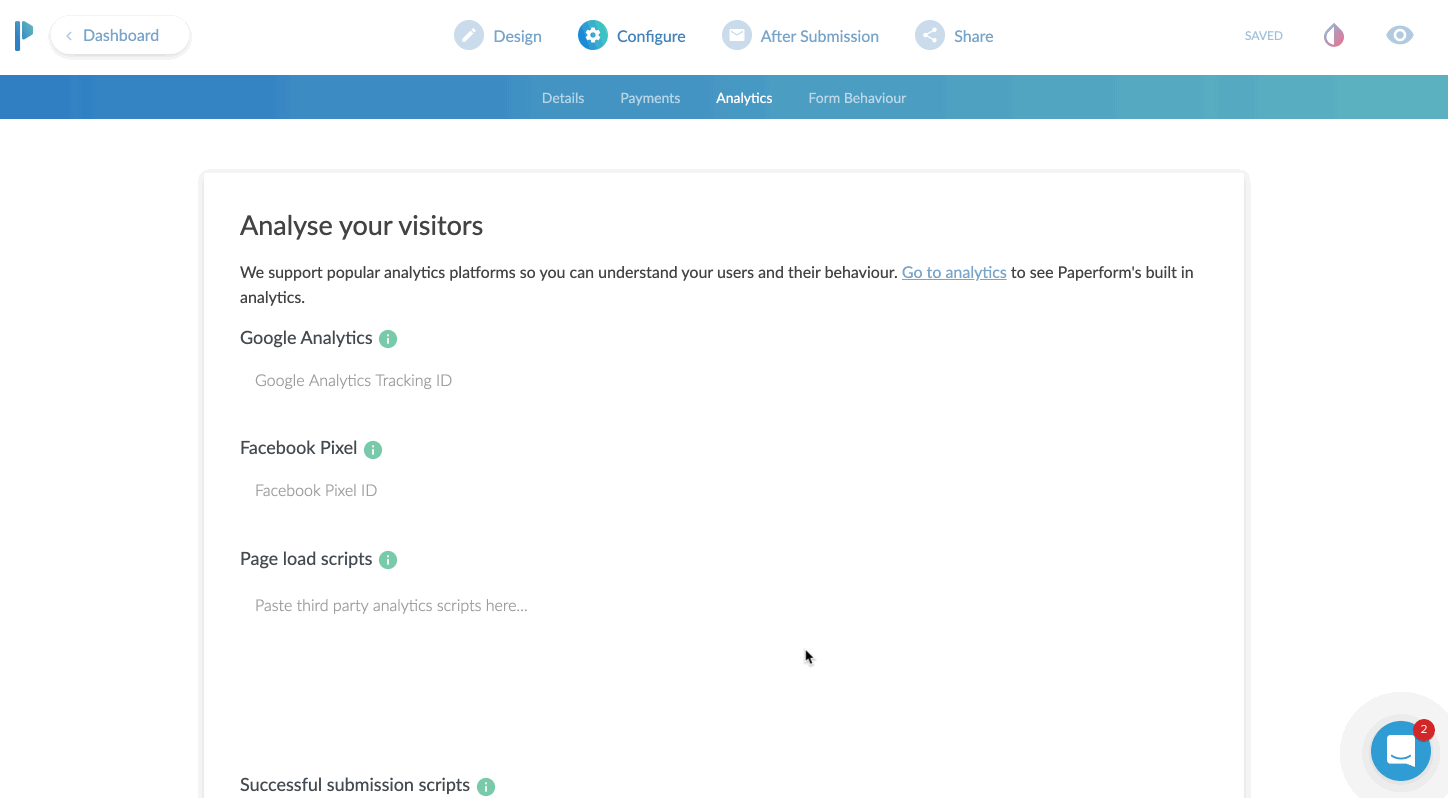
Analytics & Tracking
Going along with the theme here of using Paperform as a mini-webpage, you can actually track the entire form still!
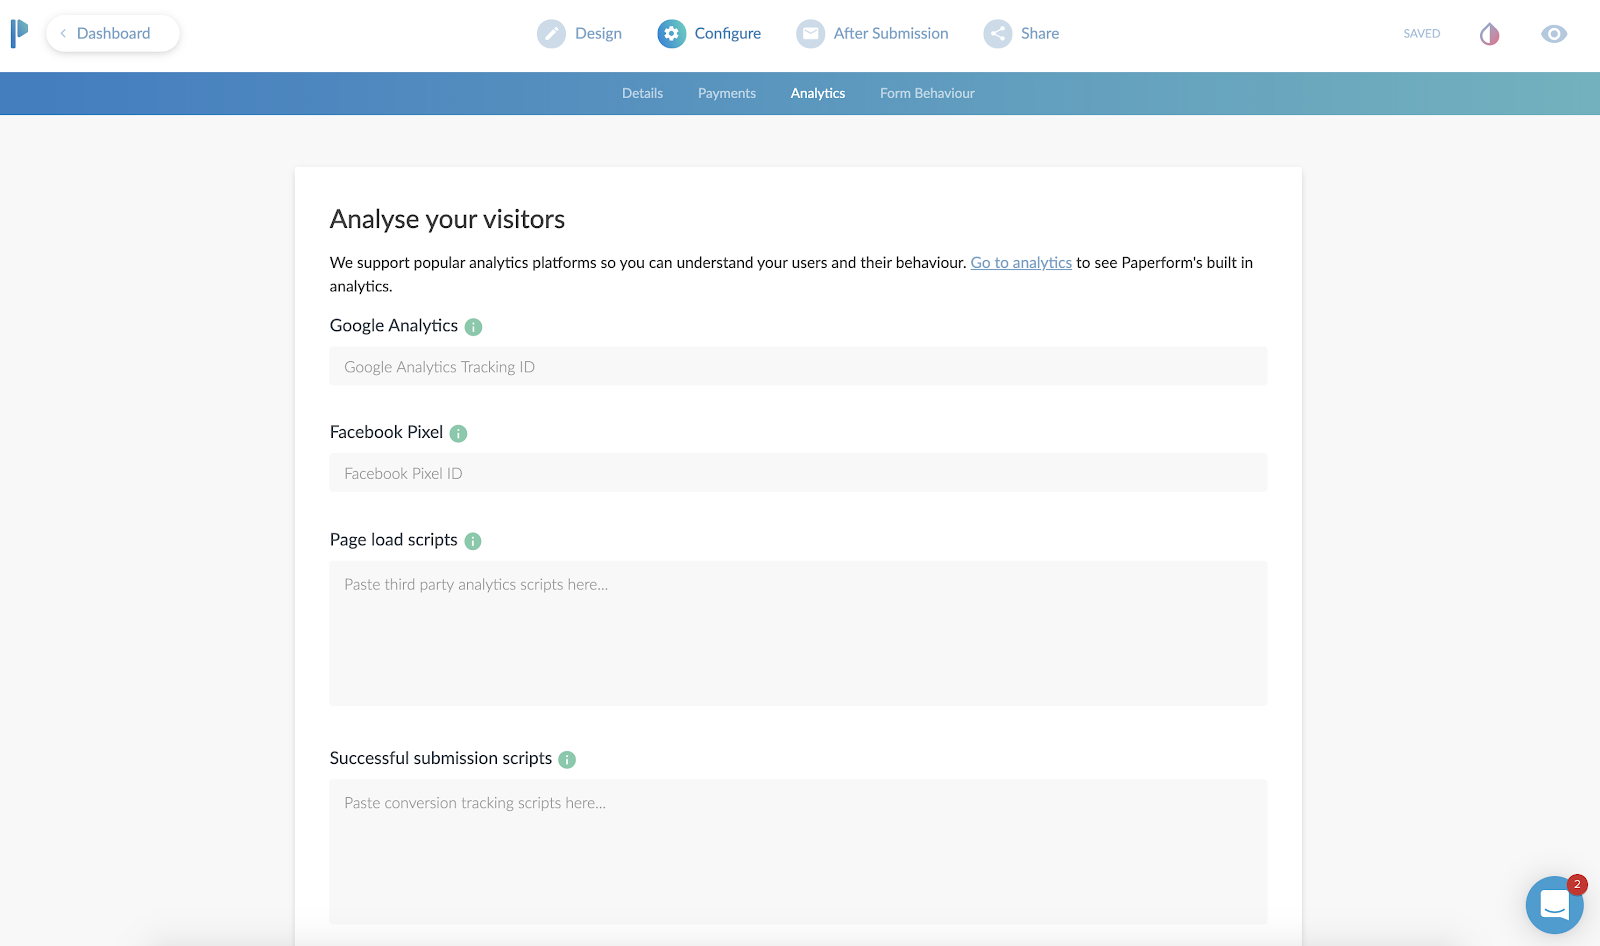
First, you’ll add your Google Analytics ID and Facebook Pixel.
Then, you can add scripts (or tag events) after the form is “submitted”.
Case use: You can send the Facebook or Google event “Lead” after a user completes the form, so you can track the return on investment of an ad.
This is also beneficial to use, even if you are going to embed (integrate) this on your website. Your website might not have the ability to add a tracking pixel to it, or you might not have control of this. By adding the tracking code to Paperform, you can ensure you are tracking the results.
Ok, now here’s the meat and potatoes of how to create a web form using Paperform.
A Step-by-step Guide to Creating a Form
First, you’ll create an account, utilizing their free 14-day trial. You won’t even need to put your credit card in to try it out.
After that, you’re in the dashboard and ready to create your first form.
You’ll just click on the Create Form button in the upper right corner.
Give your form a name, and then choose to either start from scratch or use the built-in templates.
In my case, I chose to start with a blank form. I sort of wanted to see how long and potentially difficult it would be to do this without the option of a template.
I was pleasantly surprised at how easy it was, albeit a few learning curves.
Probably the biggest learning curve for me was that you just sort of start typing. Or you can hover over the tiny icons to the left to indicate what you are adding.
For example, the icons on the left allow you to add a form field (question), an image, a video, or a break point, which splits the form into multiple “pages”.
If you only start typing, you’re basically just putting in text. This is useful to preface what the form is about. I would say this is even more useful if you plan to use the form as a landing page, since you can pretty much put all your sales copy at the top and then build out the form.
If you’re planning on embedding (integrating) this onto your website, you might be able to just skip adding headings and paragraphs here and jump right to adding form fields.
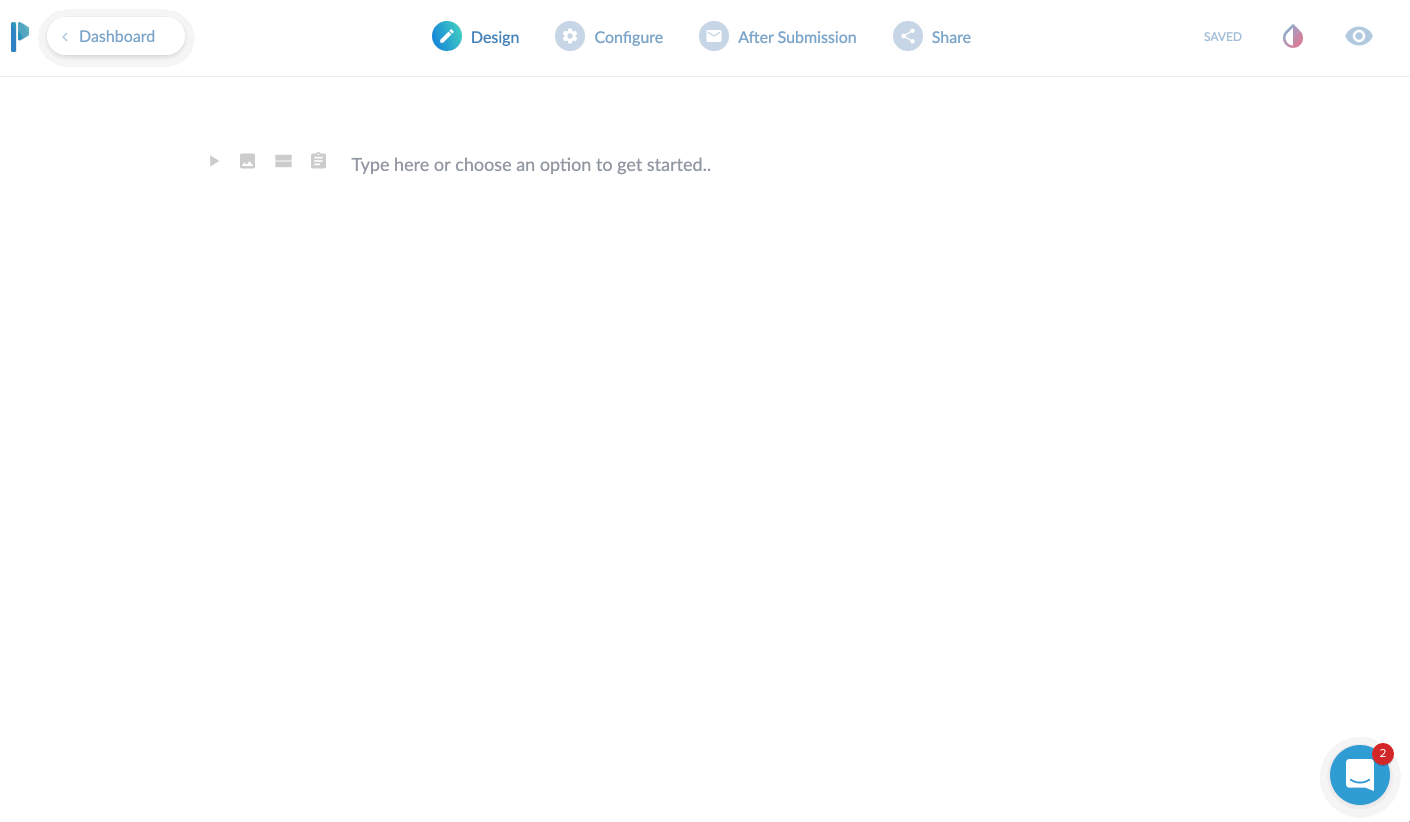
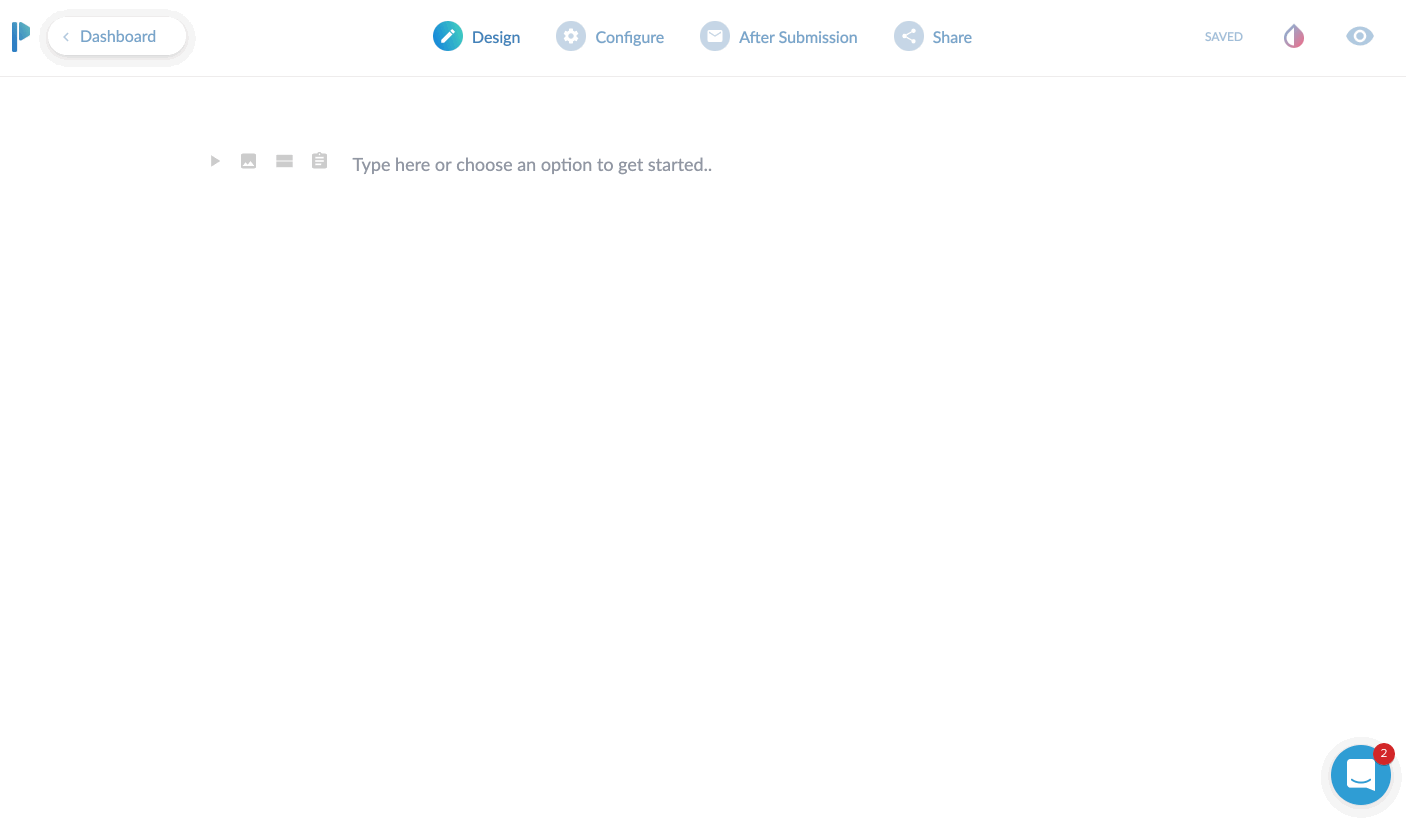
I’ll give a brief overview of the top toolbar area. Currently, you start in “DESIGN” mode. This is where you’ll lay out your form with all of the input fields, headings, images you want to use etc.
There are three additional main tabs at the top after that. CONFIGURE, AFTER SUBMISSION, and SHARE. We’ll dive into each of these.
The Design Tab

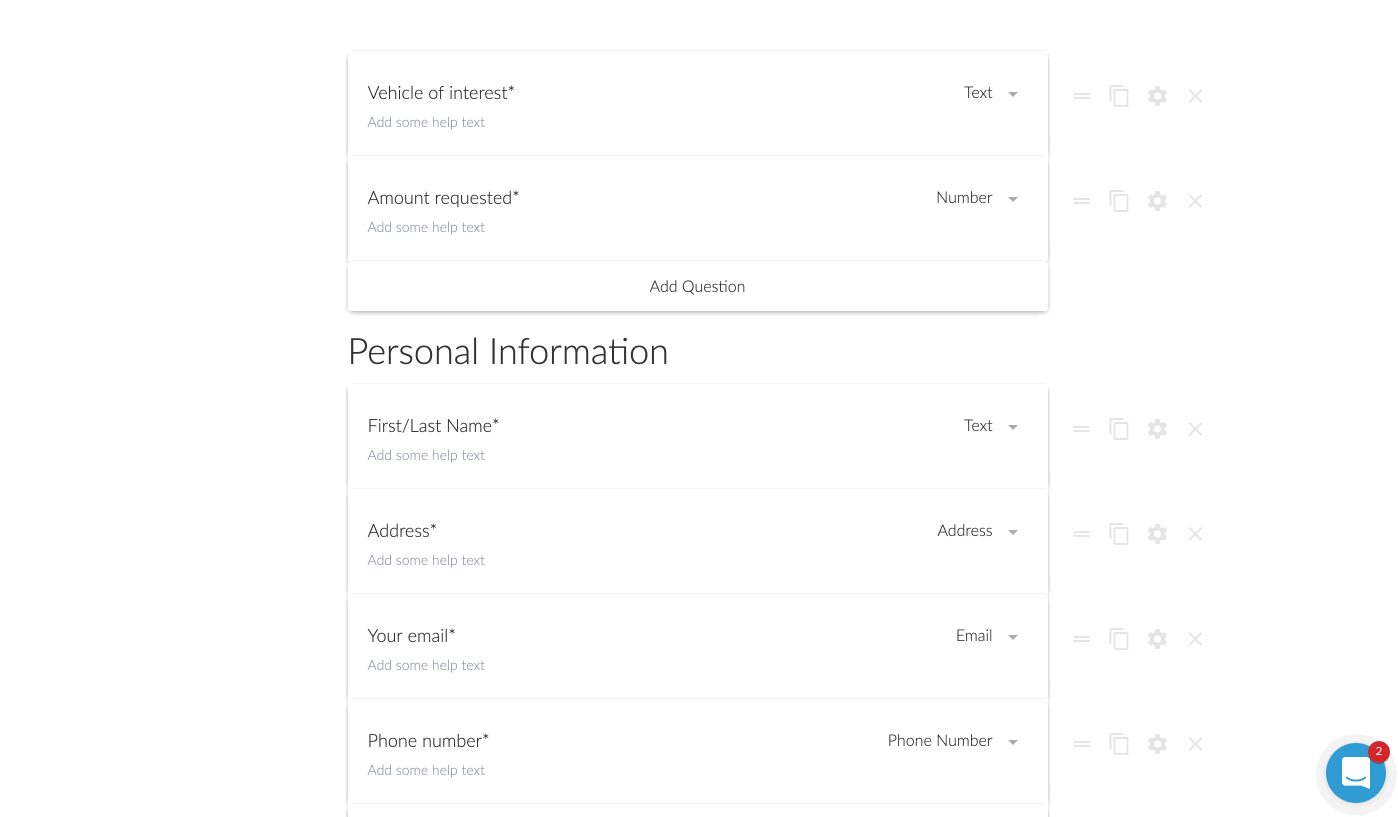
We’ve already added an introductory paragraph here. In this above screen play, you can see me clicking on the “questions” icon so I can add my first input field.
In this case, we’re asking for their “Vehicle of Interest”. To add a second field, I just click the “Add Question” at the bottom here. Super easy!
You’ll notice you can change the field type from “text” to a variety of options. You can choose from other common fields such as address or phone. There are some advanced fields you can do like multiple choice, dropdown selection, or a very handy signature input!
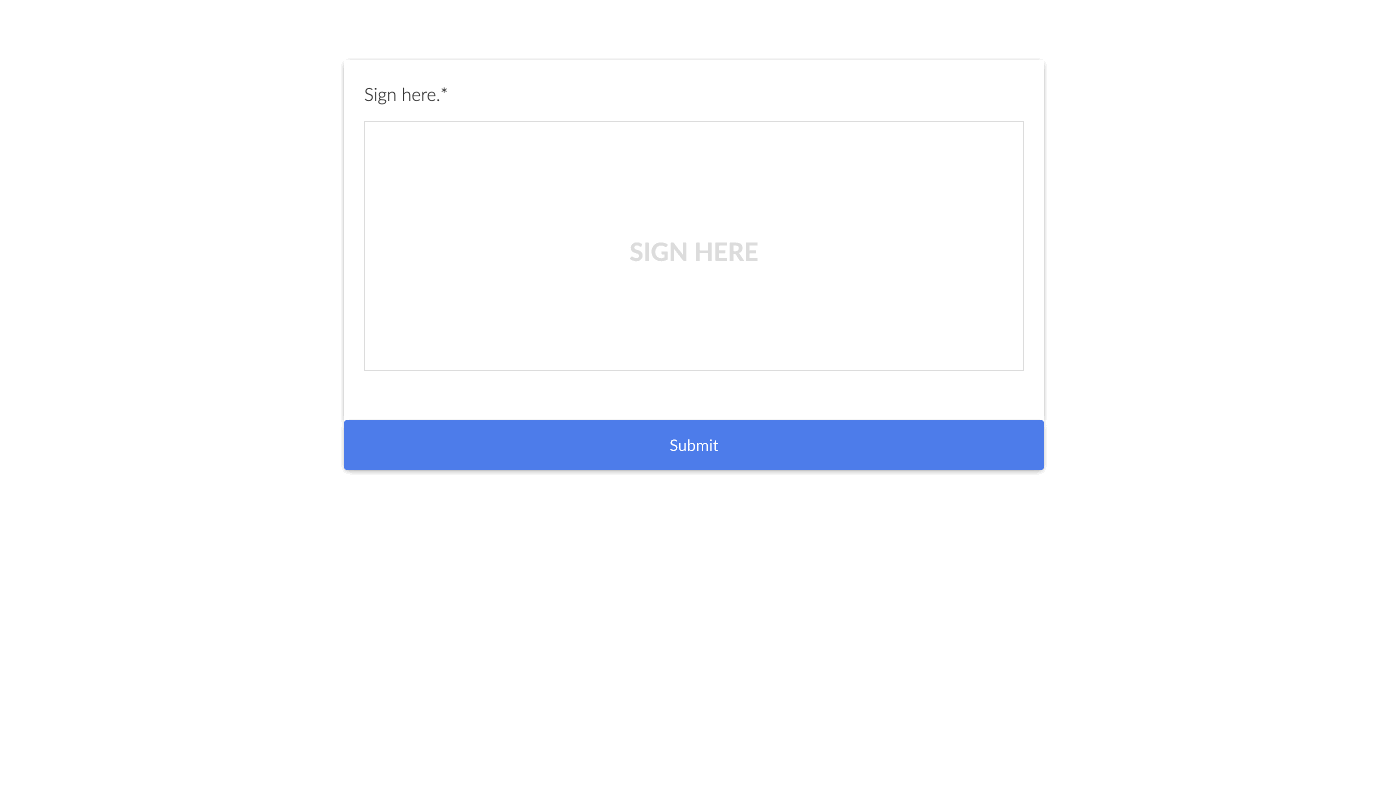
The signature input is very handy if you need to have people sign contracts here, or just need a signature for proof of submission as well. From a desktop computer, it was easy to sign by moving my mouse. On a tablet or phone, they can just do it with their finger. Or a stylus if you’re one of those people that carry a stylus around to use on your phone.
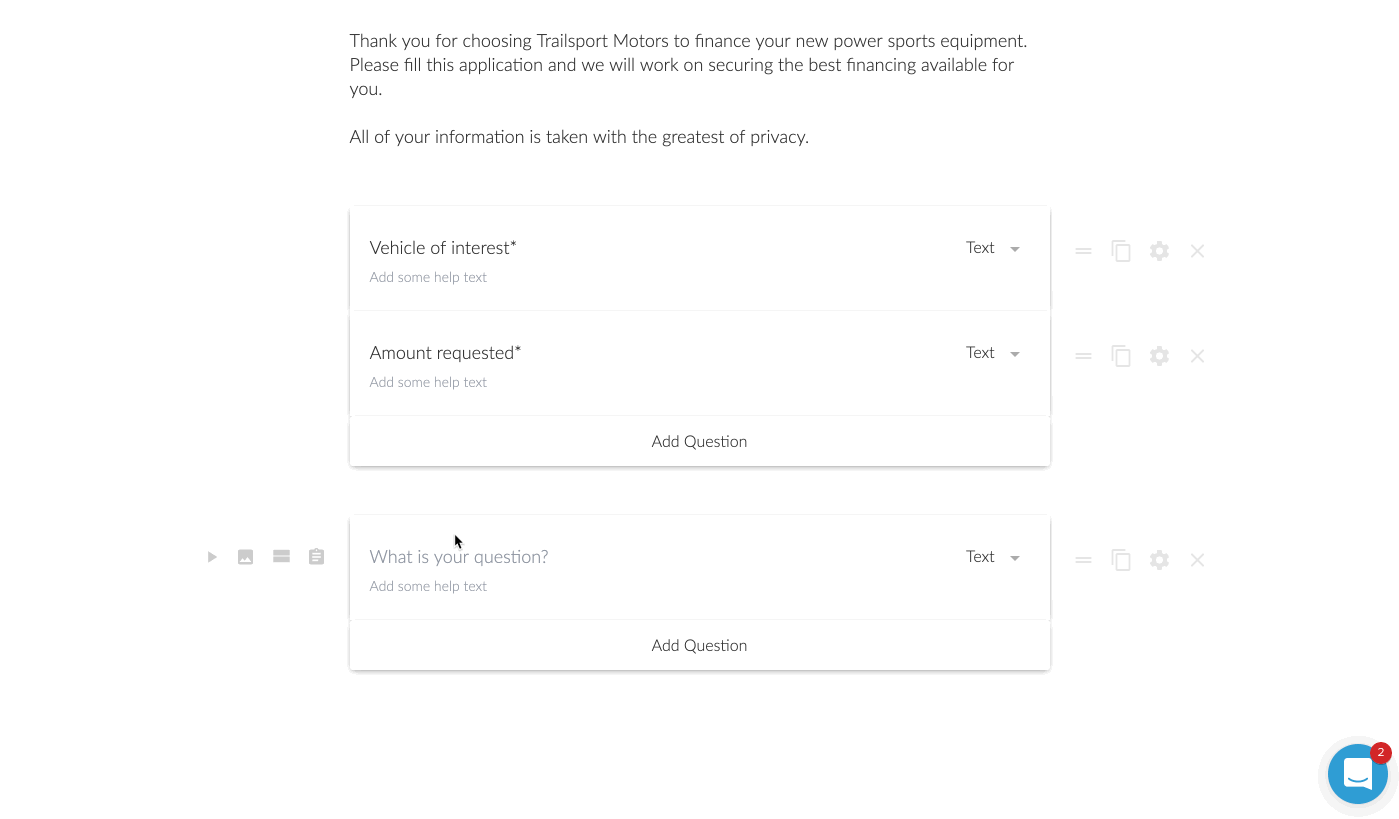
Now in this next step, I wanted to add a heading in between the different groups. This might be a little specific case use, but I was creating a longer loan application. I wanted to break up the sections. Another option I could have done was to add a ‘break’. This would make it so after those first two questions were answered, there would be a “next >” type of button.
For the loan application, I opted for to break it up by using headings. However, is this was a lead generation form, I am a huge fan of multi-step forms. It was one of my conversion trends for 2019 that I laid out on YouTube. Multi-step forms are perfect for lead generation because they assist with micro-conversions.
A micro-conversion is someone just only typing in their zip code for instance and clicking next. Once they type in their zip code, they’ve already micro-converted ONCE. Now you just need them to do a few more micro-conversions until they reach the end.
It’s far less intimidating to enter a zip code real quick than to be presented with 7 questions for a lead.
Question is Optional
For some of the questions, I wanted to make them optional to answer.
This was probably the first thing I had to think about for a moment on how to do. I then realized there was a little gear icon next to each field. Clicking that brings up a host of options to consider. One of those being “question is required”.
By default all of the questions are required, but unchecking that box makes the question optional.
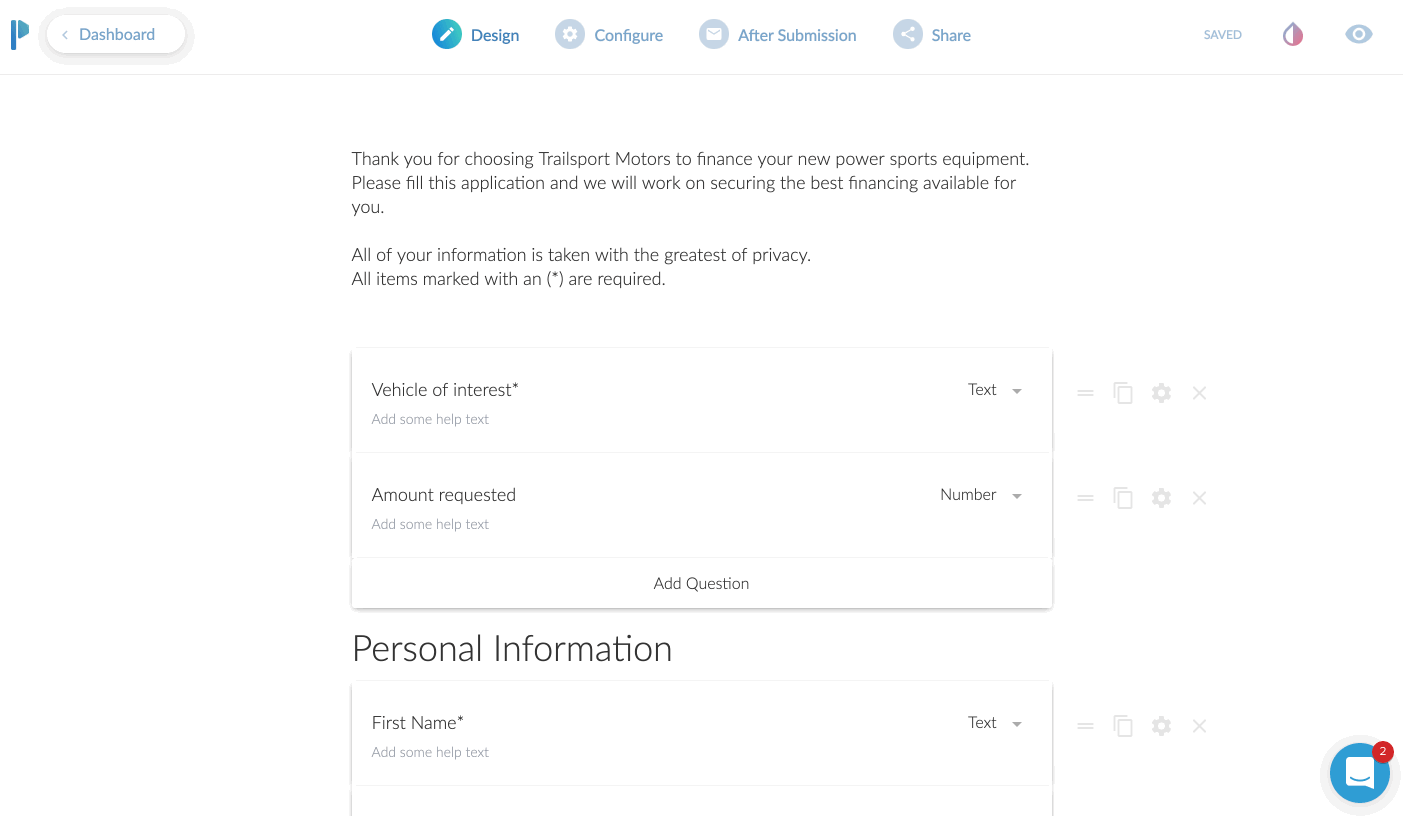
Previewing Your Form
At this point, I was feeling pretty good about how my form was shaping up, but I wanted to see it in action.
This was no sweat at all. You just click on the little “eye” icon to preview it for real. You can even enter in the fields and click the different buttons on the page. It was here that I realized I wanted to change the stock blue buttons to match the branding of my client.
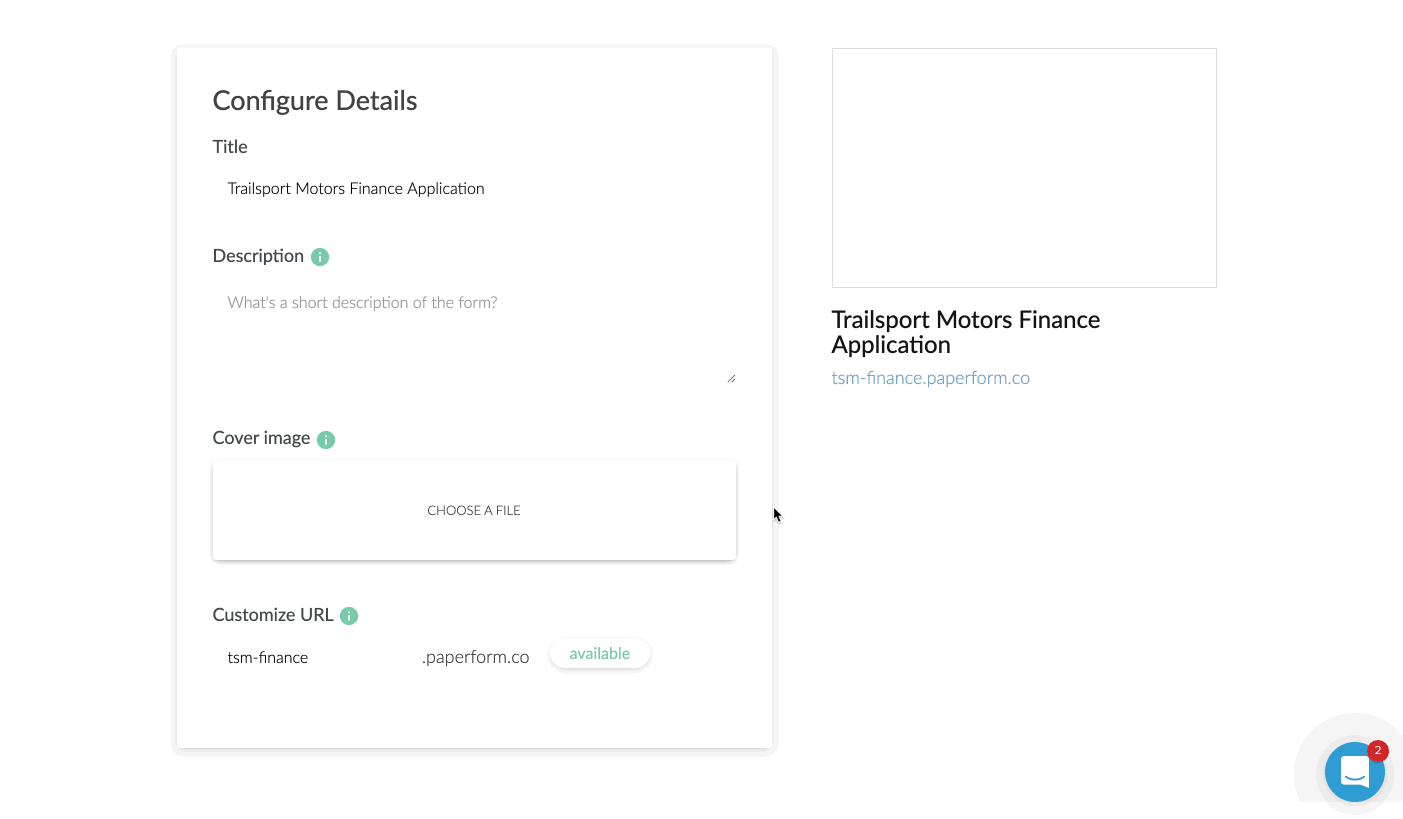
The Configure Tab
First up is the URL. If you are NOT planning on embedding this to your website, I’d highly recommend changing the URL. It will make it easy for you or someone else to remember.
From this first configure tab, you can also adjust the title, description, and cover image. This is excellent because if you plan to share the URL directly, those three elements will come up on Facebook when sharing the URL.

When I drop in the URL for this form, you’ll see the cover image I put in comes up as the share image on Facebook, automagically. In addition, the title (bold area) automatically pulls in as well.]
Now, if you are going to take payments here, you can just click on the payments options of the configure tab as well. In this area you’ll also be able to put in your Google Analytics ID and Facebook Pixel ID. This is very helpful again if you are using this as a stand alone landing page to track conversions.
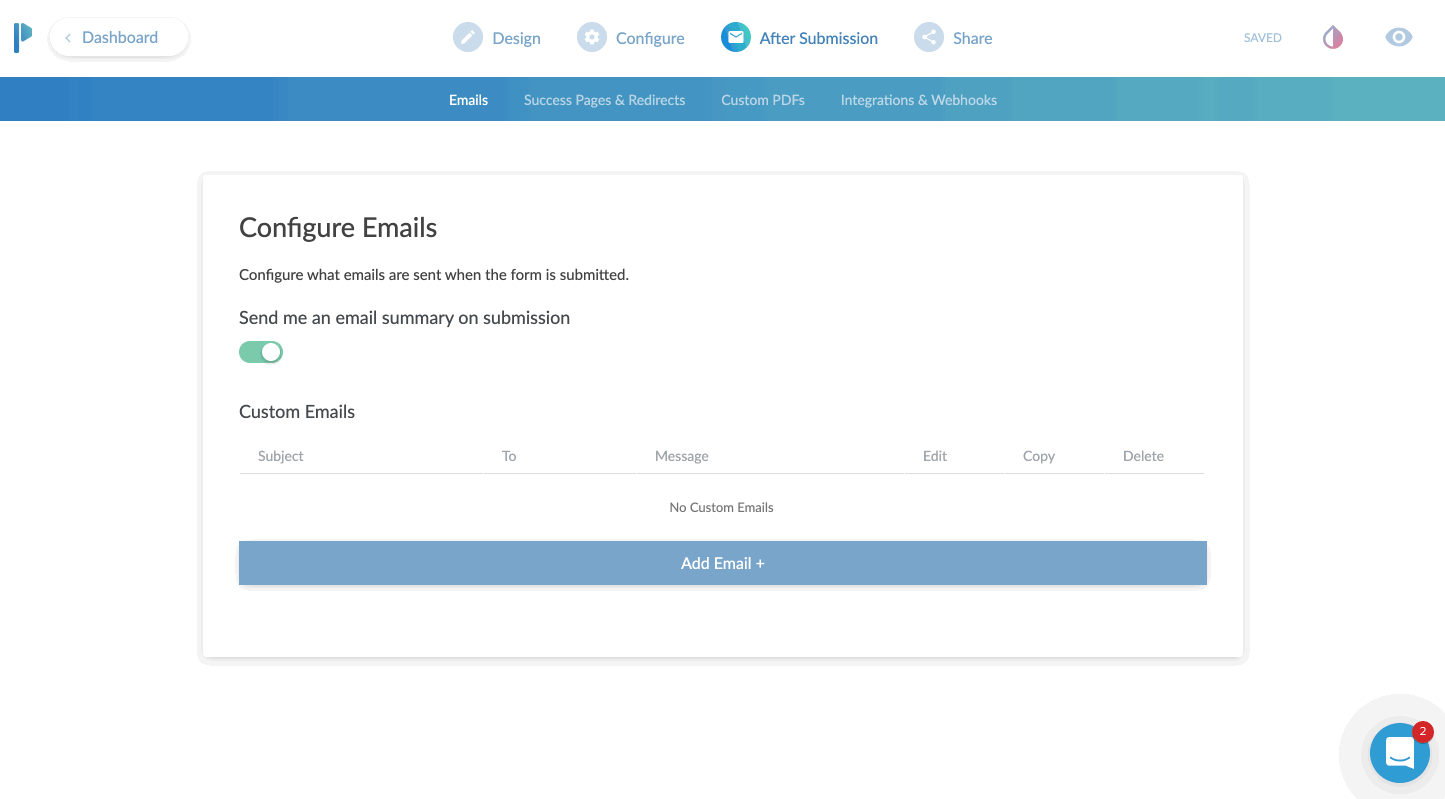
The After Submission Tab
I absolutely love this tab. Here you can configure the email that goes out when someone submits the form completely. It can be just a simple “Hey you have a new lead and here are the details”. Or, you can get a bit fancy and customize the email. This is where you can tell Paperform to attach a PDF copy in the email. Or set the “reply” address as the person who filled out the form, so that you can literally just click “REPLY” and reply directly to the lead from that email.
By the way, we’re almost done here.

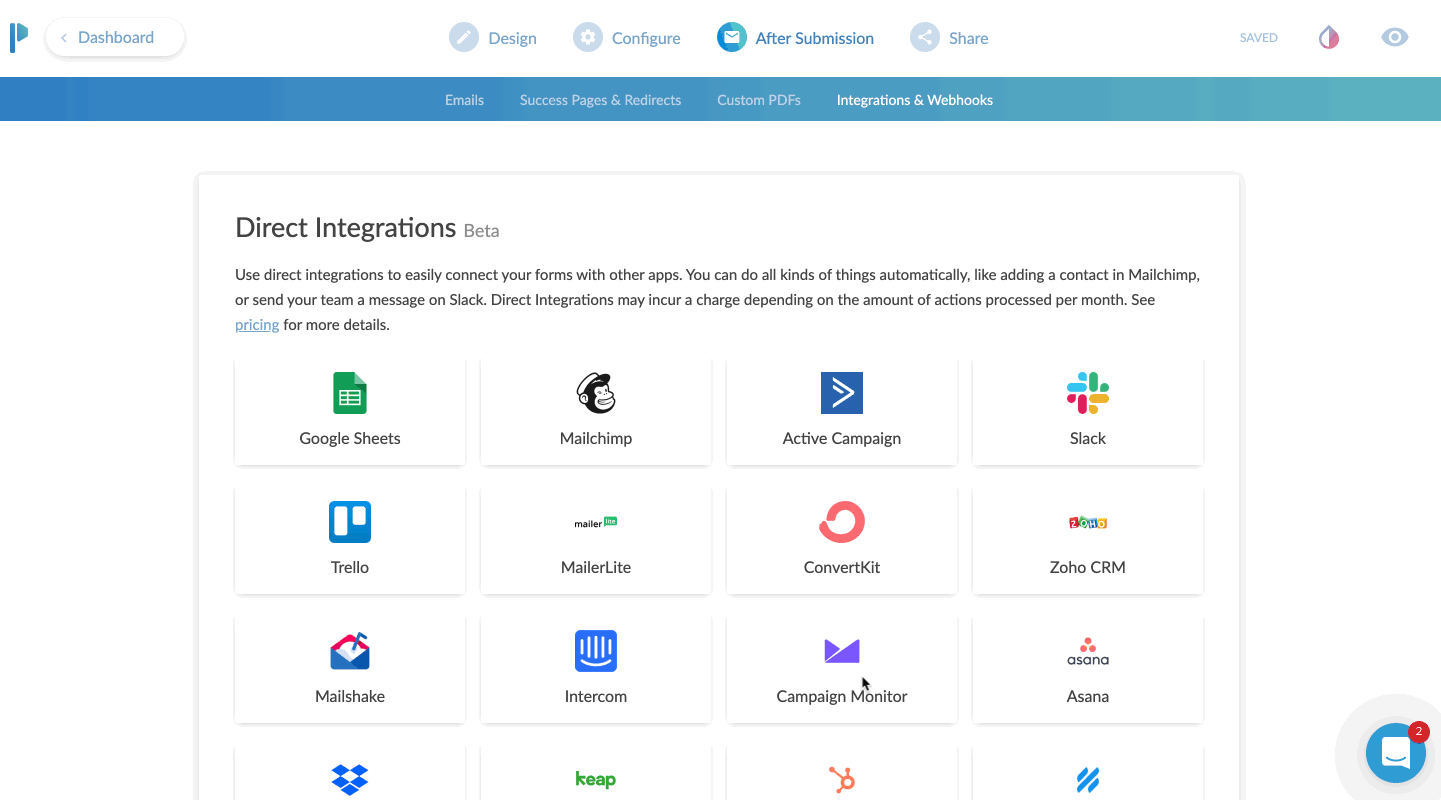
The next part of CONFIGURE is your integrations area.
You can send just about any data you collect over to an existing partner integration. Common uses would be sending data to your CRM or email marketing program. If you don’t find an existing integration, no sweat. Just choose Zapier and then configure your zap to go out to any of Zapier’s 1,500 plus apps.
The Share Tab
The share tab is pretty straightforward and easy.
This tab gives you two options. Either a direct share link to copy to your clipboard. Or an Embed option, which offers three ways to embed your form directly to an existing website.
For my client, I chose the inline embed. This places the form natively in the flow of the page it’s on.
The full screen embed is kind of neat. You place it on the page of website you want it to appear on, but instead of squishing in line with your content, it just takes over the page. BUT, it keeps the URL of your website. This is great for SEO and traffic to your site. Instead of sending traffic to a paperform.co URL, you get to send traffic to your own domain, but without having to configure a new page in your website editor.
Lastly is the pop-up option. I really like this actually. This would be a great option if you wanted to place a button on your website that says something like “Click here to subscribe to our newsletter”, and then a little box pops up with an email address field.
This is another type of micro-conversion. If the visitor clicks that button - it was intentional. They are WANTING to sign up for whatever you’re asking them.

Bonus: Theme Settings
This isn’t really a tab, but it is in my opinion, and important part of your form.
Click the little ink drop icon in the upper right and you’re brought to a theme settings area.
Here I was able to change the default blue to my client’s branded color of orange. I also customized the font choices here and as a nice surprise the background choice. The default was a light gray background. However, I was going to place this on their Shopify website, and there was already a background color of that page.
I set the color to NONE. You do this by clicking on the background color, then moving the transparency slider all the way to 0%.
Optionally, you can choose a background image instead of a color.
The Final Product
Here’s how it all looks once placed on the website. It looks and feels like a natural part of the Shopify site, but all pulling from Paperform!
From start to finish, I’d say this form took me about 15 minutes. Now truth be told, it took me longer but I was creating GIF recordings the entire time as well. I’m estimating 15 minutes.
I did go back and create another form for the client, which was limited to 5 questions. It was to request a service appointment.
Now that form, took me about 3 minutes to create I think? Since I already had one form under my belt, this second form was extremely easy and fast to create.
The Best Online Form Maker ?
All in all, I would say Paperform is the most versatile form creator on the web today. It’s easy to use and highly customizable to fit a variety of needs.
Remember – forms today are more than just name, email, phone, and message.
The ability to take payments, use smart logic to navigate the form, accept signatures, route responses to certain emails, and a crazy easy form editor makes Paperform my go to form editor for now on.
*Please note: In exchange for an unbiased review of Paperform, I received free use of the Paperform service. My opinions of the product were in no way influenced by this.

Can You Get More Web Traffic From Twitter?
Hi there! This is a slightly newer video format for me. I've been offering marketing coaching services for a while now but have recently begun to record my sessions with clients. 100% of my coaching sessions are done in-person.
Hi there! This is a slightly newer video format for me. I've been offering marketing coaching services for a while now but have recently begun to record my sessions with clients. 100% of my coaching sessions are done in-person.
In this first episode of coaching sessions, as I'm calling it, you're watching a segment of consultation with Bob Laverty, a wedding DJ in North Carolina. He's been in the business for several years and is now trying to increase his presence online through social media and SEO.
In this style of video, I'm jumping back and forth between the coaching session and adding some commentary for deeper context and explanation of what I was saying to my client.
I hope you enjoy this, if you do, please hit the like button and consider subscribing.

5 Ways To Turn Warm Leads Into Hot Leads
Congratulations, you did it! You got those leads. It took a while to build the right infrastructure to get those leads pouring in, but now your business has more leads than it knows what to do with… quite literally in fact. A lot of businesses pour their efforts into generating leads in the hopes of buoying their sales. But here’s the thing...
Congratulations, you did it! You got those leads. It took a while to build the right infrastructure to get those leads pouring in, but now your business has more leads than it knows what to do with… quite literally in fact. A lot of businesses pour their efforts into generating leads in the hopes of buoying their sales. But here’s the thing...
Lead capture is only half the battle!
Being able to capture leads doesn’t necessarily mean that you’re able to convert all those leads into sales. In fact, statistically, the vast majority probably won’t convert… Ever. Depending on the industry, average conversion rates fall somewhere between 2% and 10%. Still, that doesn’t mean that the majority of the leads you’ve worked hard to generate need to go to waste.
A strong lead qualification criteria is essential in separating the “hottest” leads and ensuring that your sales team get to work on them as quickly as possible to avoid a loss of momentum that could cause them to go cold.
But what about the rest? They may not be the cream of the crop, but that doesn’t mean they’re not still of value to you. Warm or even lukewarm leads that score medium to low-medium on your lead scoring rubric can be turned into white-hot leads that practically zoom through your sales funnel.
Here are some effective ways to heat things up!
Give them highly targeted content
Any marketing executive will tell you that content is king when it comes to moving leads through your funnel. High-quality content delivered on multiple channels helps to build both familiarity and value in your brand for the lead. This content has to be about giving the lead something they want and is of real practical use to them.
Deliver this kind of value-rich, high-quality content and you can establish your knowledge, credentials, and authority in ways that will help to build the lead’s trust. But in order to deliver the kind of content that motivates warm leads, the personal touch is all-important.
Deliver a “drip campaign” of highly targeted content in your email shoots and social media engagements. Deliver offers that will appeal to them or blog posts that will help them to solve a problem that they encounter regularly. Address them by name. Help them to realize that the content they’re getting is just for them.
Highly targeted content can generate the kind of value that converts a casually interested lead into a loyal customer.
Let them know, it’s all about them
Why do consumers rail against marketing and advertising content? Because they see it as brands trying to get something from them, whether it’s their time, their money or their attention. And nobody likes giving to brands without getting anything in return.
Thus, if you want to make warm leads hotter and prevent them from going cold they need to realize that you’re all about them. Enter them into a competition to win something that you know they want. Reach out to them with a free gift or a special discount on their birthday. Have they been looking at a particular product on your website but never pulled the trigger? Give them a personalized and exclusive offer that’s only for them.
Combine this with your highly targeted approach to content and you can make the lead feel truly valued.
Build that relationship
A warm lead can start to cool at any time, which is why it’s important to invest real and genuine effort in building your relationship with them. Leads are more likely to warm to your brand (and, thus, move through your sales funnel) if they feel that you have an interest in them as a person and not just as a consumer. Seek them out on social platforms. Like things that they post (assuming, of course, that they align with your brand’s values). Respond when they tag you or @ you in their posts.
Yes, it can be painstaking, yes it can take a while, but it’s certainly a more sustainable strategy than plowing efforts into generating leads which only go to waste.
Create a network
Warming up leads isn’t just about helping them to find the products, services and content that’s of value to them. It’s also about helping them to find each other. If your leads (and social followers and customers) feel like they’re part of a community, they’re much more likely to engage with your brand.
Identify beneficial connections between leads and you might just find that you increase the value of your brand and your network exponentially. You see that one of your leads has a nascent startup that’s just gotten off the ground? That’s so cool! You can’t help but notice that another is an accountant who specializes in small business taxes. They should get to know each other.
Casting yourself as a professional and social matchmaker can help leads to build a personal connection with your brand… And that’s the kind of value that simply can’t be bought!
What’s more, if you can make this network into an elite club where members get exclusive access to special offers, discounts and promotion, that’s a little extra added value which will help prevent the lead from cooling.
Get them in the same room as you
When all’s said and done, no matter how high in quality your targeted content or how much you agonize over getting the wording of your email shoots just right, there’s no substitute for good old-fashioned face-to-face contact.
Get a lead in the same room as you and you stand an excellent chance of keeping them interested and engaged. Try to convince them to join you for a coffee (or maybe a spot of lunch) and a chat about their needs. While this might not be a viable strategy for every business, it can be a fantastic way of heating up lukewarm leads and creating meaningful and valuable early interactions.
Although it goes without saying that this is not an opportunity for a hard sell. Think of it as a networking opportunity and a chance to get to know the lead and their needs a little better.
A combination of these strategies can seriously reduce your risk of warm leads going cold and help you to gain maximum momentum on the leads you’ve put so much effort into capturing!

7 Effective Ways To Nurture Your Leads
Our businesses need leads just as our bodies need oxygen, but there’s a complex process at work making that oxygen useful and nourishing to our bodies. The exact same thing goes for leads. It’s important to have them… But even more important to know what to do with them.
We’ve said it before and we’ll say it again. Leads are the oxygen of business. The more of them you have the more you can accomplish… But be mindful of the operative word here… can. Many enterprises invest a lot of their time, effort and capital on inventive lead capture activities, only to find that an abundance of leads never quite translates to success in business. Our businesses need leads just as our bodies need oxygen, but there’s a complex process at work making that oxygen useful and nourishing to our bodies. The exact same thing goes for leads. It’s important to have them… But even more important to know what to do with them.
It seems that there’s a lot of information out there when it comes to generating leads, but decidedly less information on converting those leads into loyal repeat customers. Here we’ll look at effective and actionable strategies for capitalizing on the momentum you pick up with your new leads...
The importance of Lead Scoring / Qualification
Generating leads is a bit like panning for gold. Can you be sure that every little sparkly nugget you dredge up will be worthy to make a necklace or a wedding ring? Of course not. By that same logic, it’s important to remember that not all leads are created equal. You’ll need to qualify the incoming leads and separate the wheat from the chaff if you’re to capitalize on your lead generation effectively and efficiently.
Of course, that’s not to say that some leads are wasting your time, but some will be “hotter” (and by hotter we mean more intent-rich) than others. Knowing the interested from the intent-rich can help you to set your sales team at work on the prospects which are ripest for conversion while your marketing efforts can help nurture those leads which need a little more help along the way. Don’t worry, we’ll get to that part later. It also prevents you from inadvertently turning cold leads colder by “harassing” them with unwelcome sales calls.
So, how do we score and qualify these leads? Glad you asked...
How to score your incoming leads
With a scoring criterion that’s appropriate to the needs of your business, scoring leads can be a quick and easy process. While every enterprise’s needs are slightly different the following rubric can serve as a rough guide which you can later personalize to better suit your needs;
Demographic Information- This helps you to build up a customer profile. How old are they? What’s their income? Who do they work for? Where do they live? Do they have children? How can this information inform their consumer behaviors? You may also find outliers that make the lead unsuitable for you due to geographical restrictions.
Company information- B2B businesses will want to get to know the company the lead works for. What industry do they serve and how much quantifiable need is there for your product or service in that industry?
Online behavior- What social platforms do they use? What other brands are they engaging with?
Brand engagement- How, if at all, are they engaging with your brand? Are they clicking through to links sent on email shoots? Are they retweeting you? Are they commenting on your Facebook posts?
Types of interest- The type of interest a lead has shown will demonstrate whereabouts in your sales funnel they are. Are they downloading your free e-book, requesting a free sample or demo or simply viewing a product page repeatedly?
Activity level- How active are they on your website? Which pages are they spending the most time on? How many inquiries have they made and how much content have they downloaded?
Spam detection- Finally, your qualification criteria should also weed out the spammers and bots.
Determine your own points system based on which of the above criteria matter most for you and align the closest with your priorities.
Nurturing your leads
Once you’ve applied your lead scoring criteria and filtered out the “hottest” leads, you’ve redirected them to your sales team who are ready to work their magic and get some conversions. But what about all the cooler leads?
Don’t make the mistake of assuming that just because a lead isn’t red hot right now that it won’t have value later.
Lead nurturing is the process of helping cooler leads through your sales funnel and guide them successfully to the point of sale. Here are some effective lead nurturing strategies which will help convert the tentative lead into a faithful customer.
Keep giving them something for nothing.
A steady stream of content is a useful lead nurturing strategy for two reasons. Firstly, it keeps you a constant presence in their mind. Even if the lead doesn’t read all of your email shoots, simply getting them helps to build familiarity with your brand… And familiarity is a building block of trust.
Secondly it helps to build value in your brand. It establishes your knowledge, authority and expertise and gives them what we all want… Something for nothing! For optimum impact, make sure that your content is useful to the lead. It should help them to solve a problem, save money or make their lives easier in some way.
Deliver targeted content
Targeted content gives leads the personal touch. It gives them content that’s just for them rather than a generic piece of marketing content. Leverage the information you have to deliver highly targeted content including special offers and links to products and services that you think will be of use to them.
Embrace multi-channel marketing
Leads cannot be nurtured by email shoots alone. Hedge your bets by reaching out to leads across the channels that they use the most. Effective marketing takes place over email, social platforms, retargeted ads and, of course, direct sales outreach.
Fail to keep your name, your logo and your brand at the forefront of a lead’s mind and they may drift over to your competitors.
Keep in touch
Do you expect leads to convert after the first time you make contact with them? If so, your expectations may be a little unrealistic. It can take an average of 10 “touches” to guide a lead through the top of your sales funnel to the bottom.
With an effective lead scoring criteria and the right approach to nurturing cold leads, you can make sure that not a single lead that you’ve worked hard to generate goes to waste.

How to Make A Facebook Messenger Chatbot in 2019 – Free Easy Setup
If you want to learn how to set up a chatbot for your website or Facebook page then this video is going to blow your mind.
Today, I'm going to show you how to:
Set up a chatbot for your Facebook page or website without writing a single line of code.
I'm going to show you how to create auto-responses for your chatbot to interact with your audience while you're not even there.
I'm gonna show you how to put this on your website so you can get messages to your Facebook page from your website as well.
Which Facebook Messenger Bot Service Should You Use?
The messenger chatbot service that I use is called Mobile Monkey. And the founder Larry Kim had this to say about chatbots.
People already overwhelmingly prefer messaging for communication, but yet businesses haven't figured this out.

100% Mobile Monkey Facebook Messenger Chatbot
More often than not, I don't want to have to call up a business. I end up either messaging them on Facebook. It's not because I'm antisocial, in fact I'm completely the opposite of an anti-social person.
I just find that messaging oftentimes is much quicker especially when I'm trying to get support from a company that I'm already using. You know most of the time when you call in for phone calls nowadays, it's all automated anyways. So I would much rather get an automated response back from a messenger bot because it's just gonna lead me to the place that I need to get to very likely.
The thing of it is most people aren't using chatbots so this is kind of a really nice way for you to get a competitive edge because people aren't using these chatbots right now so this isn't like a flooded market feature that everyone is using right now.
So I'm gonna keep this video as short as possible so you can just finish up with this and then just get to installing your chatbot right away. But this video is part of a five-part series on web design trends to boost conversions in 2019, and this is part one.
I recently published a highlight of the top five web design trends to boost conversions in 2019. So I'll throw a link up in the cards if you want to be able to check that video out as well. But if you find this kind of content helpful then consider subscribing right now so you can get notified of the other four tips that I'm going to show you in-depth on how to boost your conversions in 2019.
Okay, so let's get into the meat and potatoes. Let's just quickly talk about why chatbots are part of my web design trend.
Why Chatbots Are Part Of My Web Design Trends
First of all, Facebook Messenger messages have an open rate of 80%. Those same messages have a click-through rate of up to 20%. Now, 20% doesn't sound like a whole lot but go ahead and look at the last email campaign that you sent out and look at the click rate of that email campaign.
I thought so.
So 20% is actually a really really good click-through rate when it comes to one-to-one message communication. Plus, when you set up a chatbot properly, it's going to be your best sales and marketing person 24/7.
It's going to deliver the same messages everyone in the same format. And not only that, but it works on both your Facebook page and your website simultaneously and seamless. And lastly, once again, it's currently not being used by everyone, hence, this is why I call this a trend.
If you don't know me. My name is Brad Poirier. I'm the owner of Bear City Impact which is a web design and video marketing business. Now, I'm going to show you exactly how to create this chatbot in just a few seconds.
But before I do that, if you want to pause this video, and in the description box below there's a link that says click this to start a chat, that's going to open up a new messenger chat through my Bear City Impact page and I've created a special chat sequence for this exact YouTube video.
Click this link to try out the test chatbot sequence: https://bit.ly/2JCWCIm
Okay, so we are now over at the computer and I'm gonna jump in and I'm gonna show you how to create a chatbot for your website and your Facebook page. Let's jump in.
So we are on the Mobile Monkey web page. So if you need it's just mobilemonkey.com. So we're just gonna click login. You'll notice basically there isn't like a get started kind of thing. The app itself is free. They do have paid plans.
When I click login, it's actually asking me to sign in with Facebook. So there isn't an option to like sign in with an email or something, it's basically just sign in with Facebook so that's all you got to do. So we're gonna click sign in with Facebook. That's just gonna take my account. In here I already have the chatbot set up, okay. So this chatbot basically already set up here.
The first thing actually I want to show you is how to install this on your website because it's super super easy. Once we get that out of the way then I can show you how to create the bot and you can create multiple sequences for your bot depending on what you're trying to do. So to do that we're actually going to click on lead magnet and over here it says customer chat widgets, okay. And basically what that will do, I already have one set up here but to create one is super-easy and so basically we’re gonna do add customer chat widget. We're gonna give this a name. We're going to call this website chatbot, okay. The dialogue is one of the dialogues that you've already set up. So I've already set these things up here and so I'm gonna do the welcome dialog, okay. So basically when they click this button here on my website, I want them to go to the welcome dialog which is sort of just like the sequence that I want to put them into. And then you can also change the color of it. Then from there you just need to copy this code and then add it to the header of your website. So depending on what website you have, it's gonna be different for every kind of website. I'm not gonna get into it.
I do mine through Google tag manager. Google tag manager is super easy. Basically I just go to tags and from here I just add a new tag. If you don't use tag manager now, I highly recommend it. Much easier to add these little plugins to your website. So I'm just gonna call this one Mobile Monkey chatbot and in the tag configuration I click custom HTML and I add my script there. And then on the triggering I'm going to do all pages. It's the way it comes up on every page and then that’s basically it. So once you click submit then from there it's going to automatically activate that and again it's gonna look something like this on my particular website. So in yours it's gonna a little different. And so here you'll see the little chat button again here so this basically opens up a chatbot.
So now we have installed the chat widget to your website so now we're gonna show you how to build a bot. And I'm gonna build this bot for this particular YouTube tutorial that we just basically talked about in the very beginning. So again if you haven't interacted with it yet and you want to try it out, click the link in the description that says click here to start a chat and you'll see basically what happens. You'll basically see what we’re… Basically what we're building right now is what's gonna go to that little click here to start a chat so you can kind of see what happens in the future of this video which is now. [Phew] Mind blown, told you.
Okay, so the first thing we need to do is basically build a new dialogue for the YouTube bot that I'm creating right now. So we're going to do is click on the bot builder from the home page wherein click on dialogs. And basically we're going to click on add a new dialog and we're gonna call this one YouTube video. I'm going to create this dialog. And basically the first thing we want to do, so you’re kind of like it's almost like building out a web page but just kind of like step by step so you're building out a series of text here. So let's go ahead and just throw in perhaps an image to start with. I'm just going to grab an image. I'm going to speed this up real quick. Okay, my dial-up internet is finally working so I have the image uploaded now. So then we're gonna add another little widget here. So basically this will happen, this is the first thing that someone will see. Just click add a widget and we're going to say I want a little text piece here actually so we're gonna put a little typing box. So this kind of simulates the fact that someone is typing right now and then we're going to put in some text and we're gonna say hi, first name, and then we're gonna add another little typing piece. We're gonna add another widget. We're gonna add this texture that says, “Thanks for watching my YouTube video. If you'd like more helpful content like this, please tap the subscribe button below.” And we're gonna add a little button here and we're actually gonna click.
So there's a couple things here. So if I can click a dialog and basically this button will take them to another dialog so this is kind of how you can funnel them into different parts but right now I'm going to keep it super simple. I'm going to just click a URL and basically that URL is going to be my subscription link so when they click this or when you click this, it'll subscribe you. So I'm going to click this add button. I need to enter a button name, duh. Subscribe on YouTube. Okay, now we're gonna click this add button. Okay, so that's basically it there. So this is all that it's going to do. I mean this is like a very very basic bot. But from here… That's pretty much it. So I'm just gonna go back here we can see that this is all done here. I'm gonna copy this link so I can test this dialog by clicking the test dialog and then opening in messenger. And now when I do this, you'll see here you this is the sequence here. So it's basically has through that picture in there and then it says hi Brad so that's obviously that's me that's logged in here. And then here's the thanks for watching my YouTube video. If you'd like more helpful content, please tap subscribe button below. Subscribe on YouTube. And when I do that [Pop], it opens up the YouTube sub confirmation. Are you sure you want to subscribe to Brad Poirier Bear City Impact? That's basically it, so that's like super super simple.
Now even a little bit simple, you can basically take this now and you can do this for a lot of other things so this could be from your YouTube. So perhaps if you have a video on YouTube, you can use this to send them to a content upgrade that you want them to download but you're doing this all from messenger, right. So they're already logged in. You don't need to grab their name and email, all kind of stuff. You basically already have their contact information from Facebook's database and then you can simply say if you want this you know content upgrade just confirm your email here. So it's gonna assume their email which is the one they're logged in from or they can change it up and then you can give them the content upgrade link right from within your Facebook Messenger. So it's super super easy.
So this is a very very basic kind of bot but that's basically the bottom building from Mobile Monkey. I mean it's literally just a few minutes and you can pretty much get yourself going here and really what you can do is this just limited to the ideas that you have. So again that's basically that's how you create a chatbot for your website or Facebook page it's, pretty easy.
Okay, wasn't that super helpful? So if that was helpful maybe perhaps hit that little thumbs up button, that would be great. I'm really interested to see the chatbots that you create so go ahead and drop a comment with what your Facebook page name is and I'll go ahead and visit it in a few days and I'll go ahead and check out the chatbot that you've created. And now remember this is part one of a five part series that's going to show you how to boost your web design conversions in 2019. So be sure to subscribe and hit the bell button so that way you can get notified when I show the other parts to these web design conversion trends. And throughout the week I'll be posting some additional content on these web design conversion trends on my Instagram. So be sure to visit @bradpaulp for more tips. But that's it for now. I will see you on part two.
How To Upload IGTV Videos Widescreen Horizontal in 2019
On May 23rd Instagram announced that they are now supporting horizontal video for IGTV. Here’s the problem – when you upload a horizontal video to IGTV, still today, it automatically crops it for a vertical video.
On May 23rd Instagram announced that they are now supporting horizontal video for igtv
Here’s the problem – when you upload a horizontal video to IGTV, still today, it automatically crops it for a vertical video.
So how exactly do you upload a horizontal video to IGTV natively without having to do that weird move it sideways trick in your editing software.
First let's talk about why Instagram has to be so difficult with everything they do.
When I went to the IGTV app I went to uploaded a horizontal video and it still cropped it in the portrait mode. I said well maybe it was just for a preview, but it actually posted it that way! It was still in portrait crop.
But then I cracked the code. I figured out how to upload a video to IGTV horizontally without having to turn the whole video sideways.
This is how you upload a video horizontally natively to IGTV without any weird trick and I'll show you exactly how to do that looks just jump onto the computer.

7 Local SEO Tips for Contractors
As a general contractor, you’re accustomed to handling many of the same problems as many other businesses. You face stiff competition from other businesses, who are competing with you for the same local seo attention of customers.
As a general contractor, you’re accustomed to handling many of the same problems as many other businesses. You face stiff competition from other businesses, who are competing with you for the same local seo attention of customers.
You know that you need every inch of inside track you can get when it comes to making yourself visible to the people who need your services. Unlike many other businesses, however, contractors cannot rest on the laurels of repeat customers.
Your customers either need building, repairs or maintenance work carried out… Or they don’t.
Of course, if you make a great impression, customers may well contact you when they next have need of your services, but that may be months or even years down the line.
Thus, a contractor who hopes to gain a leading edge in a highly competitive field must ensure that their Search Engine Optimization (SEO) game is strong.
Here, we’ll look at some SEO tips that will make you more visible to local customers when they need you most, positioning yourself above your less proactive competitors and ensuring ongoing success for your business.
For contractors, it’s all about the local game
As a contractor, you’re largely (or even wholly) dependent on your ability to attract local business. Yet, what many small businesses don’t realize is that you need to adopt a subtly different strategy if you plan on dominating your local market.
“Unlike many other businesses... contractors cannot rest on the laurels of repeat customers”
Local SEO is slightly different to national SEO. That’s why we’re going to spend this post discussing the subtle art of local SEO and how you can master it to provide a steady stream of customers for your business.
Keep your NAP data up to date
One of the simplest, yet most effective local SEO tools is your NAP data.
Your NAP data is:
Name
Address
Phone Number
Keeping this up to date on all local directories in which you are listed is crucial in ensuring that you remain visible to prospective local customers.
When first starting out it’s likely that you submitted this data to a host of relevant local directories. Nonetheless, if any of these changes, it’s vital that you update this information in all directories in which you are submitted.
Local directory listings are like a vote of confidence in your business to search engine crawlers, and inconsistencies in this data will be off-putting to search engines and frustrating for customers.
BONUS: Get your free Local SEO report in less than three minutes.
“Your Google My Business page is also a fundamental building block of your local SEO.”
Get Google verified
Going through Google’s verification process is a relatively straightforward procedure but can go a long way towards legitimizing your business not just in the eyes of local customers but in the metaphorical eyes of the search engine giant itself.
List all your services
Your Google My Business page is also a fundamental building block of your local SEO. However, some contractors sell themselves short by only submitting their primary specialism, thereby limiting the number of search terms in which your web page pops up. It’s a good idea to list yourself in 3-5 categories e.g. general contractor, home builder, bathroom remodeler, kitchen remodeler.
Optimize your homepage
Your homepage should give prospective customers all the information they need to place their trust in your services. However, it should also be a calling card to search engine crawlers, helping to ensure that your services are a good fit for the needs of local customers.
There are certain tricks to getting your homepage noticed by the search engines. One of the most important aspects of your homepage is the title tag you use. This is like the chapter title of a reference book; it tells you what the content therein will be about.
Optimal title tags are usually around 50-65 characters long. If you’re struggling for ideas, “General Contractor in {Name of City} - {Name of Company}” is an effective format.
Next, you will need to turn your attention the the homepage meta description. This should be 100- 150 characters long and is essentially a blurb for your business. Try to end it with a Call To Action (CTA). For example;
{Name of Company} offers the very best {Name of Services} in {Name of City}. Call {Phone Number} today for a free quote!
Your homepage will also need a visible headline, (known as the H1), which is a brief description of the business and the services you offer. The page copy below is your opportunity to tell prospective customers all about your business.
This is your opportunity to earn their trust. Provide a little background information, describe your services, and sign off with a compelling CTA. Try and squeeze this into around 500-1,000 words. Anything longer may be off putting to prospects.
Leverage your service and landing pages
Your service pages offer you a better chance to describe your services to local prospects. These should be optimized in much the same way as your homepage. Use intent rich keywords to ensure that your page gets noticed by prospects who have a specific service in mind.
For example, “Kitchen renovation in Austin TX”, is the kind of keyword that will ensure that your page reaches the eyes of prospects who are looking to pull the trigger on the work they need doing.
Develop citations and links
A citation is any listing on a local online directory for your business. Anything from your Facebook page to the Yellow pages or your local Chamber of Commerce websites. The higher authority these sources are, the more credible your business will appear to search engine crawlers.
What’s more, if you can get local newspapers, other trusted businesses and other high-authority sources to link to your business, this can also be extremely helpful in upping your local SEO game.
Incentivize customer reviews
Social proof is a hugely important aspect of conquering your local market. It proves the legitimacy in the eyes of local prospects when your previous customers have nothing but glowingly positive things to say about your business.
Customer reviews are one of the most effective forms of social proof you can get so it behoves you to take steps to incentivize reviews from happy customers.
Take these simple steps, and conquering the local landscape with your SEO prowess becomes a cinch!
If you haven't already done so, get your free Local SEO report. In less than three minutes you'll see exactly how you stack up against your competition for your top keywords.

What to Look for in a Contractor Website Design
If you’re looking to upgrade your business website or create an entirely new design to draw in more customers, then it’s important to understand what elements of website design are important for your specific business.
If you’re looking to upgrade your business website or create an entirely new design to draw in more customers, then it’s important to understand what elements of website design are important for your specific business. In terms of contractor web design, the idea is simple; you want it to be easy to read, you want your contact information readily available and you need to encourage your viewers to contact you.
To help illustrate these points, let’s take an in-depth look at the elements that make up a good contractor web design.
Be clear about what services and products you’re offering to customers
There’s nothing worse than a contractor that can’t make up their mind about what services they offer. Sure, you might have a wide range of services, but actually listing them instead of being vague is a good way to actually let your visitors know what you can do for them. Of course, you shouldn’t list every single thing especially if there’s a term to generalize them. For instance, you don’t need to list every type of flooring option you have; simply mentioning that you have a variety of flooring options and then listing them on a separate page is good enough.
Understand your target market inside out
If you understand your audience then you understand what services they’re looking for. If you’re targeting a high-end renovation market then your website needs to be clear, modern, elegant and showcase some of the work that you’re most proud of. If you’re a construction contractor that wants to appeal to a wider audience and different price points, then don’t make your website too wordy and keep the language simple so that your services seem accessible.
Make the content short, concise and meaningful
One of the biggest pitfalls of any contractor website is writing too much stuff on the front page. Keep it clear and concise and focus on keeping your content short so that it’s meaningful and not full of useless words that don’t contribute to the overall experience. The more straight and to-the-point you are, the less time your customer wastes and the higher the chance that they’ll pick up the phone and give you a call if you appeal to them.
Big and bold statements are attractive
Simple, big and bold statements like “You dream it, we build it” and “Beautiful Yet Affordable Landscaping” are ideal for contractor websites because they catch the attention of your viewers and it’s immediately clear what your business offers. This goes back to the idea of keeping your content short, meaningful and concise.
Let your audience know the benefits of working with you
Don’t list all of the services you provide and the accolades you’ve achieved. Instead, describe your services by letting your audience know the benefits of working with you to make it more attractive. For instance, “Realize your dream garden designs with our professional landscaping service” is a much more attractive title than “We are experts in professional landscaping”.
Keep the design simple
Navigation of your website should be simple. You should have a menu somewhere to switch between main pages and nothing on your website should ever take more than two single clicks to reach. Burying information in a labyrinth of links is a no-go and you should always simplify your website navigation to make it more accessible.
Always have a “services” page
While your front page should offer some basic information about the services you offer, it’s always a good idea to include a more detailed services page which goes into more detail about what you can offer. This will help your audience understand your services better before getting in touch with you.
Pictures tell a thousand words
If your contractor web design is full of text and zero pictures then something needs to change. Make sure you add pictures where necessary such as for your front page and in your “about us” page in order to break up text and make your content flow better.
Have a “team” or “About Us” page
A great way to introduce more customer trust is to have a team page or an about us page so that your viewers can get a better understanding of your philosophy, your services and also your experience. Having pictures of your staff members can also be a great way to introduce more trust in your brand especially if they are the contractors that you’ll be sending out.
Make sure your website is viewable on desktop and mobile devices
Smartphone users account for roughly half of the internet users in the country so it’s vital that you create a responsive web design that fits the orientation and size of the viewer’s browser. This is something that can be automatically done with the right web services, but the idea of optimizing your website for mobile users should be a consideration from the very beginning. This means less text, more images, bigger links and having information reachable within 2 clicks at most.
Ensure your contact information can be clearly seen
Every page should have some kind of contact information. Whether it’s contact details at the foot of your website or having your phone number at the top near your logo and banner, it’s vital that your contact information can easily be seen so that your viewers don’t get frustrated trying to find it or forcing them to click on your contact details page just to find it.
Adding a portfolio page is a great way to create trust
Every contractor website design should have some kind of portfolio page that shows real work that you’ve done. This helps to create trust in your brand and also shows your customers what you’re capable of. It’s a good idea to take pictures (with consent from the client) of the projects you work on so that they can be used on your website as background images and as part of your online portfolio. A brief description of each photo can also help your audience understand what they’re looking at.

5 Web Design Trends To Boost Conversions in 2019
Do you want to know what’s coming up in 2019 for Web Design trends? What if these trends could help you improve conversions on your website? Well stick around because I’m going to break down all of the 2019 Web Design Trends that will boost conversions
Do you want to know what’s coming up in 2019 for Web Design trends?
What if these trends could help you improve conversions on your website?
Well stick around because I’m going to break down all of the 2019 Web Design Trends that will boost conversions
I’m all about helping local businesses leverage the power of online marketing in a simple, and affordable way.
If you’re new to this channel, and you want to maximize your online marketing strategy this year, then be sure to subscribe and hit that bell button so you don’t miss anything!
Trends come and go with any industry. There’s no shortage of trends in web design. Knowing what trending in web design for conversions though, will help your website do its main job: Convert visitors into buyers (or leads).
If you’re in eCommerce, you want people to BUY your product, not just window shop it.
If you’re in a service business, you want your visitors to take action and make an inquiry.
If you’re a local business, like a retail store or restaurant, you want people to visit your location or call you, etc.
Trends come and go with any industry. There’s no shortage of trends in web design. Knowing what trending in web design for conversions though, will help your website do its main job: Convert visitors into buyers (or leads).
So here are my FIVE web design trends that will boost your conversions in 2019.
1. Live Chat / Chat Bots
As customers become more independent in their shopping, they are looking for quick, instant answers to their questions – and they don’t want to call in for this. Part of this is due to a history of high-pressure sales teams you meet on the phone. Live chat gives your visitor the control they desire while having accurate information at their fingertips.
You don’t always need to be available to interact either Most live chat apps allow for a chat bot to be easily created.
Based on a series of pre-triggered questions, it will lead your visitor to the right place
With the option of being alerted if the visitor is looking for a live person. Matter of fact, let me know in the comments if you have used a live chat box on a website you were browsing. I’ll also leave my go to live chat app I recommend to all of my clients.
2. Website Personalization
Interestingly, this isn’t all that new of a feature. I’ve been using this on client sites for several years now. Personalized content is becoming more readily available to anyone. Let’s say you’re a restaurant. If you’re using my Rocket Website platform, you can display an offer on your homepage that will ONLY show on Tuesdays between 2pm and 9pm and display your Taco Tuesday offer.
So think about that power. You have someone around 4pm on a Tuesday getting hungry at work. He visits your website and instead of having to search around for your specials or your menu, your website auto-magically displays your Taco Tuesday offer.
Or let’s say you’re a plumber who offers 24-hour service. You get someone on your website at 11pm. Trust me, they’re not reading your about page at that hour. They need IMMEDIATE HELP. Your Rocket Website will change the homepage content to let them know you offer 24 hour service and will show your after hours number to call for immediate help.
3. Multi-step Forms
Next up we have multi-step form. There are usually two types of lead forms on a website.
The short and sweet form that asks for name, email, phone and a message
The super long form that makes you feel like you’re buying a house
A multi-step form takes the benefit of the long form while visually appearing short and sweet. Let me explain. What you’re doing is breaking up all of your lead questions into big chunks.
We’re looking for micro conversions\
For instance, if you’re a contractor, ask for their zip code first and only their zip code. Having someone presented with a form that’s only asking for their zip code is a super low barrier for them. You have to remember, people are just more skeptical now than ever before. They’re reluctant to enter in their personal info. A zip code is hardly personal.
Once they enter their zip code, you can get the next micro-conversion.
This might be what style kitchen they’re looking for, how old their house is. Then on the third step, you can ask them for their personal information
You’re basically asking all of the questions in reverse from the way you normally would. By the tie they get to the third step and you’re asking for their name, email etc - they’ve already mentally committed 66% of the way !
Micro-conversions for the WIN.
4. Brand videos
If content is king, then video is the queen. We already know video is so hot right now.
I have used videos on websites in a few ways. Sometimes by way of testimonial videos from clients, in other cases creating explainer style videos that feature animated graphics. Consumers are not reading those fancy “about us” pages anymore. Instead, they’re looking to discover companies by way of their brand video.
What’s a brand video?
It’s your moment to really shine and give a GREAT first impression.
Think of it as your best marketing employee and your best salesperson all wrapped up into one video. The best part is, since it’s the same video shown to each visitor, you maintain a consistent message EVERY time for your brand. YouTuber Amanda Horvath has a great tutorial on creating your own Brand video. I’ll link it up in the cards.
5. Triggered Opt-In Boxes
Last but not least are triggered opt-in boxes. NO, these are not your cousin’s pop-up box that hits you in the face soon as you enter a website. Tell me in the comments if you hate pop-up boxes or not.
These are targeted opt-in boxes that only appear at certain times or based on visitor behaviors.
The most effective targeting option I’ve found is an “exit intent”. Most opt-in tools will detect when a visitor is about to leave a website. Based on this movement, it will trigger the pop-up. Or, it can trigger a different type of box - either way, asking the visitor to perform an action before leaving.
Another powerful targeting option is scroll depth. You might discover through a heat map tool that your visitors leave your blog page or product page after they’ve gone only 55% of the page’s depth. Set an opt-in box to scroll in from the bottom at 45%. This way your visitors will see your offer before they ever get to the point of leaving.
You can also have a notification bar drop down if someone RETURNS to your site and display a “welcome back” offer.
All of this actually stems from the personalization trend, but now we’re taking these targeting options and presenting a highly desirable offer to that visitor.
I recommend everyone use Convertful, a super easy opt-in tool. I use it on many of my client sites. One of them is an e-commerce brand and we get anywhere from 5-8% email conversions from our targeted boxes.
Might not seem like a lot, but on average, eCommerce only converts 2% of their traffic into sales.
These email subscribers are automatically sent a coupon in which they can redeem right away.
On a recent campaign for this same client, we achieved a 64% email open rate and gained $252 in revenue.
I hope you found these 5 web design trends helpful to your conversion goals.
QUESTION OF THE DAY:
Which of these 5 web design trends are you most excited to try out on your website?
I’d love to hear your thoughts in the comments below.
Then hit that subscribe button as I upload a new marketing tip every week.

Make Instagram Highlight Covers Free
Considering that over 400 millions Instagram users are viewing Stories, DAILY, your content plan definitely needs to include Instagram Stories. Let’s put that another way – 80% of Instagram users watch stories. Think of stories as another medium inside Instagram to reach your audience. Here's how to create awesome covers for your Instagram stories – for free!
Considering that over 400 millions Instagram users are viewing Stories, DAILY, your content plan definitely needs to include Instagram Stories.
Let’s put that another way – 80% of Instagram users watch stories.
Think of stories as another medium inside Instagram to reach your audience.
However, stories last for 24 hours by default – and poof! They’re gone! Well, they’re gone to the public eye.
They’re available to YOU in your archive.
When you set a story as a highlight, it stays there forever, or until you remove it from the highlight.
Here’s a step by step to creating highlights, and highlight covers.
If you watch this through the end, I’ll show you how you can get a copy of my highlight template for free. I’ll give you a free template you can quickly add your own brand color, and free icons to use for your highlight covers.
The reason you want to create a highlight cover is so that:
Your audience has an easy visual reference to what that highlight is about
It looks pretty
Let’s create the highlight.
Assuming you have already created at least ONE story, go to your archive.
From the archive, find the story you want, and then tap the highlight button.
If you’ve never made a highlight before, it will ask you to create a new one.
Or, if you already have a highlight, you can add to an existing one OR create a new one
Pro-tip: You don’t have to wait until the story is archived to highlight it. If you have an active story within its 24 hour period, you can just view it and tap the highlight button while it’s still active!
Now that we have our highlight, we’re half-way done!
We just need to create the highlight cover.
Ok, so let’s jump over to Canva.
If you don’t have an account with them, sign up for a free account OR just use whatever graphic design app you like best. I typically create all of my social media graphics in Adobe Illustrator, but to make this super easy for any user – I’m showing this to you in Canva.
In canna, create new design, then type in “Instagram Story”.
It will create a new design in the 1080x1920 dimension.
First things first – set your background color. I’d recommend using a solid color and matching it to your brand’s color.
Next, search for an icon you want to use.
Alternatively, you could just use text – but highlight covers are the perfect use of icons in design.
Here I’m creating a highlight cover for “Learning”.
I’m looking for an icon of a graduation cap, so I type in education
I got lucky! It’s a free one. Some of the artwork in Canva is paid.
Let’s change the icon from black to white so it pops out more.
Tap the color square in upper left and change to a new color. Depending on your brand color, you might want to use a dark icon with a lighter background.
Now, resize the icon a little. It can’t be too big or too small.
If it’s too small, you’ll have to zoom in very far and the highlight cover will be fuzzy.
If it’s too big, you won’t be able to zoom out.
I personally haven’t yet found a way to size it perfectly.. I just kind of eyeball it.
I kind of make it about 1/3 of the height though - ish.
Watch as I duplicate the icon twice, you can see they are evenly spaced out in thirds… so I’m happy with this size.
Now, Canva has what’s called grid snapping in place. So move the icon around until you see both the purple vertical and purple horizontal guide lines – this indicates it’s centered vertically and horizontally.
If you only have ONE highlight you’re all set to download.
If you have more than one highlight you need to make a cover for, the tap that copy page button.
This way, you just need to swap out the icon.
I’ll create one more here for my coffee highlight
One thing I like to do is drop the new icon in over the old one. Then snap it to the middle, then use OPTION-CLICK DRAG (ALT on PC) to resize proportionally.
Then, I remove the old icon, and re-center the new icon.
Poof, it’s done !
So now I have two highlight covers ready to go.
Let’s download them.
Click the down-arrow in upper right corner.
You want to save as PNG, as high quality image
Make sure “all pages” is selected.
It’s going to save it as a zip file if there’s more than one, or just one single PNG file if there is only one.
Side note, I call it a “ping” file, but it stands for portable network graphic.
#NerdingOut
Now, to be completely honest - this next part is probably the most difficult for everyone to accomplish.
You need to get the image you just downloaded – on to your phone !
If you have a Mac and an iPhone – the EASIEST way is to airdrop it
If you have a PC, You’re going to have to google that one. I draw a line in the sand with any sort of PC tech support… yuck.
I’m just going to airdrop this real quick so I can show you the next step.
Ok, now that the image is on my phone – I’m ready to go back to Instagram and create the cover.
Here’s a PRO PRO tip. To make a highlight cover, you USED to have to create the Instagram story, use the image as your story, then set the highlight, then set the cover.
That’s so 2018.
As of this past July, Instagram just enabled using your camera roll for a cover!
Ok, let’s goto your profile, find the highlight you want to change.
Tap and HOLD the highlight until “EDIT HIGHLIGHT” appears.
Next, you’ll tap the “edit cover”.
From there, slide all way to left until you see the picture icon. Tapping this will let you choose from your phone’s photo library.
Open that photo, and let’s center the icon nice and big inside the circle.
Tap SAVE AND YOU ARE DONE my friend.
That is IT.
So to recap how easy this is, you literally just:
Create a story
Tap “add to highlight"
Create a new highlight name
Add your highlight cover graphic as the cover
DONE-SKI !
Now, for the free template.
Click the link in the description OR on this page and I’ll send you the template to your email.
You can then open this template up in Canva, and then save as a template to your own Canva library.
From there, just swap out the colors and add your own icons.
I hope this was helpful to you. If it was, please subscribe to my channel, like this video so more people can find it.
AND, in the comments – tell me what you like most about stories for Instagram.
Cheers!

Why Your Website Isn't Converting
Newsflash: Your website probably isn't doing anything for your business. Here's why.
BONUS from video:
My #1 app for capturing more emails on your website.
Video Transcript:
Sorry not sorry to be so harsh, but we need to talk. Your 'pretty' website, you know, the one with the cool *ish your web designer did for you? Pretty doesn't sell.
You know what sells?
W O R D S.
😳 Here's something your web designer won't tell you – the beautiful big images and cool things like background video mean jack squat for conversion.
Pictures tell, stories sell.
Now, with enough traffic, even the worst converting websites will bring in new leads.
What if you could bring in SOME traffic, but capture more leads, generate more sales, and grow your business.
That's what copywriting will do for you.
I know, copywriting is tough. It sucks if words don't come naturally to you.
In case you didn't know, I was born with the gift of gab, not words.
HERE'S one quick tip on how to get better with your copywriting: Just talk to yourself in the mirror as if you were selling your product/service. Record it, write it down.
That's your starting copy.
BONUS: Want to see how you can double your email opt-in rate in the next 30 days?
Click here for my #1 recommendation to increase your email opt-in rate.

Why I'm Switching To Later For My Social Media Platform
TL:DR; 1) Excellent media manager, 2) quick schedule a week's worth of posts, 3) hashtag suggestions, 4) and link in bio management
TL:DR;
1) Excellent media manager, 2) quick schedule a week's worth of posts, 3) hashtag suggestions, 4) and link in bio management
If someone was to ask you: "Hey, have you ever tried using a social media app to manage your social accounts?" - Likely you'll respond with something like Hootsuite. In fact, I've recommended Hootsuite to many SMB's over the years. I've also recommended Buffer as an alternative. Now, those are two in a sea of 100's of apps that can help manage your social media accounts.
In fact, I have been using Buffer for quite some time now to manage my two business profiles, and several client pages. There's a lot that I like about Buffer, and it's super simple to use. A somewhat unique feature they have is a content inbox. You add a few RSS feeds to an inbox and you can quickly schedule content from those sources.
Their pricing is reasonable also. Depending on how many accounts you'll need and how many team members, you'll pay anywhere from $0 to $15 if you're just one person managing one business. After that, their next tiered plan goes to $99.
After a while of using Buffer though, it's time to say goodbye to them. It's time to say hello to Later, well, again. I actually used Later for a brief month, and just about considered switching to them a few months ago.
At the time, I was stuck on a few components that were missing in their tool set. So, those components are still missing, but I've come to realize that I can live without them and if they get added in the future, that'll be great too.
Here's the reasons I'm switching to Later.com for all of my social media management. There are some points of criticism I have though, that I explain in the end. You'll also see what I believe those missing components are, in case those are deal breakers for you.
An obsessive compulsive media library
"Did I post this picture yet?"
"When did I last post this picture?"
Those are two questions you can easily answer using Later's built-in media library, and more.
The first thing you'll want to do is add a bunch of images and videos to your media library. You can do this easily with a bulk upload of images via drag and drop. Literally, just select a bunch of images on your computer and throw it onto the media library – it adds it to the library for you and as a bonus, preselects all of them for tagging.
Which brings me to my next media library feature: tagging. With your photos selected, you can tag the photos for easy reference.
For instance, I've done a lot of dog photography in my side hustle. Here I can upload photos from a session, and tag them as "dog" and then the name of the dog. Now I can quickly find photos to schedule out for just that one portfolio. By default, the "unused" tag is filtered. So this way, Later will only show me photos I have not used in a post yet. You can easily change that filtered to "used" or "all media" so you can see everything.
There is also a native dropbox and google drive integration. If you often store your finished photos or use those services to store media – you can just upload directly from those cloud services.
A hidden gem for this media library is external collaboration. If you have someone that takes photos for you, but is not on your team, or you just don't want them having access to your later.com account, you can invite them as a media collaborator. This feature works awesome and flawlessly.
You'll set up your custom inbound email @submit.media. For example, let's say your business is Tony's Tacos. You just put in something like: tonys tacos in front of the @submit.media area. Now, you can just have yourself or anyone else email photos to tonystacos@submit.media – and poof! your photos will be ready in your media library for use! You can, of course turn on approval required before it ever makes it to the media library. No photos will get posted anyway until you schedule them.
Quickly schedule your social media posts
There's several ways you can go about quickly scheduling your social media posts with Later. I think it comes to what workflow you are comfortable with AND if you're focusing on certain social networks or not.
The first thing you want to do with your social calendar is set up what days and times you want to post on. You'll do this for each network, just once. Once you have created this weekly schedule, you can take a bunch of photos from your media library (wink) and drag it to the calendar. Later will then create a scheduled post for each content. You can go into each of them and just add your captions, and hashtags and links.
Scheduling to multiple social networks
Quick scheduling works with just one social network at a time. If, however, you want to schedule one post to multiple social networks at once, you'll want to use the multi-post scheduling feature.
Here you'll select the social channels you want to publish to, drag a photo onto the calendar, and then put your caption in.
When you click NEXT, you will actually be able to customize each network. So basically you have one 'master' caption for that post and then you tweak it per channel. For instance, you'll be required to trim it down for Twitter if it's beyond the 320 character limit. For Instagram, you'll want to remove any links you've placed and put that in the LinkIn.bio section – more on that Later! (all puns intended)
Then just watch and wait. Your perfectly captioned post will appear on all the networks you selected at the time you've scheduled it. Voila.
Auto-post to Instagram
Recently, Instagram opened up its API to allow direct posting without the need for using the mobile app. This is only for single photos though. If you're schedule multiple photos or videos to Instagram - Later has a workaround for that.
Let's say you schedule a video post for Tuesday at 10am. When that time comes, you'll get a notification to your phone from the official Later app. You'll confirm that you're in the right Instagram account, and then it will open Instagram for you with the caption already copied to your phone's clipboard. From there you'll just select the different photos or the video from your camera roll.
BOOM!
4 Bonus Gems For Creating The Perfect Post
You might have noticed in the above screenshots something called "Saved captions" and "Hashtag suggestions".
This is your life-saver, eh hem, time saver.
Saved Captions
With saved captions, you can select from several predefined captions. I personally use them for saving my hashtags.
Yaaaaaas, that means no more having to switch to Evernote to copy/paste hashtags there. I just click on the one I want and it adds it to my post :)
Hashtag Suggestions
Well, "Hey Brad, how do you even know what hashtags to use?"
I'm glad you asked. Later has a built in hashtag suggestion box. You put in the hashtag you want to start with, and it will spit back several comparable hashtags. Complete with a relevancy to your original hashtag, and also how many times it's been used, so you can see its popularity.
Tag users directly
Many other platforms do not let you tag other users outside of the Instagram app. This is also in part due to recent API restrictions, most of which came from the Cambridge Analytica scandal.
Later has a feature that allows you to tag users in the photo. Technically, if you also put their handle in the caption exactly as is, it will tag them in the actual post. It just won't show you that you've put the correct handle in during the caption.
Seek And Share
Sometimes you come across content that you really love and want to share it also. You know what I'm talking about – the HOME BUTTON + SIDE POWER BUTTON to activate a screenshot, or using a re-share app.
With Later, you can search for hashtags that you want to find content for, and then you can import the photo or video directly into your media library to reshare. Just, it's a good idea to tag that original account when you DO share the content, to avoid copyright infringement. 😳
Use your one link wisely
This is an Instagram specific feature, but it's worth its weight in gold. Instagram only gives you ONE clickable link in your entire bio area.
Just a quick break down of how your bio even works:
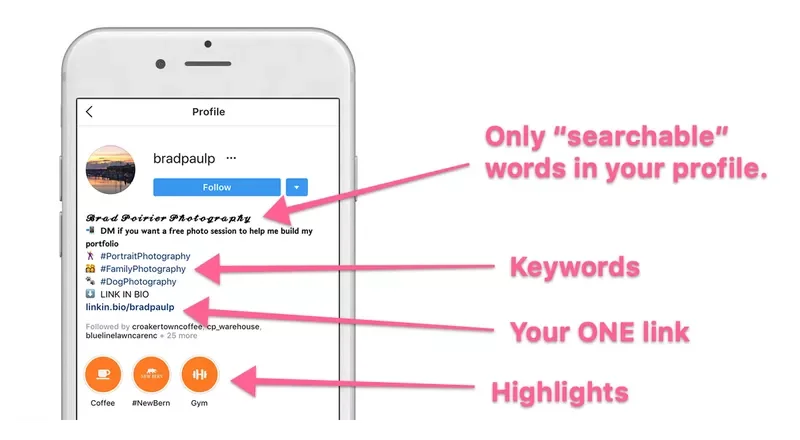
Your NAME can be anything, completely different from your username – and it should be. The name is the only searchable text from Instagram, use this like the page title in your website SEO.
The bio description area has a maximum set of characters - I recommend using this as a "keyword" area. Your profile can potentially come up when people are discovering hashtags.
At the bottom, you have your highlights, if you've enabled them for Stories.
Right above that though, is your ONE link Instagram gives you to place in your bio. In case you didn't know why this is so important – any link you place in the caption of your post, is NOT clickable. So, please stop placing links there, no one can click them. No one is going to type that 💩out into their browser – from their phone nonetheless.
So, what Later has done is something magical. They use a feature they built in-house called Linkin.bio to handle multiple links.
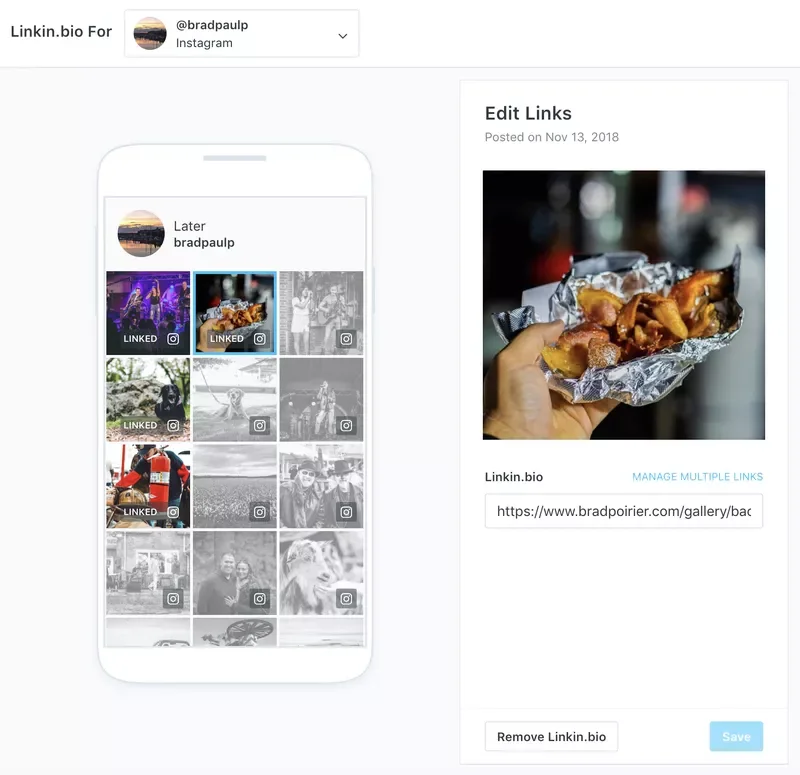
Basically any links you want people to get to on Instagram, you add them to your linkin.bio. You do this easily by simply pasting the link into the box provided during your Instagram caption.
You then replace your current website link in your bio, with the one Later provides you. From there, Later handles the rest. When someone clicks on your special link, they'll be taken to a page which has all of the photos you've tagged for links. Now your visitors can just tap the picture and go to your intended link.
Perfecto' !
Analytics that give you actionable data
I'm pretty certain that most dashboards that have some sort of analytics to them were built by data junkies, for data junkies.
There's just toooo much data to comb through usually.
Not with Later.
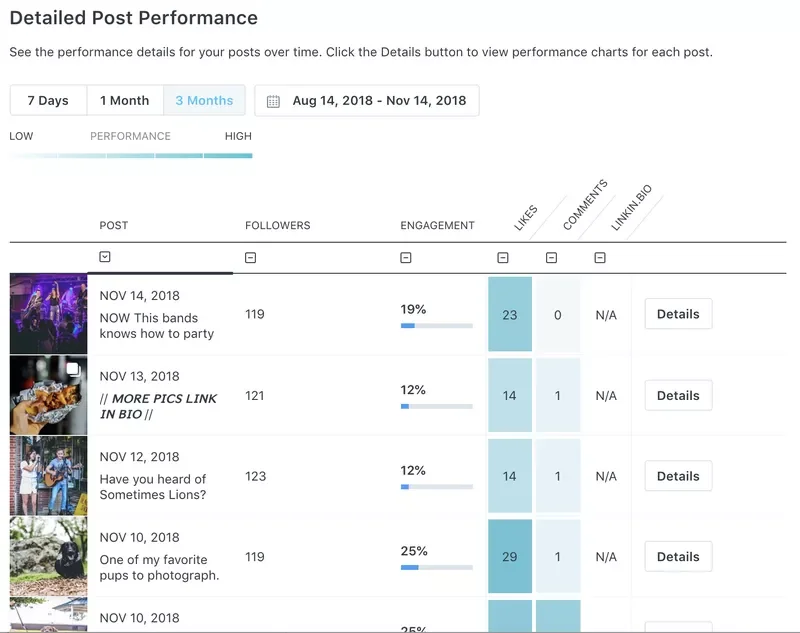
The analytics dashboard, which is currently limited to Instagram and Pinterest only, gives you a quick but powerful overview of your social media performance.
The follower count shows you how many followers you had at the time of that post being published. The engagement column shows your overall engagement percentage – which is a calculation of the likes, comments, and linkin.bio clicks divided by your follower count at that time.
Finally, you can see how many likes, commments, and clicks each post received. You can also sort by any of these columns.
Perhaps you want to create more content that generates more comments.
Just filter by the comments column, and you'll see your top performing posts that generated the most conversations. Then, you can start creating more content like that!
What's the best time to post?
This is another Instagram specific feature, but it's powerful!
Most other social media scheduling platforms will give you a recommended posting time. They might set up a queue based on known industry best times to post. However, that's really not personalizing it to YOUR feed.
Later will look at your historical posts, even the ones that weren't posted by Later, and determine the best times to post in the future based on engagement rates.
You can then use these "best times" to create your quick schedule calendar mentioned earlier.
Manage engagement right from the dashboard
Comments on your insta feed are one of the biggest factors Instagram uses when sorting your posts out in their algorithm. It's not enough to get comments though – you want to engage with them as well. This is both useful to create a community around your product, but also to keep the conversation, eh hem, engagement going.
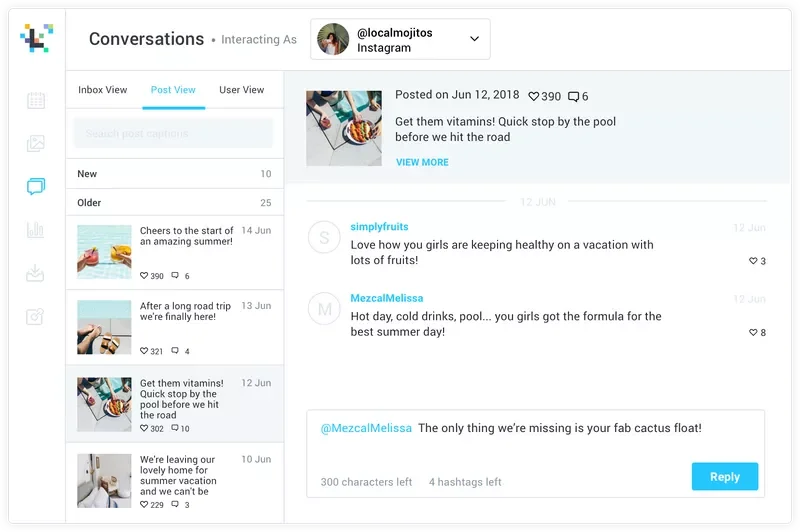
via later.com
With Later you can:
Manage Instagram conversations from within your dashboard
Respond to comments on recent posts
Like comments (heart)
Delete comments
This last one is particularly useful, especially when you get the robo-dummy comments inviting your followers to like their page.
They still need to work on a few things though
I think Later is one of the best social media management platforms out there, contending with the likes of Hootsuite, and my former pal, Buffer.
However, they're not perfect. These are a few pain points I've run into, but these may not be a big deal to you. It's worth noting however.
This first feedback is a small one, but could make life a bit easier. If posting to something like Twitter or Facebook only, it would be great to create a post with no image, and then have an image pulled in from the URL. Basically, right now the only way to create any new post is to add some sort of media to it – photo(s) or video.
I get it.
Sometimes though, I'd like to schedule sharing of content from another source, and I really don't want to have to try and get images from that site first. (Though, for what it's worth, they do have a handy Chrome extension that lets you right click any image on the web and add it to your media library)
The second feedback is to include analytics for Twitter and Facebook. Their support team has told me they are looking to integrate Facebook analytics in the future. I'm keeping my eyes peeled :).
Thirdly, they yet to have implemented anything beside Instagram, Facebook, Twitter, and Pinterest. LinkedIn is NOT present in their social networks. It's not a deal breaker for me, but it would be convenient to have as an option.
Last feedback, and this might be the most important. Transparently, they're kind of slow when it comes to responding to support requests. Their chat box indicates they usually respond in 24 hours. That's true. Perhaps I find this frustrating because there IS a live chat box inside the dashboard. I don't think you should have chat widgets on any part of your site unless it is monitored for at least some part of the day.
That's really it though. Those really aren't huge flags for me, so I'm giving them a real go at their platform.
What social media management tool are you using currently? If you're looking for other tools, I have a roundup of the 17+ best free social media tools you can use in your business right n